Sunday, 31 January 2016

Stamping Sunday: Birds Of A Feather

Today's stamping Sunday design was actually done on Thursday evening, but I am still wearing it, so clearly a success! This was my first attempt at layered stamping and I'm pleased with the results. I started with Nails Inc's White Horse Street from the 'New White' collection. The two New White's I have are sooo beautiful and just lovely to paint with and wear. The type of polish where I just keep looking at my hands!

Next I used white stamping polish from Mo You to stamp feathers onto three nails on each hand, (the feathers are from Mo You Explorer Plate Collection 14) and black stamping polish for the feathers on the thumb, from the same stamping plate. I used one of Nails Inc's 'feathered' effect polishes to go around the thumb feathers and on my accent nail. I had a couple of feather polishes already but came across this sparkly gem in TK Maxx not too long ago.

 Finally I used my Mo You Gothic Plate Collection 10 plate for the birds (except on my little finger, those also came from the Explorer plate). I used my clear jelly stamper to carefully place the birds where I wanted them. This took quite a long time and it was getting late so unfortunately there is a little smudging where the top coat was applied.

Overall I really like this design and it's nice to have something a bit different to all the dark colours I've been wearing lately. Please excuse the quality of the fourth photo below, I wanted a nice picture of the feather polish as it's such a nice bottle but I think my photography requires some work!


Colours Used: White Horse Street - Nails Inc, White Knight - Mo You, Black Knight - Mo You, Henley - Nails Inc

Friday, 29 January 2016

HBP Presents: An Arctic 'Grey-dient'

So the time has come for another Hobby Polish Bloggers link up. The HBP Facebook group is a great place for sharing and learning tips and tricks on anything nail art/nail blog related. This months theme is gradients. I usually associate gradients more with spring/summer but have fancied trying a grey one for a while now so this was my chance. I used three grey shades (detailed at the bottom of this post) to create the gradient with some nail art sponges from Ebay, and then used a Mo You stamping plate (Enchanted Plate collection 05) for the design.

I had so many nail fails doing this! All went well to start with but I tried a peel of barrier for the first time, and on a couple of my nails where these touched the nail varnish, it peeled part of it off when I tried to remove it, you can see the effect of this on my thumbnail below. I also had a couple of Cellotape miss-haps (I was using it to clean my stamper) where it became stuck to and peeled off little bits of polish, so I had to try and patch them up. Mostly hidden by the stamping but it was obvious to me, so this mani didn't last long! I'm thinking these things happened because the polish wasn't quire dry enough so at least there is a lesson learnt.

Overall I like the gradient, the stamping images and the colours, but thing this may have worked slightly better with a wintery pattern (from the same plate) rather than the animals, as in some lights they weren't very clear. Also less nail fails would be good! I liked the super shinyness of the silver against the darker grey.


Colours Used: Little Bo Peep - Rimmel, Grey - Barry M, Dragster - Barry M, Dazzle - Orly

Check out all the other lovely designs below!


Sunday, 24 January 2016

Stamping Sunday: Leafy Green

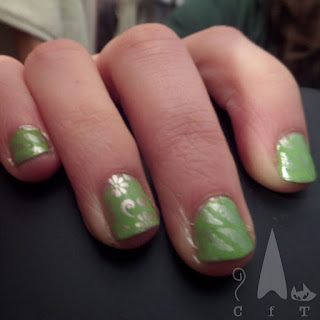
Today I am showing you some last minute afternoon entertainment in the form of doing my sisters nails! She wanted something green to match the logo at the charity shop where she's currently volunteering so we decided to go with something leafy. We looked through my stamping plates and chose Mo You's Pro Collection Plate 06. The leafy pattern is in a subtle silver polish and the floral accent nail is in a metallic rose gold type shade from Nails Inc (details below pictures). I particularly like the accent nail, it was an unexpected hit paired with green.

Here is the design below. Two things to apologise for, firstly the incomplete clean up and secondly the poor picture quality. I still haven't mastered my light box (images come out really bright) so I tried just in normal evening light but it was hard to get a clear detailed image without blurring.

Overall I like the design and look forward to using more leafy patterns in the future, especially now I have my clear jelly stamper to play with too :).


Colours Used: Key Lime - Barry M, Soho Silver - Nails Inc, Kings Road - Nails Inc

Saturday, 23 January 2016

Geek Out! Le Geek C'est Chic!

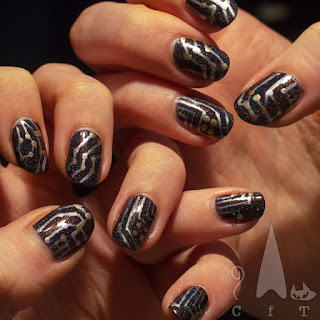
This weekend I'm feeling poorly, but just about awake enough to comfort myself with a bit of nail art, and a new nail polish to try! I'm having a real black nail polish moment. Wearing/ buying all kinds of variations with subtle shimmers, or really dark almost black shades. Perfect for this time of year really! From my recent post christmas haul this is my first wear of Higitus Figitus from Danglefoot Polish and I must say it's rather lovely (swatches at the bottom). A shimmer black in normal light, and a shimmery holo under bright light.

I've wanted to try this circuit board style nail art for a while. I have a lovely pair of Converse in this pattern which I'm super fond of and have had since I was about fifteen (ten years ago now, eek!). I used a silver nail art pen for the lines as I new they would be thin, though wonder if it may have been just as easy with a fine brush, as it can be hard to get the polish to come out properly at times. I then used a dotting tool for the gold dots using Uptown Glamour from Nails Inc's Kate spade collection of a few years ago. Finished off with my favourite topcoat, Kensington Caviar by Nails Inc, a particularly important step with nail art pens as I find they rub off a bit otherwise, plus, it dries super fast!


Below is the base colour in all it's glory! Brighter light on the left and normal light on the right. A really stylish nail polish I think and perfect for this type of design.

Colours Used: Higitus Figitus - Danglefoot Polish, Nail Art Pen in Silver - Barry M, Uptown Glamour - Nails Inc

Wednesday, 20 January 2016

Monthly Indie Review: Ellagee

This months indie polish review is one I've been waiting to do for a long time! I haven't been able to justify ordering them all the way from America plus paying postage, so Christmas money was the perfect excuse! They arrived a lot quicker than I expected considering the distance, and came with some toe separators, a few sweets and a 'come to the dark side, we have glitter' fridge magnet I am rather fond of. Today I will be reviewing So Long And Thanks For All The Fish and I Refuse To Be Invisible.

First up, So Long And Thanks For All The Fish, what a name! This is the polish I was most excited about, it's from the 'Dolphins! What?' collection (I also purchased Rainbow Reef from this collection but will move onto that in the summer). I love it because it's such an unusual idea, and I had never heard of dolphin shaped glitter before, let alone in nail polish! This is technically a very dark blue, but looks black when layered. it looks like a night sky with dolphins floating through! I like the way the subtly different sized of glitter shimmer, it really does give  a night sky effect.

The consistency is quite thick, being a glitter, and you have to fish (no pun intended) the dolphins out a little but, but it is so worth it! I found doing one layer with no dolphins first and then one or two on the second coat worked well. You can see the final effect below in different lights. As you can see the slitter shines a lovely rainbow of colours in the light.


Next up is I Refuse To Be Invisible, this isn't the sort of thing I usually go for but the swatches on the Ellagee website caught my eye. I like how the colours stand out against the white background. It looks like confetti or hundreds and thousands. either way, definitely reminds me of birthday parties! the consistency is nice and creamy, and I really like how it is pigmented but the colours still shine through. This is two coats, and the colours on the underneath are more muted and don't stand out as much as those on top. I think this gives it more depth.


I really like Ellagee polishes because of how original they are. There's a huge variety of different polishes that I haven't seen similar to anywhere else. Not to mention, there is a whole collection of dolphin themed nail polish! I hope you like them too, Rainbow Reef to follow in due course!

Sunday, 17 January 2016

Stamping Sunday: A Parrot Nail Experiment

Today's blog post is not my most glamourous (the stamping is not so good!), but I wanted to share with you my first experience with a clear jelly stamper. I will admit straight away this is not one of the originals. I got it for a couple of pounds on eBay, but I wanted to try out the concept before paying for one to be shipped all the way from America! I'm very keen to try the layering stamping plates available, but so far the only ones that are my sort of style are the Christmas ones, so think I will have to wait a little!

So, first impressions, the stamper head is quite firm (I usually use a non-sticky marshmallow stamper) but still has a little squish to it (some firm ones don't have much give, so I'm glad this is still quite squishy). I've read you don't have to buff these, and sure enough the stamping worked straight away, no buffing/ prep required.

The stamping plate I used was Tropical plate Collection 06 from Mo You. The designs on here are gorgeous and I can't wait to use more of them in the summer with some really bright colours. My colour inspiration here was taken from a beautiful red parrot design by Nailicious, you can see her original design here. It's a beautiful freehand design so mine is not in the same league, but the colours and patterns inspired me so thought I'd try it out with my new stamper. Below is the stamping plate and a view through the clear stamper. I was so impressed with how well it picked up the images without any buffing at all.


Though the image picked up well I actually found placement a little harder with this stamper. I think it's just a case of practise, but because I'd got used to lining up the images with my nails using normal stampers, trying to place the design looking through the end of the stamper was tricky! I kept automatically going to look at the stamper head instead. Below is the final look, as you can see the placement is a little off!


All in all despite my difficulties I'm really glad I've bought this. With practise it will allow me to do some fab layered stamping designs, and hopefully make precision easier once I get used to it. The thing I'm most impressed with though is it's quality as a general stamper, it picked up the images perfectly almost every time and didn't require any prep. It also didn't feel delicate as I've heard the clear ones can be. This is definitely the texture of stamper head I want to work with going forwards. If only there was somewhere to test them!

Colours Used: Dead Heat - Barry M, Black Knight - Mo You

Wednesday, 13 January 2016

Glitterati

Today I am wearing and sharing the beautiful Glitterati by Jessica Nail Polish, a Christmas gift from my lovely boyfriend. This polish is sooo lovely and glittery in the bottle, and even better on the nails! For my first wear I have decided to layer it over OPI's Lady In Black. As it's such a nice opaque black this was a quick and easy mani to do. Glitters always seem to dry faster than other polishes.

The consistency is fairly thick but smooth and easy to work with. it's got a serious amount of glitter in which is lovely. But as it's small glitter it doesn't thicken up the polish too much. the base it quite gel like so it dries a lot smoother than a lot of glitters.

Below is just one thick coat of Glitterati over black. As you can see there is some serious glitter going on there! I initially thought I'd do a gradient but so much glitter came out! Once it had though I was happy to stick with a full cover glitter look. The colour comes out a very shiny bronze with hints of green catching the light. I think it makes a perfect polish for New Year or Christmas parties. It's also, being a shiny gellish glitter, nice and strong for covering a little nail break I have on my left thumb nail (nooo!).


Colours Used: Lady In Black - OPI,  Glitterati - Jessica Nail Polish

Sunday, 10 January 2016

Stamping Sunday: Sparkly Holographic Dinosaur Awesomeness!

Today's stamping sunday post is continuing the theme of wearing bold/ bright things to try and brighten up January a bit. I now have a bit of a hankering for black nail polish though, so we'll see how long it lasts! As you may know, I love dinosaurs and also sea creatures, so when I discovered Mo You's Origami Plate Collection 05 I was delighted! It features four origami dino's, nine sea creatures, a dragon, three birds and a unicorn. <Insert excitable emoji here>

The base colour I used for this Design was Haloki by Bear Pawlish, which was a Christmas present from my lovely aunt, Uncle and cousins so I was keen to give it a try. The colour is beautiful and metallic in normal light (super shiny!) and holographic in bright light. I would probably recommend three coats with this one, but two thick ones seems to have worked on some of my nails. In the bottom left picture below you can see it in normal light, and in the other three you can see the holo working it's magic. With my Nail's Inc Kensington Caviar topcoat as well these nails were pretty blinding in any light!

The origami outlines were stamped onto my Uber Mat in black, and then filled in using a dotting tool and a variety of glitters. I found colouring in with glitter was easier than normal polish, not sure why. Once this was dry I put another clear layer of nail polish over the top, waited for it to dry and then peeled of to apply to my nails. I find the smaller images are easier to place. For my left over finger nail I just used a blob of silver holo glitter, to look like one of the dinosaur's had laid a huge sparkly egg!


Below i've included a couple of close ups of the dragons on my thumb nails. as you can see on the right the nail polish is paler, this is because I only did two coats on this nail. Not too obvious in normal light but under the bright lights for picture it showed up a bit more. I look forward to trying more of the origami designs, they're very cute and easy to work with.


Colours Used: Haloki - Bear Pawlish, Black knight - Mo you, Aqua glitter - Barry M, Fashion Icon - Barry M, Diamond - Barry M, Emerald City - Models Own, Chelsea Square - Nails Inc

Saturday, 9 January 2016

Viva Las Velvet!

Happy Saturday everyone! Today I am showing you a quick review of Accessorise' purple velvet nails set, in Pom Pom Purple. I must admit I have preferred other velvet polish sets more (the Nail Rock ones are pretty good). But I do like the colour of this a lot and think I could get it to work a bit better with practise.

I followed the standard velvet nails practise, paint on one coat of polish and allow to dry. Paint on another coat of polish. While this is still wet tip on some of the velvet (do this over a sheet of paper so that the excess can be poured back into the pot). Pat down loose bits of velvet effect and add to any missing spots. Perhaps I would have been better to put my finger directly in the pot of velvet effect, but I find this encourages it to clump together.

I have included some pictures of it fresh below (please excuse the half done clean up!). As you can see the coverage isn't particularly thick, but is nice and even. I like the way it looks. My issue with this is that the velvet effect just didn't last. It seemed to rub/ wash off which previous ones i've tried (e.g. Nail rock) haven't done. When I next try this i think I need to make extra sure that the polish is still very wet so that hopefully it will stick better.

Let me know if you have any top tips!


Monday, 4 January 2016

Comic Girl

Happy Monday everyone! I hope first days back at work haven't been too stressful. Mine has been surprisingly OK... trying not to think about tomorrow!

Today I have a bit of a throwback for you, to one of Models Owns gift sets from Christmas 2014! This design was done not too long after said Christmas, but I was not blogging at the time, so it finally has it's limelight! I wanted to do a design that used all three of the colours, and add a little bit extra with the stickers so I used a dotting tool to create a slightly pixelated effect. I think I did do a design with the bows too but there are no surviving pictures. Will have to follow this up with something bow related in the near future.

Below is the full design, the gift set, and a glimpse of my awesome dinosaur (or 'designasaur') t-shirt! :D


This picture is a little fuzzy looking as it has an Instagram filter on. As this was a while ago I couldn't find any proper blogging quality pictures. Super easy design to do as the stickers just peel off the backing paper and stick well to the nail. I'd recommend a top coat to finish as it helps to stop the edges peeling up.

The design lasted well and didn't chip to fast, the stickers lasted a few days as well which I was quite impressed with. I remember being saddened to take them off for a meeting!


Colours Used: Red Alert - Models Own, Pastel Pink - Models Own, Snow White - ,Models Own

Saturday, 2 January 2016

Happy New Year!

Happy new year everyone! I originally intended to post this on new years eve, and for it to include a specifically new year theme, but I was far too attached to my Christmas day nails, so didn't get started on these till last night. I'm yet to actually try a new year design, not sure why but they never appeal to me quite as much. I think all you need for new year is something super shiny or sparkly!

I thought of the below design as I wanted to use these two polishes together again. I got them both for Christmas 2014 and think they make a good combination. I started with a base of Topshops Fear and Loathing, which is from their matte metallic collection. I absolutely love their matte metallics and have quite a few of them, they were a real favourite from last year. I think how subtly they shine, and how they somehow look matte and shiny at the same time!

As you can see below the thumb on my left hand turned out best. I've found the fishnet metallic effect harder to use than other magnet polishes, even by the same brand, but I love the effect when it does work!

I hope you've all had a lovely break and wish you a happy and successful new year!


Colours Used: Fear and Loathing - Topshop, Piccadilly - Nails Inc