Wednesday, 27 May 2020

Sims Nails for the Holo Taco Challenge- Sul Sul!

Hi everyone - or should I say Sul Sul! Today I have some Sims themed nail art to share with you, and I believe sul sul is how the Sims say hello to each other, at least in the latest version of the game. I spent sooo much time on Sims 2 in my teens! I've played Sims 3 as well, and have Sims 4 on my laptop at the moment for some lock down entertainment. I haven't played it loads but I have made one family and have also been creating a replica of our house! I haven't done as much recently though as I've been getting out in the garden a bit more in the sun.

I've been contemplating doing some Sims nails for a little while, so when this weeks Holo Taco challenge theme came out as video games, I had to give it a go! I did these freehand for obvious reasons, and I think they could certainly be better, but it was good to get practising my freehand again. I could have done with a better brush I think, but I'm not going to blame the brush, I am very out of practise and not particularly good at painting as it is! Stamping is definitely my nail art go to.

I used a matte top coat under the nail art which makes it a little easier to paint. On my index and little finger nails I put 'sul sul' and 'dag dag' which are hello and goodbye in Simlish. It was quite tricky trying to do lettering with nail polish and my nail art brush! On my middle finger I did a basic house outline in blue, and on my ring finger a plumbob, as you can't have Sims nails without a plumbob! I then tried to do a little Sim version of myself. I was not expecting it to be good but it really is very basic! People are tricky! Dag dag! :D
Colours used: Floral Street - Nails Inc, King Tuts Gem - Jessica, Key Lime - Barry M, Charlotte Street - Nails Inc, Cocoa - Barry M, Lady In Black - Nails Inc

Thursday, 21 May 2020

Glitter, animals, and some bonus dinosaurs!

Hi again! Back with more green glitter and more animal nail art! I'm going to keep this blog post short as it's pretty similar to yesterdays, even down to the base colour. I also used the advanced stamping technique with my Uber Mat to create decals. I used the Enchanted 10 stamping plate from Mo You London. I had a bit of trouble doing these, partly because my stamping polish is getting a bit thick, and partly because I don't think the animals have been etched particularly well into the stamping plate. I had more luck with a bit of thinner in my nail polish but it was a lot harder than using the cat stamping plate. Still, I persevered! The stoat and raccoon images didn't fully come out but I don't think it's too obvious once they were coloured in. It was my first time using this plate and I'm really glad I could use the adorable stoat and beaver images! I really like the little bird on my thumbnail too.

I've added a couple of bonus pictures at the bottom of this blog post, one is of the base colour on it's own, and the other is how it looks with my cuddly dinosaurs, Cedric and Norbert. I now think of it as sparkly dinosaur green! I like how the glitter looks slightly different on this look and the cat one from yesterdays blog post. I think the glitter looks slightly darker on this one.
Colours used: Drama - Fun Lacquer, Black Stamping Polish - Rainbow Connection, Grey - Barry M, Cappuccino - Barry M, Cream Soda - Barry M, Blue Moon - Barry M
Cedric (left) and Norbert (right) - Dinosaurs!

Wednesday, 20 May 2020

Cats and Glitter!

Hi everyone :) I'm back with another entry to the weekly Holo Taco nail art challenge. This weeks theme is animals, and this is the first of two animal themed looks I will share with you. For both I decided to try out untried stamping plates which have been sat unused for so long! This one as you may gather has a cat theme. There are five images with this particular style with a cats face and some flowers around it, so I decided to try these all together. There are some other lovely images on the plate as well (Crazy Cat Lady 04 from Mo You London) which I hope to try out eventually!

So for this look I started out with a sponged on base of bright green glitter (colours listed below the pictures). It was the first time I've tried this one and it's lovely and bright. For the cats I used the advanced stamping technique and my Uber Mat to create decals, you can see how here. I'm so pleased with how these came out, I love the little kitties and the sparkle shining through in the background is the cherry on the cake for me! I particularly love the thumb nail, so have included it at two different angles in the pictures. You can't fully see the  glitter in these pictures, but believe me they are sparkly!
Colours used: Drama - Fun Lacquer, Black Stamping Polish - Rainbow Connection, Cream Soda - Barry M, Cappuccino - Barry M, Notting Hill Carnival - Nails Inc, Spring Green - Barry M, Red Hot Rio - OPI, Can't Find My Czechbook - OPI

Thursday, 14 May 2020

Raindrops That Turned Into Spots!

Hi again! I'm back so soon as I have more nail art to enter into this weeks Holo Taco challenge. This was definitely the less successful of my two entries, but I like how it looks as nail art on it's own, just didn't really fit with the theme as much as I'd hoped! So the theme is Optical Illusions, and my intention with this one was to create the illusion of sparkly raindrops on my nails.

I started with a dark blue base, and then a matte top coat, to make the shiny raindrops stand out against it. I decided to go with round spots, more like rain on a window, rather than classic raindrop shapes, and I think this is the first part where I went wrong! The colour I used for the raindrops was way too dense, meaning they look just like silver spots rather than clear glittery droplets. I really should have tested it out on my Uber Mat first! I should have used a finer scattered glitter, this one is too linear I think. All the same I used a dotting tool to add dots of clear top coat over the spots, but unfortunately this didn't really make much difference, they're still just silver spots!

So in conclusion I do like the way these look, but they certainly didn't go as planned. Might try it again some time and approach it differently. I had a bit less time after spending so long on the turtle nail art on my other hand! I'm going to enter this into this weeks challenge anyway because why not!
Colours used: Indigo - Barry M. Harp On It - Color Club

Wednesday, 13 May 2020

A Turtle Nail Illusion

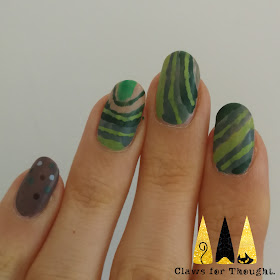
Hi everyone. I'm back with another Holo Taco weekly competition prompt, this weeks is Optical Illusion. I certainly wasn't expecting this one and it caused me to leave my comfort zone of  stamping! My boyfriend suggested I do something where I paint my nails the same as their background so they blend in. I also had some other ideas so did something else on by other hand, which I will post next, but I liked his idea best.

We did some thinking about the subject and chose this cardboard turtle which was part of a birthday card. I started with a base of Barry M's Mani Mask, to make my nails look a bit nicer underneath if there were any gaps in the green polish. Turned out there were no gaps, but it was a really good smooth base for painting on. I used a small nail art brush to paint the colours onto my nails, trying my best to line up with the pattern on the turtle. It's not perfect but I'm quite pleased with it, as it came out neater than I expected it to! I didn't quite have the right shades but I had enough of a range. Unfortunately I wasn't very good at lining up my middle finger in the pictures! I finished of with a matte top coat to try and match the turtle a bit more, and there we have it! It looks like quite an unusual earthy manicure on it's own!
Colours used: Key Lime - Barry M, Green Park - Nails Inc, British Racing Green - Butter London, Spring Green - Barry M, Basil Street - Nails Inc, Cappuccino - Barry M, Cocoa - Barry M, Laguna - Barry M

Friday, 8 May 2020

A Floral Attempt at Layered Stamping

Hi everyone. hope you are staying well! This week I have managed to squeeze in some extra nail art besides the Holo Taco challenge entries I'm doing each week. I was pleased to do this as the pink base and grey/mauve are polishes I hadn't tried yet so was keen to give them a go (colours listed below the pictures). So for this look I used the Botanical 10 stamping plate from Mo You London. This was also an untried stamping plate, and features a lot of layering images which is something a little different for me.

I have used layered stamping before but it's not something I've done often, I usually use the advanced stamping technique and create decals. I found the leaf images really satisfying to do, the colours came out well and it was so easy to get am image that looks like it was more cleverly done! With the rose and buddleia flowers I was a little unsure where to start and which shades to use for which layer of the image. I think the buddleia flowers worked well, but the rose as you can see was very faint! I should have used darker colours obviously, and possibly layered them differently, so that I know for next time! Unfortunately you can no longer see plates that have sold out on MYL's website, which is a shame as I think they used to have something with this one that showed how to layer them. Still, practise makes perfect I suppose!

I finished with a shiny top coat over the accent nails, and a matte top coat over the plant nails to make the colours stand out. I've enjoyed these, they are delicate and Spring appropriate and work friendly too (not that it matters right now!). I'll be rocking these till probably Sunday when I hope to take part in the next Holo Taco challenge.
Colours used: Vintage Tee - Nails Inc, Bust A Mauve - Painted Polish, Key Lime - Barry M, Spring Green - Barry M, Cocoa - Barry M, Seymour Walk - Nails Inc, Wardour Street - Nails Inc, White Stamping Polish - Rainbow Connection, Oasis - Barry M, Surfboard - Barry M, Acai Smoothie - Barry M

Tuesday, 5 May 2020

Day vs Night Nails

Hey everyone, back again with another entry to the Holo Taco nail art challenge. This weeks theme is Day vs Night. I was not expecting this one, they are getting quite creative with the themes, after the first few themes of Unicorn, Spring and Easter I was expecting something more generic like Mermaids (not dissing the mermaid theme though - I would enjoy that one too!). I decided to do one hand for the Day theme and the other for the Night, details below.

Day - For this I started with a blue base, medium blue on three of my nails (colours listed below the pictures) and a darker blue on my thumb and ring finger nails. Over the darker blue I used an untried polish, a beautiful flakie topper from Cuticula called Candy Crush. I really love the way it looks over navy! The navy polish also holds special memories for me as it was a gift from my boyfriend. On my other fingernails I tried to theme them around things we've seen on our daily walks, so we've got a cat, some bees, and a rainbow. The bees were added using the advanced stamping technique to create decals, for the cat face I used regular stamping, and the rainbow was freehand as you can probably tell!

Night - For the night time nails I used a similar lay out, with a purple metallic base and darker accent nails. You can't really tell very well in the pictures but the black actually has a green/purple/blue metallic shift to it under the silver glitter which I added over the top. I think this base gives the glitter some extra depth, and enjoyed the layering effect. It feels relevant to the theme too as I know Cristine from Simply Nailogical has gone for a layering effect with many of the Holo Taco polishes. I used advanced stamping for the stars and cat on the moon, and regular stamping for the cat face. The cat face showed up better than I expected over the purple, but the stars didn't come out very well, I think I went over the lines too much!
Colours used: Can't Find My Czechbook - OPI, My Car Has Navygation - OPI, No FOMO - Wikkid Polish, Black Stamping Polish - Rainbow Connection, Casablanca - Jessica Nail Polish, Diamond Glitter - Barry M, My Mate Illuminate - Wikkid Polish, Bikini Bombshell - Wikkid Polish, Joyful L'il Jellybean - Wikkid Polish, Candy Crush - Cuticula