Tuesday, 28 February 2023

Tickedy Ted

Hey nail people/ space turtles! The inspiration for today's nail art is a little different... I was watching Mock the Week and the comedian James Acaster made a joke where he called Big Big 'Tickedy Ted the time telling b***h'. It rather ticked me, especially as I was reminded of it when I could see Big Ben out of the window when I was at work the next day! So I decided some more London nail art was due. It's also very fitting as I'll be in London for work tomorrow for the first time in a few weeks.

I started with a base coat and a couple of layers of deep green/black nail polish (which looks quite slate grey when matte). I then added London themed images from Mo You London's Scandi 01, 03 and 10 stamping plates with Tickedy Ted in the middle of course! Once dry I carefully added a top coat to avoid smudging the design and then added a matte top coat over the top. I have found in the past matte top coats have been quite bad for smudging nail art which is why I add another one underneath.

I'm loving the final result! Sometimes these quite simple designs can come out so well - probably because there is less that could go wrong!

Friday, 24 February 2023

Help From a Magnetic Seal

Hey space turtles. Tried something a bit different with this look. I've seen a lot of people on Instagram using magnets to create a stripy effect with magnetic nail polish and thought I'd give it a go. I chose my adoptive son Ray to help with this task (my parents adopted a lovely seal for me from the Cornish Seal Sanctuary for Christmas). I've included a picture of my Ray fridge magnet below - looking splendid!

I started with a layer of beige polish to add some opacity. Meanwhile I had some decals drying on my Uber Mat. I placed magnetic Ray under the mat and then painted nail polish over the top in three different shades (colours listed below the pictures). I then added a layer of clear polish over each decal. Once dry I applied the decals to my nails, trimmed them and tidied the edges with nail polish remover before applying a clear top coat.

As you can probably see from the pictures there is rather a lot of bubbling! It happened once I added the top coat but it was too late for me to do anything about it at that point. I found it quite hard to apply the decals flat as they were quite stiff and were not sticky side down. I probably should have applied a sticky top coat to help them adhere better. I think this was a fun look but I could definitely work on my technique!

Colours used: Paradox - Cirque Colors, Dream Within a Dream - Cirque Colors, Mood Ring - Cirque Colors

Wednesday, 22 February 2023

Ladies In Purple

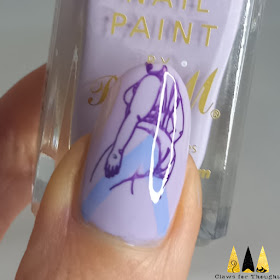
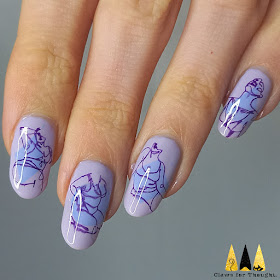
Hey space turtles! Today I'm sharing more nail art I thought of around Valentines Day with a bit of a self love girl power vibe! I've been meaning to use these images from Mo You London's Le Musee 04 stamping plate for ages and now seems like the right time. It was fun to use this shade of purple again too as although pastels aren't my usual go to for nail polish I do think lilac really suits me.

I started with three coats of lilac nail polish and then added some shapes in blue using Uber Chic Beauty's Basic Shapes 01 stamping plate. I then used dark purple to add the ladies (colours listed below the pictures). I carefully applied a glossy topcoat although I didn't do it quite carefully enough as I smudged the purple a bit. Maybe I didn't let it dry long enough, but to be honest I think the smudging in some ways makes it better as the lines were looking quite thin before.

Even though they're a little smudged I do like these. I'm enjoying the Spring colours (even if I don't feel fully ready for Spring!) and wearing something a little different to my usual looks.

Colours used: Berry Ice Cream - Barry M, Blueberry - Barry M, Plum - Barry M

Monday, 20 February 2023

Hungry Like the Wolf

Hi space turtles! I have only called this blog post 'hungry like the wolf' as it is very much in my head as I look at this nail art! This look continues the Valentines Day theme of animals that mate for life - this time I chose grey wolves, I liked the idea of them howling to each other in the forest to find each other. I spend quite a while deciding what colour to do these and am really pleased with what I chose.

I started with a base of pale muted pink. Once dry I created a gradient using a sponge and the same pink, a slightly less muted pale pink (which created a lovely transition I think) and a medium pink. I then added a layer of magnetic silver nail polish for a sparkly effect which looked great in real life but you can't see that well in these pictures! Next I added images from Mo You London's Noel 06 stamping plate to depict a night sky, mountains, wolves and paw prints. To get the wolves facing each other I used the same image, but one was stamped directly onto my nail and for the other I made a decal. I think they do look slightly different even though they're the same image. Probably just to do with what's around them.

Really pleased with how these came out. My best gradient yet! Only bit I'm not so keen on is the thumb as I chose one shade of pink which is too bright, but at least the rest looks good!

Colours used: Pink Lemonade - Barry M, Acai Smoothie - Barry M, Essential White - Uber Chic Beauty, Black Stamping Polish - Dance Legend, Platinum Diamond - Fun Lacquer

Monday, 13 February 2023

Happy Valentines Day Beavers!

Hello space turtles and eager beavers! I was struggling for inspiration for Valentines Day nail art this year so I put out a request for ideas on Instagram and a friend suggested animals who mate for life. With that and another thought that later popped into my head I now have too many ideas! I think this one is my favourite though so I'm sharing it on actual Valentines Day. The first animal I've chosen which mates for life is beavers. This one is also close to my heart as I'm part of a winter swimming group called 'frosty beavers and shy turtles' so this is fitting for that too!

I started with a peel off base coat and two layers of red reflective glitter on three of my nails, and pale muted pink on the other two. I had no beaver images on my stamping plates so this was one of my rare moments of freehand! I added the brown polish with the brush from the bottle, and then used a small nail art brush and dotting tool for the details on the beavers face. I used a striping brush for the pattern on the tail. I also used a small nail art brush to add two red hearts in the same red glitter. I finished the look with a glossy top coat.

I love how these turned out! The beavers tail is a tiny bit smudged but it's only visible in pictures or very up close. I love this gorgeous red glitter too - another of my Christmas presents. Colours used are listed below the pictures and the pictures show the look in different lighting and angles.

Colours used: Burning Bright - Emily de Molly, Vintage Tee - Nails Inc, Cappuccino - Barry M, Cocoa - Barry M, Cream Soda - Barry M

Friday, 10 February 2023

A dream within the forest

Good evening space turtles! The title of this blog post is a play on the name of the purple magnetic polish I've used for this look - Dream Within a Dream by Cirque Colors. I was inspired by mullemaus1281 on Instagram to create this look. It was pretty simple to do. I started with a layer of base coat and of purple magnetic polish, then added a further layer which I magnetised. The magnetic effect has spread out a bit as you can see below so I don't have as much of a crisp magnetic effect, but I like this effect in it's own right. I added images from Mo You London's Noel 06 stamping plate in white and then finished the look with a glossy top coat.

I like how these turned out. They may not be quite like the original but I like them in their own way. It was fun using a magnetic polish again too.

Colours used: Dream within a dream - Cirque Colors, Essential White - Uber Chic

Wednesday, 8 February 2023

Mountainous and Blue

Hey space turtles! Today's nail art is one I'd wanted to try for ages - some landscape nails using Mo You London's Noel 18 stamping plate. I saw a look on their website and deiced to try and re-create that as best as I could with the polishes I have available. I started with two coats of blue nail polish and created decals on my Uber Mat for the mountains - it was refreshingly easy to do these as it was all one colour and easy to colour in! Once the decals where dry I placed them around the middle of my nails and then added some trees in front in blue. I also added some clouds on the thumb nail and a blue bird of prey on my ring fingernail. I finished the look with a matte top coat.

The trees would have probably been better if they came out a bit darker and more opaque but I do like them. On my thumb nail I tried lighter trees in front but they didn't really come out that well so that's why it looks a bit blurry. I did also end up with a few bubbles from the decals. Overall though I like these - they're not perfect but they're blue and landscapey so that's fun!

Colours used: Laguna - Barry M, Essential White - Uber Chic, Cappuccino - Barry M, Indigo - Barry M, Cyan - Barry M

Saturday, 4 February 2023

Ice Swimming Mermaids

Hey space turtles! Today's nail art is close to my heart as it's inspired by my cold water swimming which I've managed to keep up throughout this winter. I'm loving the swims and post fire chats so much that I almost feel like I don't want it to warm up! I usually swim in a lake near me and had the fortunate experience of trying an ice swim earlier in January (it's all organised with life guards etc). Last weekend I also swam in the sea with my sister who is into wild swimming too - great fun! So I wanted to do a tribute to that with some wintery mermaid nails.

I started with a peel of base coat and one coat of gorgeous reflective nail polish (colours listed below pictures). I created decals on my Uber Mat using white nail polish to stand out against the background.  While these were drying I added snowflake images to my outer nails using Mo You London's Noel 08 stamping plate. The mermaids are from their Atlantis 05 stamping plate. After placing the decals on my nails I added some smaller snowflakes around the mermaids and some little drops of snow using a dotting tool. I finished the look with a glossy top coat.

I'm undecided as to whether I should have done the outlines of the mermaids in black or white but I think white was probably the right decision. It's hard to know how well black would have shown up. Overall I'm pleased with these - the base colour is gorgeous and I love the theme! I particularly like how the mermaids are looking up at the snowflakes. I look forward to wearing these for my lake swim tomorrow!

Colours used: Tapped Out - KB Shimmer, Essential White - Uber Chic, Charlotte Street - Nails Inc, Cappuccino - Barry M, Purplicious - Mark

Wednesday, 1 February 2023

Winter Animal Village

Hey space turtles! Today's nail art is using another new nail polish I got for Christmas (Fancy Gloss - Ice Queen) and a stamping plate I've used a fair few times but just love so much! These little winter cabins on Mo You London's Noel 01 stamping plate are so cute and when I used them a week or two ago I thought it would be good to try them again with a paler background and some sparkly snow. 

For this look I made decals on my Uber Mat. For the animals on the sparkly nails I used Mo You London's Noel 09 stamping plate. I added some stars and moons to the lilac nails before I trimming down the decals and adding them to my nails. They are a tad smudged but not too bad. I think I should have removed the smoke from my middle fingernail too as it doesn't look quite right. The snow is shimmer polish with white underneath. Finished the look with a glossy top coat and enjoyed :) Pictures below with and without flash,

Colours used: Wardour Street - Nails Inc, Ice Queen - Fancy Gloss, Black Stamping Polish - Dance Legend, Essential White - Uber Chic, Cappuccino - Barry M, Little Bo Peep - Rimmel, Indigo - Barry M, Bright Purple - Barry M, Aura - Nails Inc