Sunday, 30 April 2017

Painted Polish - Kelli's Birthday Bash Duo

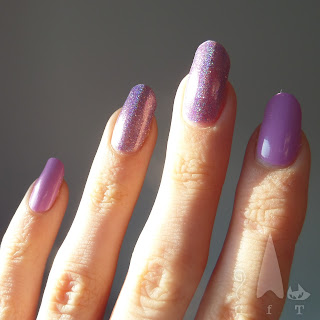
Happy Sunday all! Short blog post today. Just wanted to share my thoughts on Painted Polish by Lexi's lilacy 'birthday bash' due. I know there are many reviews of this already, but the pictures are pretty so I had to share them! The duo consists of a pastel creme polish, Take The Cake and a matching shimmering holographic, Counting Candles. They're not the sort of shades I'm typically drawn too, but I saw a lot of gorgeous pictures of these all over social media and it wore me down!

I absolutely adore Painted Polish's holographioc glitters, but these were the first creme, or normal holo polishes I tried from this brand, I have to say they didn't dissapoint. Take The Cake (the creme) had good coverage and smooth finish. I found this to be a really flattering shade for my skin tone.

The holo, Counting Candles is a little more sheer but still covers well. It's lovely and elegant polish and goes brilliantly with Take The Cake. I think they'll be great for some spring nail art.
Colours used: Take The Cake - Painted Polish, Counting Candles - Painted Polish

Wednesday, 26 April 2017

My favourite top and base coat

Hi nail people! I post lots of nail art and some reviews here and there, so thought I probably ought to mention the top coat and base coat the sit under (and above) it! For some time I've been OK with paying a little more for top and base coats as I use them so often and know I'll finish them. A few years ago, shortly after it came out, I discovered the nail kale base coat and Kensington Caviar top coat from Nails Inc and was so so pleased with them, I'm now on my third bottle of each!

Here are my thoughts on them:

Nail Kale base coat - This is just wonderful! It has quite a pleasant smell for a nail polish, and applies easily, with the wide tapered brush in the bottle. I found my nails were less stained while using this, it lasts well and dries fast. Can't see myself stopping using this any time soon! Price: £15

Kensington Caviar Top Coat - Another excellent product, I think good top coats are easier to find than good base coats, but this one is still above the others I've tried. It's easy to apply, quick dry and lasts well. It's good for using over stamped nail art, and always gives a super shiny glossy finish. Price: £15


So I haven't really used many other base coats since the discovering of Nail Kale, but I've ended up with a few other good top coats, so I've added some comments on them below. Kensingotn Caviar is still my favourite!

CND Vinylux Weekly Topcoat £12.96 - I got this one in a mail order nail box, and was very impressed with it. It was as good as Kensington caviar in terms of lasting, drying speed and shinyness. However the brush wasn't quite as good, and towards the end of the bottle it did go quite stringy.

Barry M Wet Set Quick Dry Topcoat £2.99 - This is absolutely phenomenal for such a good price! It dries quickly with a good finish, has a wide brush too. It's not as good for using over stamped nail art though and is perhaps a little less thick and glossy, still pretty shiny though!

Friday, 21 April 2017

Mermaiding Around

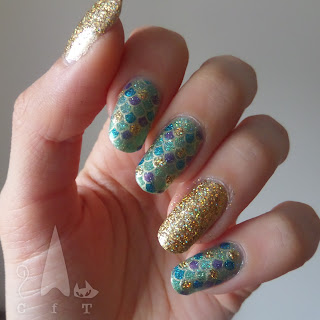
Hi everyone, happy Friday! I certainly have that Friday feeling! Today I have some long awaited mermaid nail art to show you, from my new bundle monster & twi star collaboration stamping plate. To be honest it didn't really work as I'd expected, so I had to change the accent nails (see bottom two pictures). You can see my other bundle monster collaboration plate experiments here and here.

So I started with a couple of layers of Bermuda Breeze from ILNP on three of my nails on each hand, and a few layers of Flipper from Urban Outfitters on my thumb and accent nail. I completely forgot to start with a white base under flipper which set me off to a bad start! I used my Uber Mat to create decals for the mermaid scales. You can see my picture tutorial of how to do it here.

On the blue nails I used a water effect pattern and the put more sheer blue over the top. I made decals using gold polish and filled them in with some shimmer. This was a mistake however as the images just didn't show up well at all. It didn't help that I'd forgotten the white base. So I took the blue polish off and opted for a gold base smothered in gold holo glitter! I do really like the final look, and look forward to experimenting more with the stamping plate.
Colours used: Bermuda Breeze - ILNP, Foil Effect Gold - Barry M, Yours Truly - ILNP, High Tide - ILNP, Million Dollar Dream - Fun Lacquer. Gold Digger - Barry M, Flipper - Urban Outfitters

Monday, 17 April 2017

Easter Nail Art 2017

Happy Easter everyone! Hope you've had a lovely long weekend, I'm trying not to think about it coming to an end! I ended up doing this years Easter nails a little late (the morning of Easter Sunday) so I'm posting them here a little late too. I spent ages deliberating over what to do, and getting the will power to remove my mermaid nail art (further blog post to come). For nail art Easter probably isn't my favourite holiday as I'm not so much a pastel sort of person, so I had a few obscure idea in mind (snakes etc!). I did get very tempted to do mini egg nails again, as that is my favourite Easter design of all time (see my first try here) but I went for something as explicitly Easter as possible instead!

Here's how I did it:

  • Paint each nail a different pastel colour (I mixed the order up on each hand).
  • Prepare some decals on a nail mat or stamper using clear polish (paint a patch of clear polish)
  • Use an opaque white polish and a small nail art brush for the egg shells and rabbit ears.
  • Use brown polish and a small nail art brush to paint the rabbit outlines on the thumb nails, and then some pastel colours for the lines on the little finger).
  • Draw some egg outlines on the clear polish decals using a nail art pen or small brush, and foll them in with white polish.
  • Use a dotting tool for the rest of the pattern on the little fingers.
  • Use a small nail art brush and dotting tool for the eyes and beak of the chick,
  • Paint the pink inner ears on the bunny ears using a small nail art brush.
  • Use a dotting tool to decorate the Easter eggs on the dotting tools and go over the outline with black polish or a nail art pen.
  • Add white nails to the thumb nail bunnies using a dotting tool.
  • Paint a layer of clear polish over the Easter egg decals.
  • Once the polish it dry peel up the egg designs, place on the desired nails and trip where needed.
  • Use a clear top coat to finish.
So it's a little long winded but also pretty simple. I was glad to do some freehand again as I need some practise! I enjoyed this design and it's classic Easter look, and now have some less classic Easter designs in mind too!

Colours used: Blueberry - Barry M, Notting Hill Carnival - Nails Inc, White Knight - Mo You London, Mint Green - Barry M, Berry - Barry M, Surfboard - Barry M, Cappuccino - Barry M, Papaya - Barry M, Lady In Black - OPI, Nail Art Pen in Black - Barry M

Tuesday, 11 April 2017

Kelli Marissa Bundle Monster Space Plate

Hi everyone! I have the next of my recent Bundle Monster blogger collaboration plate purchase on the blog today. You can see my first (unicorns) here. The next plate I used was Kelli Marissa's space themed stamping plate. I used this over Fun Lacquers Starry Night Of The Summer, which is a gorgeous deep metallic blue. In bright light it has some holographic flare too!

So I had some grand plans on advanced stamping and colouring planets, but once I started a few of the simpler images I liked them so much I thought I'd just stick with silver over blue. Rarely have I done an experimental 'use as many designs from the plate as I can' that I've liked this much! I really enjoyed using a mixture of smaller images on some nails, and found that I kept looking at my nails while wearing the design, which is generally a good sign! Picture below include some in brighter light, but I still couldn't quite capture the holo flare!
Colours used: Starry Night Of The Summer - Fun Lacquer, Silver Foil Effect - Barry M

Friday, 7 April 2017

Nails Inc Mindfulness Nail Polish

Hi everyone! Anyone else just delighted that it's the weekend?! I really have that Friday feeling, especially with the weather being so uncharacteristically good! It feels like summer has come already! Today I have a couple of Nails Inc polishes to show you. It seems like ages since I've bought Nails Inc shades, as I buy so many more indie polishes now. I was distracted by these in Debenhams when I went to buy some of their Nail Kale base coat which I swear by (blog post on that to come). I wouldn't usually spend this much on individual colours (my upper limit is about £12) but I didn't discover these were £15 till I got to the till, by which time it was too late, I was attached!

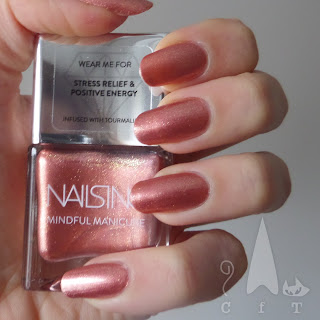
Anyway, enough rambling and on to the nail polish! First up is And Breathe. Both polishes are from their 'mindfulness' collection, with five polishes, each 'enhancing' different areas of your live. Not the sort of thing I go in for really but it's a nice idea! This one is for 'stress relief and positive energy' which tickled me as to be honest all nail polish brings me that! :D

I absolutely love the brushes in Nails Inc bottles, they are wide and nicely tapered so application is just lovely. The polish was easy to apply too and gorgeously shimmery. I can't quite figure out what colour this is. I'd say it's mostly copper but there's a hint of rose gold to it. There are teeny tiny gold flakes in it which are more visible in the bottle but give the polish a gorgeous shine. Id like to try this with my new UberChic owl stamping plate.
Next up is Good Vibes, a glitter topper with a lovely subtle rainbow shimmer to it. It's quite different to how I expected it to turn out from seeing it in the bottle. Also very difficult to capture the sparkles on camera. I was expected it to be subtle scattered glitter with a rainbow sparkle to it. It was more of a densely packed shimmer and also had some iridescent flakies scattered around. It creates a vibrantly shiny manicure but was a little less sparkly than I'd thought. I'm wearing it over Oasis, a muted purple from Barry M. I did try it on my Uber Mat over black, white and nude as well but I really couldn't capture the sparkle on camera. I think it works well over pale shades for a bit of unicorn shimmer.
So in conclusion, I like them! And Breathe is my favourite, as it's quite an unusual shade and the finish is very smooth (both polishes are shown with no top coat). I look forward to using Good Vibes with more colours, and getting it involved in some nail art!

Sunday, 2 April 2017

Stamping Sunday: Unicorn Island

Hi everyone! Hope you're not dreading Monday morning too much! Can't say I'm particularly looking forward to it myself. On the plus side however I do have purple nails with a sprinkle of rainbow sparkles and unicorns! And for once I'm actually posting a design while I am still wearing it.

So I had a Fun Lacquer haul from Rainbow Connection in January and am still working through them all. For the lovely sparkly Unicorn Island I was keen to stick with the theme and do a unicorn design. Fortunately I was saved from attempting to freehand when I stumbled across the unicorn plate on www.nailart.co.uk while purchasing the Twi Star mermaid blogger collaboration plate (pictures of the plates I bought at the bottom of this post).

I used the advanced stamping technique design for the unicorns on my thumbs, while the stars and clouds are stamped normally. You can see my picture tutorials on advances stamping here and here. Unicorn Island is beautiful and it's a shame my pictures don't capture the rainbows a bit more. I think stamping in silver didn't quite work as it blended to well with the purple foil effect polish on the unicorns mane, and the eyes didn't show up too well either. So next time I used these images I think I'll try them in black.
Colours used: Unicorn Island - Fun Lacquer, Silver Foil Effect - Barry M, Purple Foil Effect - Barry M, White Knight - Mo You London, Cosmic Girl - Danglefoot Polish


Above is my haul from nailart.co.uk. I was delighted to find somewhere in the UK I could by the twi start mermaid plate! As a result of this I ended up with two more blogger collaboration plates (Kelli Marissa and Nailed The Polish), an Uberchic owl plate and some lizard stencils. Postage was free over £20 and it arrived quickly, so I'm impressed :)