Wednesday, 30 September 2020

Safari Skittle Nails!

 Some wild nails for you today! Recently (well not that recently actually - I can't remember exactly when!) I decided to give Uber Chic's Warm Blooded stamping plate a try, as I liked the Cold Blooded one so much. The Warm Blooded plate has a great variety of animal prints, not all of which I can determine at this point in time - if anyone can help with that do let me know!

So for this look I decided to try out a few different prints and do an animal themed skittle mani. In case you didn't know a skittle mani is where the nails are painted in all different colours or shades, so I've taken it a step further with these and got something rather colourful! They were pretty easy to do and I like the variety I got from using all different colours as well as prints. My favourites are the tiger and giraffe nails. Can you guess the rest?

Colours used: Basil Street - Nails Inc, Floral Street - Nails Inc, Seven Dials - Nails Inc, Little Bo Beep - Rimmel London, Not From Concentrate - Nails Inc, Black Stamping Polish - Rainbow Connection, Cocoa - Barry M, Grey - Barry M

Monday, 28 September 2020

Midnight Leafy Nails

Hi everyone, hope you're having a good start to the week! The nail art I'm sharing today was inspired by Urban Nail Art on Instagram and YouTube. I saw this beautiful design on her Instagram and just had to try it! Didn't come out quite right for me but I think it can with some practise! 

I started with a base of white polish (colours listed below the pictures). Next I used a gradient sponge and using white, pink, purple and blue I made circles on the sponge, with white filling the middle. I dabbed some of this pattern onto each nail to create a gradient. Next up was some stamping. I used the Uber Chic Lovely Leaves 01 plate and some sheer black stamping polish for the leafy pattern. This didn't show up that well on all nails but it worked on some! I then used black stamping polish and the same image over the top but not directly over the other leaf print, to create a sort of shadowy effect. All of this was done using the tutorial on the Urban Nail Art YouTube channel.

I have mixed feelings about how this one came out! I do think it's pretty, but the gradient didn't come out well on all nails, and the sheer black I used was possibly a bit too sheer too! I think the thumb nail and middle finger nail came out best. Still, I do love the colours and the pattern is pretty too so it's not all bad!

Colours used: Floral Street - Nails Inc, Love & Liberty - Painted Polish, Acai Smoothie - Barry M, Lexington Gardens - Nails Inc, Coal - Fancy Gloss, Black Stamping Polish - Rainbow Connection

Friday, 25 September 2020

Mermaid Scale Nails

 Hi everyone, just a quick one today as this look didn't involve too much effort! I recently discovered that I had this beautiful blue flakie polish sat in my untried collection, so I had to try it while the weather is still warm! It's super pretty and a very mermaidy nail polish! The flakes are mostly blue with some green, and a few other colours of flakies sprinkled throughout.

I wasn't sure quite what to put over the top but I knew it had to be something mermaid related. I used the Bundle Monster and Twi-Star collaboration stamping plate do do mermaid scales on my index and little finger nails, and the big mermaid images across my middle two nails, with a castle on my thumb. It was all a bit random and I decided each image as I did it. I like it but the gold didn't show up as well as I'd hoped. Lovely colours though!

Colours used: Past the Breakers - Emily de Molly, Foil Effect in Gold - Barry M

Thursday, 24 September 2020

Blue Marble Pond Nails

Hello world! Yet more kind of summery nail art to share today, I'm still clinging onto it a little as there are a few more looks I want to try before I move onto the autumn and Halloween looks. Todays look is something I've seen on pictures of professionally done nails, and tried to replicate using regular nail polish. It didn't come out how I had envisioned it so I didn't keep it on for that long. Coming back to the pictures now it's better than I remembered, I think it's OK it's own, it's just not what I was aiming for!

I started with a couple of layers of sheer blue polish (colours listed below pictures) and then added a layer of flakie topcoat, followed by two more layers and some more flakies. Once dry I used an image from Mo You London's Explorer 34 stamping plate and white stamping polish for the marble effect, followed by another layer of sheer blue. I then added some more marble effect pattern over the top in silver. Finally, I used a nail art brush and gold nail polish to frame the look in gold. I don't think I did this very evenly though which is the thing I like least about this look!

Overall I like the colours, and the pattern looks OK but it's just not as fabulous as I hoped it would look! The gold definitely lets it down but the flakies also aren't as visible as I had hoped. Maybe I can find a tutorial somewhere and try it again!

Colours used: Flipper - Urban Outfitters, Aurora Unicorn Skin - Holo Taco, White Stamping Polish - Rainbow Connection, Gold Digger - Barry M, Foil Effect in Silver - Barry M

Sunday, 20 September 2020

Stamping Sunday: Snazzy Cactus Nails!

Hello nail art people and happy Sunday! Got some pretty sparkly nail art to share today, using a nail polish I haven't tried before. Dynamite by Fun Lacquer is a gorgeously sparkly lilacy-pink holographic glitter. I don't always go for pinks but I saw this on Glitterfingersss on Instagram and just had to have it! I used a peel off base coat and then sponged on the glitter for extra sparkly-ness! 

On top of the glitter polish I used my 'glitter grabber' nail polish from Glisten & Glow to smooth it out ready for nail art. There was no advanced stamping involved in this look, as I used only layered images from Mo You London's Botanical 09 plate. The one on my little finger kind of looks like a gherkin but otherwise I'm happy with the look. For the light brown parts of the images I did have to stamp them over twice for the colour to show over the glitter.

I really enjoyed this look and didn't want to take it off! In the end there was a big crack on my thumb nail where it looked like the nail polish was about to peel off so I removed it just in case - on to the next!

Colours used: Dynamite - Fun Lacquer, Key Lime - Barry M, Green Park - Nails Inc, Cappuccino - Barry M, Cocoa - Barry M, Black Stamping Polish - Rainbow Connection, White Stamping Polish - Rainbow Connection

Tuesday, 15 September 2020

A Shimmering Pastel Forest

Hello all - I'm back again already, I'm on a roll! Today the nail art I'm sharing is inspired by gabys_nails on Instagram. It's from quite a while ago but has been sitting on my nail art to do list! Mine came out a lot more yellow than hers, and more yellow than I'd intended, but I still like it! I like the pastel take on a forest at night time look so thought I'd give it a go.

I started with 'smoosh' nail art for the base, which involved dabbing nail polish of a few different colours on a stamper, and dabbing it onto my nails. I put the yellow on first which is probably why it came out so strong! I then used purple nail polish and the Noel 06 stamping plate from Mo You London to add the trees. Next up I added a few stars and moons using the same plate, and then a coat of Scattered Holo Taco. I was so impressed with the scattered holo, it's so perfect and even better than what I had hoped for! My boyfriend said it looked like snow, which definitely inspired me to use it on some winter or Christmas designs later in the year.
Colours used: Vintage Tee - Nails Inc, Notting Hill Carnival - Nails Inc, Mint Green, Nails Inc, Peach Melba - Barry M, Blue Moon - Barry M, White Stamping Polish - Rainbow Connection, Wigmore Street - Nails Inc, Scattered Holo Taco - Holo Taco

Sunday, 13 September 2020

Stamping Sunday: Dino Party Nails!

Hi everyone, or should I say roar? I have a feeling I have done a dino party named blog post before but I think it sums up this look so I'm going to stick with it! This month I am taking the time to focus on designs I've wanted to do for a while, and not doing as many challenges, and this look is one that has been on my list for a while so I was pleased to finally do it! It was nice to use this base colour again, it's one of the earlier indies I bought and I have only one other polish that's even remotely like it. It's definitely got party vibes! I don't usually go for these type of polishes (I think they're called crellies?) but I do really like this one.

I started with a base of the aforementioned party polish! For the other nails I created decals using my Uber Mat, you can see how here. For the individual dinosaur images I used a plate which I think I got on ebay, called BM-611. I'm not sure which brand it's from but possibly it's an old Bundle Monster one. For the multi-dino images on my middle finger nails I used the Animal 04 plate from Mo You London. Colouring this in was a tad fiddly but it came together more easily than I expected! I think the pastel colours worked well too. Can't see the base colour much at all though but never mind, I should have thought that through and just used white, but I kind of like how you can see the teeniest bit peeking through! I finished the look with a matte top coat.

So overall I really like these, I think they're cute and fun, and wore them till they chipped (I had a peel off base coat underneath) and would definitely wear it this look again :)
Colours used: I refuse to be invisible - Ellagee, Black Stamping Polish - Rainbow Connection, Peach Melba - Barry M, Berry Ice Cream - Barry M, Mint Green - Barry M, Notting Hill Carnival - Nails Inc

Thursday, 10 September 2020

Holo Taco: Kitties in the Rain

 Hi all! Some more Holo Taco polishes to share today though the polishes are somewhat hidden behind some cats! This look is for Holo Taco's latest nail art competition following the release of the Menchie and Zyler nail polishes (named after Cristine and Ben's cats). The theme is cats, and I just had to take part as not only is it a cute theme, but I had so much fun last time taking part in the nail art competitions during lock down.

For this look I started with a base of blue (colours listed below the pictures) and then added the three anniversary collection flakie polishes from Holo Taco in a random selection on my nails. They are so pretty and the glitter is a little smaller than I expected from the videos, which in my opinion is a good thing. I'm tempted to try a gradient with them. I applied my 'glitter grabber' nail polish next to smooth out the glitter and make stamping easier. On my thumb I used a raindrop image, and for all the other images I made decals which you can see how to do here. For the cats I used the Crazy Cat Lady 02 plate from Mo You London, and for the rain clouds I used Uber Chic's Forecasting Glam plate.

It feels strange having darker colours on again but I do like it! You haven't seen the end of my more summery nails yet though! I felt a bit mean putting these cats in the rain but they seem to like it so it's all good!

Colours used: My Car has Navygation - OPI, Blue Flakie Holo Taco - Holo Taco, Purple Flakie Holo Taco - Holo Taco, Gold Flakie Holo Taco - Holo Taco, White Stamping Polish - Rainbow Connection,  Moonfish - Barry M, Cappuccino - Barry M, White Horse Street - Nails Inc

Tuesday, 8 September 2020

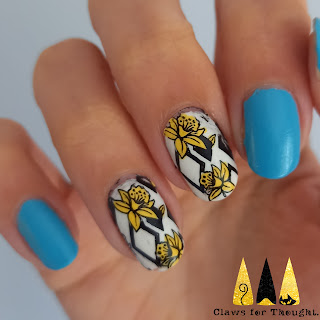
Delightful Daffodil Nails

Hello all! Am I being arrogant calling my own nail art delightful? I'm not sure but I like them so I'm going for it! I did these while on holiday so although there was one small thing I forgot they bring back fond memories (I was going to use two different shades of yellow for the flowers but only remembered to bring one).

For this look I started with a base of blue on three nails, and white on the middle two. I then created decals using the Flower Power 26 stamping plate from Mo You London, you can see how here. Although I only had the one shade of yellow, and the look is simple (in terms of repeating the same image and not using a variety of techniques) I really like them. Sometimes simple looks can be the most striking. They are kind of Spring like I think but work for Summer too. I finished the look with a matte top coat to make the colours pop. The blue is an old Nails Inc one I love! Not much else to say on these really but hope you like them :)
Colours used: Bruton Place - Nails Inc, Floral Street - Nails Inc, Black Stamping Polish - Rainbow Connection, Seven Dials - Nails Inc

Sunday, 6 September 2020

Stamping Sunday: Nature Book Nails

Hi all and happy Sunday! Got some fairly basic nail art stamping to show you today but some I have been planning to do for a while. I got this stamping plate from Mo You London (Botanical 06) with images that look like the black and white drawings you find (or used to find I suppose!) in scientific books about plants and animals. I particularly like that it has the names next to some of them in tiny italics. For this look I went for a base of lightly specked polish from Cirque Colors (colours listed below the pictures) as I thought this would work well as part of the nature theme.

For the stamping I chose images largely at random, I did manage to squeeze in a bit of the wording too! I particularly like the bird and butterfly nails, the butterfly image is so crisp and the bird really does remind me of a nature book. I finished the look with a matte top coat for that bookish look. I like how these came out but I wonder of the black against blue is a bit too harsh, perhaps I should have stamped in grey? I'm not really sure but I suppose I wouldn't have got that lovely clear butterfly image if I'd used grey. Hope you like them!
Colours used: Robin - Cirque Colors, Black Stamping Polish - Rainbow Connection

Wednesday, 2 September 2020

Nail Addicts Collab - Glitter Theme

Hi again! I'm back already as I have a bit of a nail art backlog due to being away last week. I was on the West Coast of Scotland out in the countryside and it was so peaceful and relaxing! I did this nail art just before we went, as part of the Nail Addicts Collab, for which the collage has now gone up on Instagram. The theme this month is glitter which is awesome, but was actually a lot harder than I thought as I have so many glitters to choose from! I decided to settle for this vertical gradient type look with a pattern down the middle, using most of the colours from the Fun Lacquer Valentines 2019 collection, and one other Fun Lacquer shade. Colours are listed below the pictures.

To create the look I sponged the glitter polishes on using a nail art sponge where I painted a line of each colour side by side. I started off going for gradients but then just went for more of a straight lines approach as the pattern would cover it anyway. I used a small nail art brush for the pattern in black, originally I was going for more of a jagged. spiky effect but it didn't really come out that way. I think I need a new go-to brush! Overall I quite like these but they weren't quite as sparkly as I'd hoped (with the exception of the gold), especially compared to the Holo Taco shades in my last post! I do also very much struggle to capture glitters on camera which doesn't help!
Colours used: Million Dollar Dream - Fun Lacquer, Crazy In Love - Fun Lacquer, Lucky Girl - Fun Lacquer, BFF - Fun Lacquer, Love Potion - Fun Lacquer, Precious Moment - Fun Lacquer, Lady In Black - OPI

Tuesday, 1 September 2020

Holo Taco Holodays Collection: Lazy Swatches

Hello all! I'm feeling sparkly on my blog today! I've been trying out the Holodays collection from Holo Taco, which were part of a large order (and my first!) from Holo Taco last month. The Holodays collection was released for Christmas 2019, and consists of five super sparkly holographic glitter polishes. I've tried them out one on each finger to start with so I could get a feel for them. I think they go well together which I do like in a nail polish collection!

I'm not going to go into detail on each shade as that's been done plenty of times now and it's not a new collection, so I'll just share my overall thoughts and some pictures. I do struggle to capture glitter polishes but I think these pictures have come out reasonably well considering. The top left one I took at the front of the holiday home we were staying in last week which is making me feel quite wistful!

So these polishes were as beautiful and sparkly as I expected! The dark blue is the least holographic and the lighter colours more so. Across the board silver holographic polishes do seem to be the sparkliest, my sister said this one was blinding her when we were out on a sunny walk! The thing I found most impressive about these is that despite being super glitter packed you can actually paint them on rather than sponge them. I think this is so much more convenient and satisfying to do as well. I've used three coats for the below pictures but I reckon the darker colours only need two. I was surprised how much I was drawn to the red as I normally lean towards blues. All of these are gorgeous though  and I can't choose a favourite!

I have some more Holo Taco polishes to try and weirdly so far the unicorn skin one I tried has impressed me the most, but that's probably because I wasn't expecting it to, I always new these Holoday ones were going to be spectacular!