Monday 30 December 2019

Traditional Christmas Stamping

Hello all, one more Christmas nail art to share before we're in the new year! To me this look is a bit more classic and not as overtly Christmassy as some of my other looks, I was inspired by someone I saw on a Facebook nail group who did lovely navy and gold nails with a gold accent, and am really pleased that I tried out some more of the classic looking images on my Mo You London Noel 01 stamping plate.

Simplicity was the key to this look, though it still took a little while waiting for all the layers to dry! I started with a base of Bobbing for Baubles by Essie, it needed a bit of a shake and was darker than I remembered but I'm pleased with it, I was going for a sort of muted navy look. On my accent nail I used a gold base and then sponged on some gold glitter, it's a pretty old one so stank the room out a bit - I dread to think what chemicals are in there, definitely not 3-free!

On the navy blue I used gold metallic nail polish to stamp some images from the Noel 01 plate, and a matte topcoat over the top. They are quite traditional looking and I'm really pleased I tried them out without colouring them in as they are quite detailed and I think that really shines through in gold over navy. It's a shame the bottom right picture didn't come out very well but the thumbs were my favourite, I love how the snowman is a perfect fir for my thumb nail!
Colours used: Bobbing for Baubles - Essie, Gold Digger - Barry M, Foil Effect in Gold - Barry M, Gold Glitter - Barry M

Sunday 29 December 2019

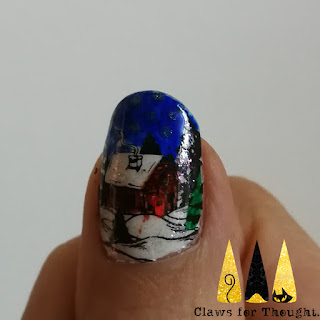
Christmas Scenes for Christmas Day

Hi all - hope you had a lovely Christmas! My Christmas Day nail art didn't quite turn out how I wanted this year but I think it's OK. That has happened a few times before, probably because I try something new and exiting I haven't done before, and then don't have time to change it if I'm not so sure! Christmas Day itself was lovely though!

I started with a base of white nail polish, and then stamped some Christmas scene images from Mo You London's Noel 01 stamping plate in black. I love the images, they are so detailed and remind me of Mole's Christmas, a short Wind in the Willows Christmas special me and my sisters watch every year before Christmas. My initial plan was to use the sharpie technique where you water down the sharpie ink with nail polish remover on tin foil, and with hindsight I probably should have stuck to this. Instead I decided to colour the images in with the sharpies, straight onto the nail polish (a top coat was applied first). This gives stronger colours but I think they were probably a little too strong/dark in this case as it takes away from the detail of the images. I also ended up with one sharpie coming out a lot more neon orange than expected!

Once the sharpie colouring was complete I used a dotting tool to add some shimmer over the white snow, and a few little silver dots as stars. I liked how the shimmer turned out though you can't see if well in these pictures. So overall I think these were OK but I would definitely do them differently next time.
Colours used: Floral Street - Nails Inc, Assorted Sharpies, Balancing Act - Nails Inc

Tuesday 24 December 2019

Christmas Countdown Nails!

Happy Christmas Eve! The nail art I'm sharing with you today is one I was excited to try after the idea came to mind when we picked up a little count down to Christmas decoration at an arcade in Hastings. The idea was to put numbers on my nails and cross them off as the days went by. In the end I didn't cross any off after 5 as I think they looked nicer with the numbers showing! I really enjoyed bringing an advent calendar feeling to my nails. Maybe next year I can somehow have pictures that I uncover as a countdown to Christmas?

I started with a base of Christmas Cookie by ILNP on all the nails where I wanted to put images, Say Love (also ILNP) on a couple more, and for the green base I used green polish topped with green glitter (colours listed below the pictures). For the images I used the advanced stamping technique with stamping plates Noel 03 from Mo You London and Happy Christmas from UberChic. For the background patterns beneath the numbers I used more images from the Happy Christmas plate and Holiday Spirit, also from UberChic. On the Happy Christmas plate there is a little circle for colouring in one of the bauble images which was a perfect base for the numbers. The numbers are from Mo You London's Typography 04 plate.

I'm really happy with how these turned out, I love the little mouse with a hot cocoa image! I've enjoyed having these very festive colours on too! I felt a little sad to be taking them off today but by Christmas Day nail art must be done!
Colours used: Christmas Cookie - ILNP, Say Love - ILNP, Watermelon - Barry M, Secret - Fun Lacquer, Primadonna - Danglefoot, Black Stamping Polish - Rainbow Connection, White Stamping Polish - Rainbow Connection, Little Bo Peep - Rimmel, Foil Effects in Gold - Barry M

Monday 23 December 2019

Penguins In A Winter Wonderland

Hello again!! This nail art was done shortly after the last for our trip to Oslo. I was really pleased with how it turned out and with how our holiday turned out too! Three years ago we went on a 'one-off' trip to Norway pre-Christmas and thoroughly fell in love with it! We've now had pre-Christmas trips to Trondheim, Tromso and Oslo, all were wonderful in different ways!

For this look I wanted to create a cosy winter village look with penguins skating though, inspired by the little house images on my Noel 03 plate from Mo You London. I used the advanced stamping technique and a few of Barry M's Molten Metal polishes, and a few sneaky sparkly shades for the penguin scarfs and present. You can see how here. For the snow which I stamped on before the decals I used the Noel 06 plate, I used it for the snowflakes behind the penguins too.

To improve things next time I think I need to apply the top coat better and clean up and the bottom of my nails as there were some jagged edges but overall I was really happy with this look, and think it was quite fitting for Norway too (though unfortunately I didn't actually see any skating penguins while there, just people).
Colours used: Laguna - Barry M, White Stamping Polish - Rainbow Connection, Black Stamping Polish - Rainbow Connection, Bronze Bae - Barry M, Gold Digger - Barry M, Say Love - ILNP, Emerald - Cirque Colors

Elegant Bauble Nails

Hi all, back again already - I have way too much nail art to post before Christmas! These were pretty short lived unfortunately, as I wanted them for my work Christmas party, but then wanted something different (coming up next) for our pre-Christmas trip to Norway. I wanted something classy but also a bit shimmery and Snozzberry by Cirque Colors was perfect! It's a really gorgeous vampy colour and my favourite from the Candy Coat collection (still need to try Juicy Fruit though!).

I painted all my nails except my ring fingernails with Snozzberry, and used a cream base on the accent nail.  For the images I used a tree branch and decoration image from Mo You London's Noel 01 plate from their new Christmas collection this year. I used the advanced stamping technique (see how here) to create decals with these images and stick them on my nails before finishing with a glossy top coat, and used a peel off base underneath as they were due to be short lived.

I was pretty pleased with these and enjoyed their simplicity and sparkle, plus the rich Christmassy colours. They didn't last very long with the peel off base (usually it lasts OK on me) but that did make it less of a challenge to get them off! I've included a picture at the bottom of this post of the decals as well as I think the design could have looked better if I could have fit more of the lovely baubles on!
Colours used: Snozzberry - Cirque Colors, Cream Soda - Barry M, Emerald - Cirque Colors, Citrine - Cirque Colors, Crushed Ice - Cirque Colors, Sapphire - Cirque Colors, Padparadscha. Black Stamping Polish - Rainbow Connection
To the left are the full size decals I created for the accent nails, following being peeled off my Uber Mat.

I probably shouldn't have bothered colouring in all the baubles as I knew they wouldn't fit across my nails, but they looked so gorgeous sparkling away with the lovely Cirque Colors Facets Collection shades!

I'd never have been able to fit the whole things width ways over my nails but it's a shame I had them filed down a bit shorter at the time as it would have been nice to get more the the glittery tree branches in!

Sunday 22 December 2019

Christmas Jumper Nails & 'Ugly' Nail Polish

Only three days till Christmas! It's all coming towards me very fast and I feel a bit unprepared but excited! I've got all my presents now but haven't wrapped any for those I'm seeing during the holidays. I'm lucky enough to be off from Christmas eve through to the new year but will be working on Monday. So I have kind of ended up with a backlog of Christmas nail art! I will have to do two blog posts in one day if I want to get them all out before Christmas! This is partly due to a lovely trip to Oslo we had from Saturday to Wednesday.

So for this nail art I wanted to do some Christmas jumper patterns as I have a fair few of these between my various Christmas stamping plates. I also thought it would be a perfect opportunity to try Pineapples Have Peelings Too from OPI. I remember when this first came out and I saw it in a department stores and felt... confused... it seems to be a odd mix of glitter colours to have in a gold base! Several years down the line I've seen it come up in various bloggers least favourite polish lists, and when I saw it reduced in TK Maxx I had to have it for that very reason! To be honest it's not the ugliest polish I've seen, and it has some festive fun to it, I'm kind of fond of it in a way! But it was a strange idea to put chunky glitter in metallic gold which then covers the glitter up on 2nd and 3rd layers (which it needs as the gold is thin). The colour choices are also unusual and glitter placement is quite tricky as the glitter particles are heavy in the watery base. Not what I would usually expect from OPI but it has it's own special place in my nail polish collection and it is kind of perfect for 'ugly Christmas jumper' nails. I also don't think Christmas jumpers are ugly, I think they're glorious! :D

I feel like I've waffled on a bit there, for the nails that weren't wearing Pineapples Have Peelings Too I used metallics (colours below the pictures) and white stamping polish over the top. The stamping plates used were Holiday Spirit (Christmas-01) from UberChic, and Festive 06 from Mo You London. My finger nails were just short enough to use the MYL ones and I used UberChic images on the thumbs. I was quite happy with these overall, fairly simple to do and quite fun. Also despite it's questionable formula I do think Pineapples Have Peelings Too is possibly the best name for a nail polish I've ever seen! (Giddy Kipper is a close second)
Colours used: Pineapples Have Peelings Too - OPI, Red Velvet - Mark (Avon), Emerald Green - Barry M, Primrose Park - Nails Inc

Tuesday 10 December 2019

Cosy by the fire Christmas nails!

Hello all, I'm listening to some jazzy Christmas music which seems pretty appropriate for the nail art I'm sharing today! This nail art has a 'chestnuts roasting by an open fire' vibe and came about because I wanted to do a fiery design with my new orange polish from Femme Fatale Cosmetics. If you read this blog regularly you'll notice that these pictures have a different backdrop! I am having trouble getting good pictures at the moment in the darker weather so took some on the train when it was brighter!

On my index finger, little finger and thumb nails I used Sands Of Time by Femme Fatale Cosmetics. It's not the sort of colour I usually go for but I just love how vibrant it is! In a weird way it reminds me of marmalade, really vibrant marmalade! On my other nails I used cream polish for a base (colours listed below pictures) and created decals on my Uber Mat for the stocking and fireplace images, both are from the UberChic Happy Christmas stamping plate. Alongside some metallic gold I used a couple of shades from the Cirque Colors Facets collection. You can see it well enough in these pictures but it was hard to see the detail of the fireplace very well in some lights so I think I should have used a slightly lighter red, but I do love the sparkle!

Overall I'm pretty happy with these. The orange was warm and Christmassy without being a traditional colour while the fireplace and stocking added a more traditional touch. December is flying by as always!
Colours used: Sands of Time - Femme Fatale Cosmetics, Cream Soda - Barry M, Black Stamping Polish - Rainbow Connection, Emerald - Cirque Colors, Garnet - Cirque Colors, Foil Effect in Gold - Barry M

Sunday 8 December 2019

Stamping Sunday: Cosy Christmas Polar Bears

Hey everyone, I'm behind with my nail blogging agaain!! This is from last weekend and I only had it on for a few days as I wasn't sure it suited me that well. I wanted to try something pale pink with a snuggly polar bear image from one of my new stamping plates, so thought it would be the perfect opportunity to try out Pink Lemonade from Cirque Colors. It's a really pretty colour but I'm not sure it really suits me unfortunately. Something about the peachy gold aspect of the flakies just didn't quite work with my skin tone.

On my middle fingers I stamped some Christmas jumper images from the Mo You London Festive 06 plate in black and gold, they came out a bit wonky which didn't really improve the look! I used the new Mo You London Noel 03 plate for the cute little polar bear images and the festive stars. I created decals on my Uber Mat so I could colour them in, and dressed the cuddly polar bear in a wintery grey, the polar bears are my favourite but I do like how the stars came out too.

So overall I wasn't totally thrilled with these, but I do like the little polar bears. From here till the end of the year it will be full on Christmas nails!
Colours used: Pink Lemonade - Cirque Colors, White Stamping Polish - Rainbow Connection, Black Stamping Polish - Rainbow Connection, Foil Effect in Gold - Barry M, Little Bo Peep - Rimmel

Sunday 1 December 2019

Stamping Sunday: Snowflake Time!

Hey everyone and happy 1st of December! Today I bring to you my first Christmassy nails of the year (or wintery if you're not ready yet!). I went for something that was more wintery than Christmassy as I did do them a few days ago, but Christmas stamping plates were used!

The two main colours I used were from Barry M's new(ish) Crystal rock collection, and I was super impressed with them! The white is so perfect for snowmen and snowflakes, and the blue is gorgeously sparkly! I used a shiny top coat for this look but the polishes look amazing with their textured finish too. For the snowflake nails I painted them white and then added a top coat to make them a bit smoother for stamping. I used a black stamping polish to add a reverse snowflake image over the top. For the snowmen I used the reverse stamping technique and my Uber Mat, and finished off with another layer of top coat once done! Both images are from the UberChic Christmas 01 stamping plate.

So are you all set up with your tree  and Christmas nails now or do you prefer to wait a bit longer? We're doing our tree next weekend but the nail art is in full swing and I think I shall get the Christmas socks out too! I'm really pleased with how these turned out and thing it's a good start to this years Christmas nail art!
Colours used: Flourite - Barry M, White Moonstone - Barry M, Black Stamping Polish - Rainbow Connection