Sunday 31 October 2021

Mystic Witchy Halloween Party Nails!

Hey everyone! Happy Halloween! Today's nail art is my last Halloween look of the year and was done for my early Birthday/ Halloween party yesterday. I decided as it was for an occasion I'd actually do the same look across both hands again - something I've rarely done since before the pandemic! I enjoyed getting this super spooky ILNP shade out again (colours listed below the pictures) and having my nails so long and pointy!

I started with a base of sheer black on some nails and multi-chrome on the others, alternating and doing a few coats of multi-chrome but only one coat of black. I then created decals on my Uber mat for the crystal ball, moon and ram skull, see how here, While these dried I added the spider web and lace patterns on a couple of sheer nails. I placed the decals on the remainder of the sheer nails and then carefully added an outline to all the sheer nails with black nail polish and a thin brush. All images used are from Mo You London's Halloween 12 stamping plate.

I enjoyed the final look of these, it's the kind of mystic witchy look I was going for! I think it really works on my long nails too. I dressed up as a witch for the party so these were just right!

Colours used: Eclipse - ILNP, Coal - Fancy Gloss, Lady In Black - OPI, Bronze Bae - Barry M, Good Vibes - Nails Inc, Ruby - Barry M

Wednesday 27 October 2021

Zyler & Menchie on a Halloween Night!

Hello or should I say miaow! Got some Holoween cat nails to share today for Holo Taco's 'Holoween' competition. I had to get Zyler's lovely orange nail polish out for this one of course, and I'd forgotten how gorgeous it is. I love the different sizes of glitter and that lovely holo sparkle! This nail art was a bit of a make it up as I go along look but I love it!

I started with a base of pale pink on my middle two nails, black on my index and little fingernails and just base coat on my thumbnail (all with a peel off base underneath). I then added a few coats of Zyler the Cat holo glitter over the black nails and thumbnail. For the middle two nails I added one thick layer of thermal top coat over the top and then let it all dry. Next I used a star image from Mo You London's Noel 06 stamping plate in white over the black nails, and created a cat on the moon detail from their Animal 15 plate (you can see how here). I added the cat decal and another little kitty face image to the black/star nails - I love how much the kitty face disappeared among the stars!

I enjoyed the finished look and as ever enjoyed it even more once the colour change started to take effect - such fun! I'd say it's not a massively Halloween look but it kind of is, and I love it! Pictures are below of it in different temperature states and I'm hoping to get a decent video of it in action to add on my Instagram (Claws For Thought)..

Colours used: Lady In Black - OPI, Pink Lemonade - Barry M, Zyler - Holo Taco, Black Thermal Topcoat - Fancy Gloss, White Stamping Polish - Rainbow Connection, Black Stamping Polish - Rainbow Connection, Flakie Holo Taco - Holo Taco

Sunday 24 October 2021

A Spooky Night in the Nail Forest...

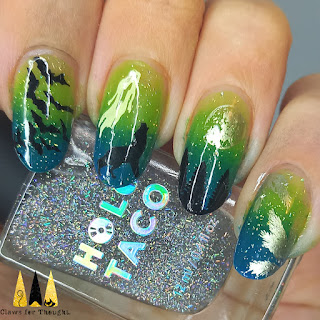
Hey everyone! Today's nail art is another Glam Nails Challenge prompt and probably the last one I do this month. The prompt is 'spooky night sky' which is quite frankly awesome! I've seen so many gorgeous designs for it already as I thought I would! 

I started with a layer of green and then created a gradient over the top using blue and green. I topped this with Holo Taco's Flakie Taco to create a sort of starry night effect. I then used Mo You London's Halloween 13 and Noel 06 stamping plates to create the haunted forest scene. If you look closely on my thumb nail you can see there is another layer of trees behind the black ones - but unfortunately it didn't show up very well! My nails have got so long now that I misjudged my plans for the wolf nail and had to add an extra ghost so it wasn't too empty!

I have mixed feelings about this design. The gradient came out better than I expected and I'm pleased with the background colours, they're good fun and not too dark for the images to stand out. However I think I should have planned the images a bit better and I'm not sure the silver polish works that well in the look. I think they're fine but definitely not spectacular like some spooky night nails can be!

Colours used: Audacious Green - Accessorize, Cyan - Barry M, Flakie Taco - Holo Taco, Grey - Barry M, Foil Effects in Silver - Barry M, White Stamping Polish - Rainbow Connection, Black Stamping Polish - Dance Legend

Wednesday 20 October 2021

Ghosties!

HelloOOooOo! Spooky ghosts today for the latest Glam Nails Challenge prompt. I was keen to try out Black Rainbow by Fancy Gloss again and decided this would work pretty well for some pretty ghost nails. I've seen a few lovely ghost themed nail looks on Instagram with other things around the ghosts and a clear base, so I decided to try something similar but where the base will change from pale to dark.

I started with a peel off base coat and a couple of layers of Black Rainbow, before using various images from Mo You London's Halloween 09 stamping plate and some metallic polish to dot them around my nails. I also added some bats from their Halloween 13 plate. I then made some ghost, candle and potion bottle decals using the same two stamping plates, you can see how here. I stuck these over the top and then added a top coat. I had liked the way it looked pre top coat so added a matte top coat over the top to complete the look which I think was the right decision.

I really like these, they came out well and it's just the sort of look I was going for. Only bit that didn't work so well was the ghost on my thumbnail. Unfortunately I must have smudged the image when adding the white polish as when I peeled up the decal I saw it was smudged, sadly I did not have the time or patience to make another one!

Colours used: Black Rainbow - Fancy Gloss, Black Stamping Polish - Dance Legend, Floral Street - Nails Inc, Foil Effects in Gold, Silver & Lilac - Barry M, If You've Got It Haunt It - UberChic

Sunday 17 October 2021

The Jack-O-Lantern's Are Back!

Hey nail people! More Halloween Glam Nails Challenge nails tonight - this time the theme is Jack-O-Lanterns. I decided to sort of recreate a look I really enjoyed from absolutely ages ago. I remember it was in the year I started working at my current workplace and I've been there for a long time! I did change it up a bit in terms of which nails have which patterns and used different polish plus I have longer nails - so they are a bit different.

I started with a base of black on two nails and linear holographic orange on the others. For the white spots I used a dotting tool, I tried to keep them fairly uniform but the little finger came out a lot better than the index finger. On the other nails I used a small nail art brush to add the spooky pumpkin faces. I think they're definitely neater than last time and the sizing worked quote well which I suppose is an advantage of freehand (I wasn't sure how well it would work on long nails). I Googled Jack-O-Lanterns and took inspiration from whichever ones looked easiest to do! I've included a picture of the original nail art at the bottom of this post.

Colours used: Lady In Black - OPI, French Tip White - Sally Hansen, If You've Got It Haunt It - UberChic Beauty

Wednesday 13 October 2021

90's Rave Skeleton's!

Hey everyone! Today's Glam Nails Challenge prompt is skeletons. There are many things I could have gone for here but for one reason or another a colourful 80's/90's pattern came to mind! I'm thinking of the kind of thing you'd see on Saved By The Bell but on a black background. The skeletons here look very still but I reckon they dance when I'm not looking! :D

I started with a base of black (polishes listed below the pictures) and then used the Halloween 13 stamping plate from Mo You London to add skeletons on each nail in silver. Once done I applied the same images again on each nail in white, over the top but slightly to the side of the silver skeletons to leave a sort of shallow. This didn't work as well as I'd hoped to be honest, so after the first one (the thumb) I aimed to get the white more over the top of the silver. Next I used a small nail art brush, a dotting tool and some bright Cirque Colors neons to add some shapes around the skeletons on each nail. I finished the look with a matte topcoat.

I like these, I think they're fun and a bit different, but I do think they could be a bit neater - my freehand is not the best! I've enjoyed them though and I'm glad I did them.

Colours used: Lady In Black - OPI, Foil Effects in Silver - Barry M, White Stamping Polish - Rainbow Connection, Electric Daisy - Cirque Colors, Vitamin D - Cirque Colors, Game Over - Cirqie Colors, High Roller - Cirque Colors, Miami-Dade - Cirque Colors

Sunday 10 October 2021

A Haunting in the Nailyard

Hey everyone! It's that time of year again,.. Halloween nail art is back! Some people have started way earlier than me so I've had plenty of inspiration! My next few nail art looks (including this one) will correspond with Glam Nails challenge prompts and then I'm hoping to squeeze in a couple of other Halloween looks right at the end of the month. I thought of this look while on holiday and was super excited to try it out!

I started with a base of white nail polish (colours listed below the pictures) on most nails, and three coats of dark orange glitter on my little fingernail. I then added one thick coat of black thermal top coat to the white nails and waited a while for it to dry. Once dry I used black stamping polish and the Halloween 13 stamping plate from Mo You London to add the grave, cat and mushroom images. It was a little hard to see where I was placing them! I then used white stamping polish to add some ghost images from the stamping plate, again a little tricky to place but it went well! 

I've included pictures of the nails in different temperature states. I think it looks best in black but the colour changing aspect with the graveyard scene is a great fun addition! I kind of hoped the ghosts would disappear against the white background but the thermal top coat does have a tint to it so you can see them, but I can't complain - I am rather pleased with this look! Also really love the orange glitter :)

Colours used: Floral Street - Nails Inc, Black Thermal Polish - Fancy Gloss, Winifred - Enchanted Polish, Black Stamping Polish - Dance Legend, White Stamping Polish - Rainbow Connection

Friday 8 October 2021

A Dark Sky in the Country Nails

Hey everyone! One more autumn nail look before I move onto the Halloween nail art - OooOOooh! This look was inspired by the Lake District in the UK and the countryside at night. I did make a bit of a blunder with this one, as I will explain, but they definitely grew on me!

I started with a base of vibrant blue (a pretty fun start in my humble opinion!) and then made decals using my Uber Mat (see how here). I used the Fall In Love 10 plate from Mo You London (same plate as my last design), which has so many wonderful autumn and generally nature themed images. On the website they have created this look with some blue polishes and I love it so thought I'd create something similar with slightly different shades of blue. I did slip up by leaving the black stars and moons in my decals. I meant to take them out and add them to my nails in yellow. I thought I'd correct it after but couldn't as the decals are placed on my nails with the images in reverse, so stamping over the top on my nails the positioning would be all wrong! I could have made more decals but didn't have time.

So to start off these felt like a bit of a flop but as time went on and the vibrant colours kept catching my eye I've grown to rather like them! I also do really love these images!

Colours used: King Tut's Gem - Jessica Polish, Black Stamping Polish - Dance Legend, Skyline - ILNP, Silver Lining - Barry M, White Stamping Polish - Rainbow Connection, Laguna - Barry M, Greenberry - Barry M, Indigo - Barry M

Monday 4 October 2021

Camping into the Autumn Nails

Hey everyone! More advanced stamping nail art to share today - surprise surprise! I'm also wearing the third of the autumn ILNP shades I bought recently - Skyline. I've decided not to do all of the Halloween Glam Nails Challenge prompts this year as I wanted to squeeze  in a couple of autumn designs first, this being the first one. 

I started off with a base of Skyline on my thumbnail and two of my finger nails, and cream on my other two fingernails. I them used my Uber Mat to make details for the two cream nails and thumbnails, you can see how here. For the thumbnail I used Uber Chic's Who Gives A Hoot stamping plate and for the other two nails I used images from Mo You London's Fall In Love 10 stamping plate. I thought the little woodland camping images would be quite fiddly but they were easier than I thought!

In conclusion I really like these, they're good summer into autumn images and I'm enjoying the sparkle! I've included images with and without flash below but unfortunately none of them bring out how sparkly the sunflowers are in real life!
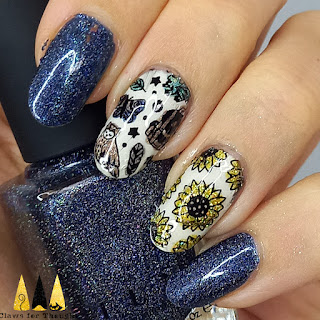
Colours used: Skyline - ILNP, Cream Soda - Barry M, Black Stamping Polish - Dance Legend, Taupe Temptation - Painted Polish, Tickled Taupe - Painted Polish, Yo-Ho Holo - Painted Polish, Princes Lolly - Cupcake Polish