Tuesday 25 April 2023

A Reflective Rainbow

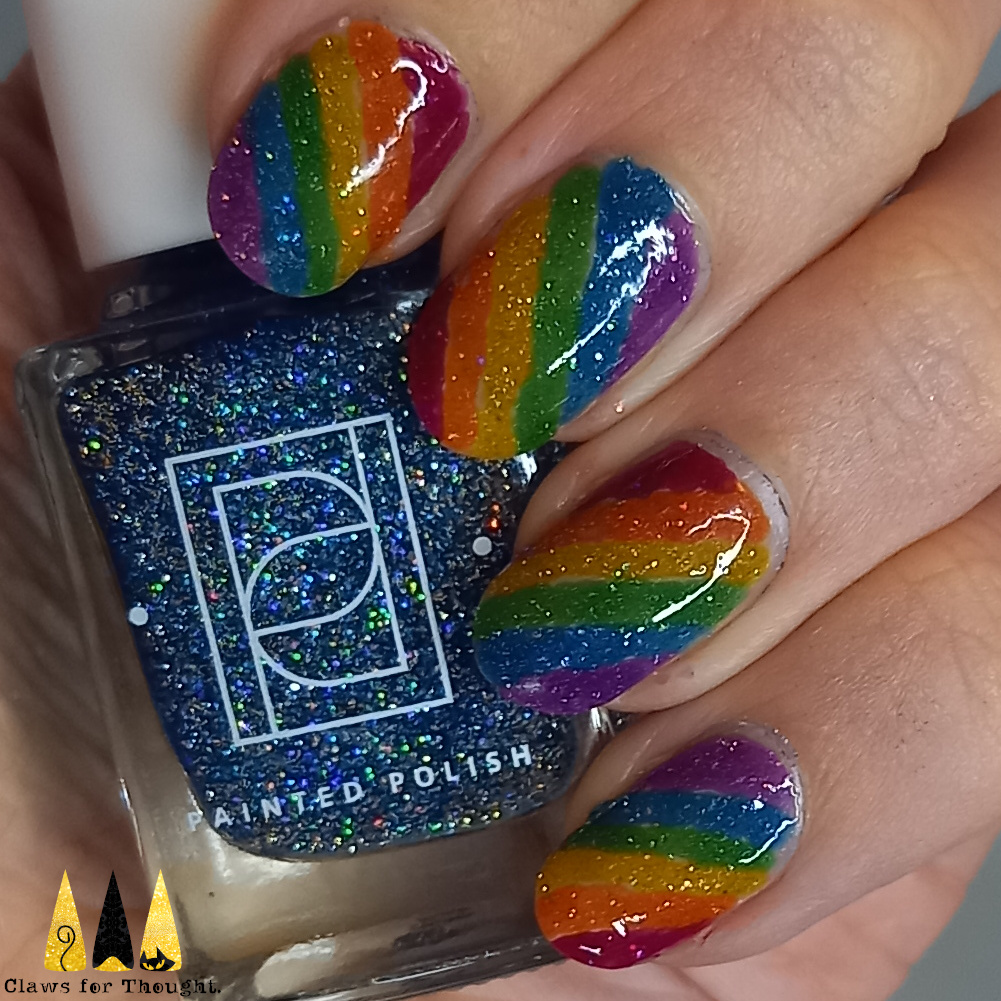
Hey space turtles! Something fun and bright to share today - rainbow nails. This was for a Glam Nails Challenge prompt on Instagram but is also something I'd been meaning to do for a while with my new rainbow reflective glitters (colours listed below pictures). 

I started with a nude base coat for opacity as I knew there's only be one layer of sparkly polish. I then used a small nail art brush to add the striped on my nails one colour at a time. This was easier and came out neater than I expected as the consistency of these polishes is so perfect for it. Reflective glitters tend to be quite opaque and thick so it worked really well. I loved looking at these gorgeous glitters sparkling in the sun too! All of the colours are from the Painted Polish 'At Sea: Rainbow Reef' collection except the red as that wasn't in stock where I buy my indie polishes. The red is from the same brand and finish however so is close enough I think, just slightly darker. Love how these came out :)

Colours used: Soft Focus (nude) - Polished for Days, You Razz My Berries, Shell We Dance, Catch Sun Rays, Can't Kelp Myself, Laguna Matata, Feelin' Knotty - All Painted Polish

Monday 24 April 2023

Daffodil Days

Hey space turtles! Back to blog catch up as we've been away again this weekend. This nail art was done for April's Glam Nails Challenge on Instagram - this time the theme is daffodils. I really love this daffodil image from Mo You London's Flower Power 26 stamping plate so it was the perfect candidate for this look. 

I started with a base of cream on my two middle nails and electric blue on the others (colours listed below the pictures). For the daffodil nails I created decals using my Uber Mat. I chose some reflective glitters for the daffodils and am really pleased with how they came out, even if you can't really see the sparkle that much in the pictures. I finished the look with a glossy top coat.

Colours used: Blueprint - ILNP, Cream Soda - Barry M, Black Stamping Polish - Dance Legend, Shell We Dance - Painted Polish, Catch Sun Rays - Painted Polish

Tuesday 18 April 2023

Rainbow Sparkle Ladybird's

Hey space turtles! This is my final catch up blog post for now, and it's for last Wednesday's Glam Nails Challenge theme of Ladybug. I've done ladybird nails before and thought of a few ways I might do them a little differently, settling on some sparkly purple ladybirds which don't cover my whole nail. I wasn't sure whether to add eyes as they looked quite good without but glad I did as I definitely like them best that way. Pictures of both in reflective and non-reflective forms are below.

I started with a muted pink base coat which ended up looking a bit more purple after I added a tinted top coat at the end! I then painted a line on each nail where the purple point would end and then added a thick layer of sparkle underneath it. I used a small nail art brush to outline their little heads and fill them in before painting some antennae. Once dry I added lined down the middle and then used a dotting tool to add the spots and eyes, finishing with a super glossy top coat. Love how these turned out :)

Colours used: Briar Rose - Polished for Days, Rainbow Stardust - Fancy Gloss, Essential White - Uber Chic Beauty, Lady In Black - OPI

Donut Swap!

Hello again! More catch up today. This donut nail art was inspired by 'a bit of glitz on the tips' on Instagram, who had been inspired by 'isolated.color'. We agreed to do a 'mani swap' where we each chose one of each others designs to recreate and I liked this one as it was achievable for me to do freehand (a lot of hers are more intricate and a bit tricky for me!) and fits with the general sweet things around Easter time theme. 

I started with a base of bright pink (colours listed below pictures) and then added a bit of brown to represent the donut. This colour was a bit too dark and looks more like chocolate or a burnt donut but I stuck with it! I added a matte top coat to the brown part to differentiate it more from the icing. I then used a small nail art brush to add a variety of sprinkles. Someone did ask me if it was a donut so it must have worked! These were good fun and I enjoyed our mani swap :) 

Colours used: Bikini Bombshell - Wikkid Polish, Cappuccino - Barry M, Joyful L'il Jellybean - Wikkid Polish, Hello Sailor - Wikkid Polish, My Mate Illuminate - Wikkid Polish

Sunday 16 April 2023

The Mini Eggs Are Back!

Playing blogger catch up as I have got a bit behind! This is some nail art I am currently still wearing and the only nail art I've recreated numerous times. You just can't go wrong with mini egg nails! I started with a different pastel colour on each nail and then used a fan brush too lightly splodge some brown nail polish over the top. I followed that with a dusting of white polish using cling film and then a matte top coat. I love this look and I imagine it won't be the last time I do it! The bottom right picture is my most popular on Instagram this year. Back soon for more catch up!

Colours used: Cream Soda - Barry M, Berry Ice Cream - Barry M, Surfboard - Barry M, Notting Hill Carnival - Nails Inc, Bermondsey Street - Nails Inc, Cocoa - Barry M, Matte Taco - Holo Taco

Sunday 9 April 2023

Easter Yellow

Happy Easter everyone! I started the day with an Easter lake swim wearing bunny ears (impractical but fun)! I've got different Easter designs on each hand and I'm loving them both. I particularly like the novelty of this look since I don't usually wear so much yellow. It feels very seasonal and fun and I'm enjoying wearing them matte too. 

I started with a base of yellow on some nails and cream on others (colours listed below the pictures). I made decals for the little chick's using Mo You London's Festive 58 stamping plate and while these dried I added patterns from the same plate to the yellow nails in white. I enjoyed how simple the chick's were to do with just a couple of colours on each decal. Once dry I trimmed and applied the decals to my nails and added a top coat and a matte top coat. Spring ready :)

Colours used: Seven Dials - Nails Inc, Cream Soda - Barry M, Black Stamping Polish - Rainbow Connection, Atlantic Road - Barry M, Ridley Road - Barry M, Essential White - Uber Chic Beauty, Matte Taco - Holo Taco

Tuesday 4 April 2023

Springtime Bunnies

Hey space turtles! I've finally accepted Spring pastels and I'm loving it! I'm going to do the Glam Nails Challenge again this month though I'm already slightly behind. The first prompt is bunnies and I knew I had to use this adorable bunny image from my Mo You London Festive 58 stamping plate again. I stuck to a fairly simple look but enjoyed getting back to the advanced stamping too. My short index fingernail is starting to grow out a bit and I think these pastel Easter looks do suit short nails.

I started with a shimmery base coat and then added a couple of coats of a few pastel shades (colours listed below the pictures). For the blue and green I used some old textured polishes initially which needed a 'glitter grabber' layer to smooth them out as the texture has gone a bit funny. I had to re-do the blue one as it's gone quite gloopy so took ages to dry and ended up smudging. Ended up using a beautiful coconut infusion shade which was a pretty good colour match. I added wording directly onto the blue nail and created decals for the two pink nails, finishing the look with a matte top coat. I'm glad I chose to do two different shades of bunnies. Really pleased with these :)
Colours used: Pink Lemonade - Barry M, Laguna - Barry M, Ridley Road - Barry M, Black Stamping Polish - Dance Legend, Seven Dials - Nails Inc, Cappuccino - Barry M, White Horse Street - Nails Inc, Essential White - Uber Chic Beauty, Matte Taco - Holo Taco

Spotted Sea Creatures

Hey space turtles! More simple stamping to share today as I chipped my strawberry nail art the day before going to London and wanted to neaten it up. I wanted to try out a new stamping plate from Kads Nail Art and thought this would be a good opportunity as it was something I could do quite quickly with no advanced stamping involved. I started with a base of pale blue and then added the block colour images in navy. The spotty images where added over the top in white stamping polish. I tried layering up two sets of images on my thumbnail but it didn't really work, I think I messed up the placement of the mermaid image. Finished the look with a glossy top coat and enjoyed!

Colours used: Pale blue - Brand I no longer support, The Serpentine - Nails Inc, White Stamping Polish - Uber Chic Beauty

Monday 3 April 2023

China Plate Skittle

Hey space turtles! Keeping this one short and sweet today as I have a bit of a back log. I fancied trying out my china plate stamping plate again and after some thought as to what would work best I decided to go for bright and colourful as Spring approaches. I started with a base coat and two layers of white polish (best nail polish name ever - colours listed below the pictures) and then added the images in a variety of colours using my Porcelain 02 stamping plate from Mo You London. I finished the look with a glossy top coat. I'm thinking I should have tried them out in matte too but too late now as I moved onto my next nail art today! Pleased with how these came out :)

Colours used: A mantis shrimps favourite colour - Bees Knees Lacquer, Watermelon - Barry M, Plum - Barry M, Indigo - Barry M, Pomegranate - Barry M