Thursday 30 September 2021

Tropical Animals in the Autumn

Well hello there! Slight nail fail to share today but it was a weekend of experimental nail art! I purchased three of ILNP's new autumn collection and thought Park Ave and Uptown would be good backgrounds for some tropical animal nail art, and that tropical animal nail art would be good for a baby shower I went to for my lovely friend Charlotte. I did intend to do gradients on each hand, also featuring the other shade I bought - Skyline. However this didn't work at all - not sure if the colours are too strong or it's the sponges I was using but it didn't work for me at all. You can see some extra silver on the thumbnails which I where I started my attempt. The sponges soaked up the colour pretty much just leaving silver glitter!

So, I proceeded with just a plain base of green and amber, they're good jungle colours as well as being good autumn colours I think. I then used gold and black stamping polish to add images from Mo You London's Enchanted 08 stamping plate. To add further difficulty my gold stamping polish ran out part way through so I was testing out alternative options! I think the black images came out a lot better. So I think these were a bit of a flop really, the gold didn't come out that well, the gradient didn't happen and I smudged one of the images too! They're OK though, I definitely prefer the amber hand, the images came out better and I'm enjoying the colour being a bit different to my usual shades.

Colours used: Park Ave - ILNP, Uptown - ILNP, Black Stamping Polish - Dance Legend

Sunday 26 September 2021

Look Out! Super Reflective Nail Polish!

Hey everyone! Something a bit different to my usual stamping nail art to show you today. I have recently purchased some of these reflective nail polishes which seem to be popping up everywhere at the moment and had loads of fun playing around with them yesterday afternoon! I've got a couple more to try but I wanted to share my thoughts about the ones I tried as it's so much fun trying something new!

I've been tempted by some reflective polishes I saw from Bow Polish for a little while but when Uber Chic brought theirs out with a sparkly deep red version I just had to have it as I thought it would be so perfect for Christmas parties (if we're lucky enough to have any this year). The Uber Chic reflective polishes are gels so I wore a peel off base coat underneath. I'm not very used to gel but this is my favourite one I've tried so for, I do love how shiny they come out!

In the first picture below you can see I'll Be Fireside lit by my ring light, this is how it looks in regular daylight and when you get it under bright lights or a phone torch is does this amazing twinkling thing which I just could not capture on camera... but it's insanely beautiful! It makes me think of the red carpet and paparazzi - very glamorous! The second picture is with flash - the glitter glare is insame! It's less likely to look like this while being worn unless very directly under a bright light, but the twinkly sparkly thing it does it better - trust me! I'm so in love with this polish, it's even better than I expected and absolutely perfect for a party.

Not long after I'd ordered my Uber Chic reflective nail polish to try 
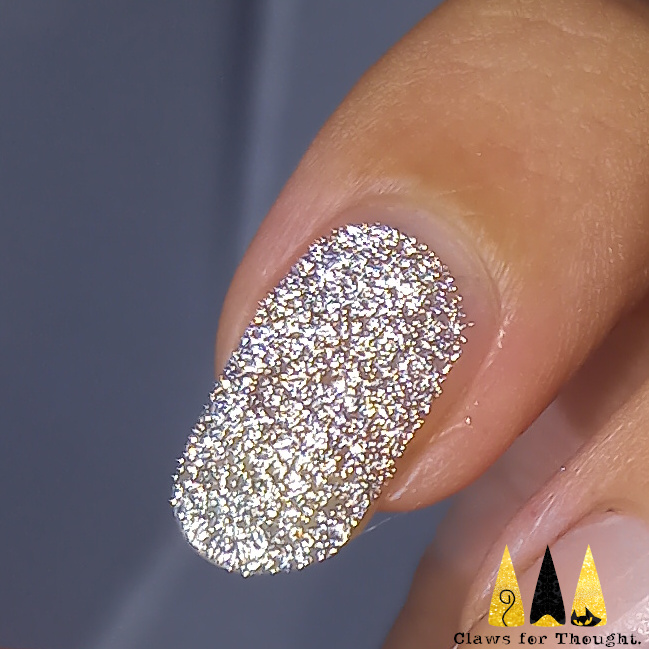
Fun Lacquer brought out a whole collection! This time I didn't just choose one to try but three, I was so wowed by the pictures and videos I saw! I also know silver polishes are often the most sparkly so wanted to try it out. The Fun Lacquer Flash collection has four different reflective polishes which are available in regular or gel formula. I chose Flash Platinum, Flash Diamond Flake and Flash Gold Diamond Dust. The one featured in these pictures is Flash Platinum.

So as you can see from the pictures below...wow! These pictures are of course under flash, but under any bright lights these are amazing, I love the way they look textured almost as if there's some kind of diamond dust on my nails! In regular light they are still pretty sparkly, but more of a silvery grey colour. I can't wait to see what the Flake and Gold ones are like! This was also easier than I thought it would be to remove with regular nail polish remover, I didn't need to soak it.
I feel like this post is getting a bit long, but want to share one more thing! I was keen to see what this super sparkly nail polish would look with some stamping over it with the polish shining through. I used Uber Chic's Lovely Leaves 01 plate to create the below look, and I love it! Honestly these polishes are so gorgeous and I really look forward to doing full manicures with them :)
I've chosen some of the shiniest pictures for this blog post but also have a few video's which I will put on Instagram. TTFN!

Saturday 25 September 2021

Deep In The Ocean

Hey everyone! I'm feeling a bit ill today - really hope it passes overnight as I have things to go to over the next couple of days! But I'm not so ill that I can do some blogging and play around with some nail polish :) As I've mentioned before I was super excited to receive some of the Mo You London Atlantis stamping plates. They are exactly my kind of thing! For today's nail art I'm using Atlantis 02 which is full of layering images. I have many ideas for this one but liked the idea of a dark sparkly ocean with the sea creatures standing out so decided to try that first.

I started with a base of black followed by shimmer (colours listed below the pictures). Once dry I started with the bottom layer of each image I'd chosen on the stamping plate, which I added in white on my nails so that the colours I then applied would stand out against the dark background. I then proceeded with the other colours, one nail at a time. These images were pretty easy to do, I was pleased with how easy they were to layer (although mine aren't perfectly layered, but not too bad I think!). My favourite is the clown fish, the colours worked so well. I'm really pleased with these overall and look forward to using this plate again!

Colours used: Lady In Black - OPI, White Stamping Polish - Rainbow Connection, Papaya - Barry M, Passionfruit - Barry M, Black Stamping Polish - Dance Legend, Seymour Walk - Nails Inc, Yellow - Barry M, Indigo - Barry M, Cream Soda - Barry M, Acai Smoothie - Barry M, Key Lime - Barry M, Spring Green - Barry M. Crystal Shimmer - Accessorise 

Tuesday 21 September 2021

A Mysterious Sparkly Ocean of Nail Polish!

Hi nail people! I have a new nail polish and a new stamping plate to share today. The base colour I've used is Emily de Molly's The Glaring, which I recently purchased even though I have sooo many blues! I just couldn't resist the glitter and I'm glad as it's a gorgeous polish! Emily de Molly really do make some spectacular polishes - I particularly loves ones with a bit of depth. This one was a little on the thick side but only as it's so packed with sparkle! I used two coats here and got really good coverage.

As above I started with two coats of my base colour/glitter. Once dry I used images from Mo You London's Atlantis 04 for a sort of mystical under the sea look! I was so excited to get this plate as I love under the sea things and it was so perfectly fitted to the abstract trend but with perfect ocean vibes. I feel like there so much I can do with it. In this instance it was mostly just a bit of layering and adding some stars and moons around the other images.

I think this glitter is perfect for an ocean look and I adore both this nail polish and the stamping plate. I do wonder if maybe they distract from each other a bit and would be better appreciated separately, but I'm pretty pleased with this look!

Colours used: The Glaring - Emily de Molly, Foil Effects in Gold, Silver & Lilac - Barry M, White Stamping Polish - Rainbow Connection, Acai Smoothie - Barry M

Thursday 16 September 2021

Yo Ho Yo Ho A Pirate's Nails For Me!

Yo Ho Yo Ho a pirates life for me... argh! I was a big fan of Pirates of the Caribbean growing up so was pleased to see some pirate themed images on Uber Chic's Mermaid Life 02 stamping plate which I've finally got round to using! I was inspired by nbnailart and themermaidpolish on Instagram who did some pirate nail art over gold which I thought was a perfect combination. I've struggled to get good pictures of these, possibly due to the glitter but I do rather like them, especially the thumb.

I started with a layer of gold nail polish followed by three layers of gold glitter polish. It's such an old one it stinks of chemicals but it still sparkles! For the images I used my Uber Mat to create decals, you can see how here. I had a tough time choosing which images to use! In order to use a few more I combined some wording with images on my ringer finger and thumb nails. I'm really pleased with the way the thumb one came out. the sizing is just right for my nail and I think the positioning went well too.

Colours used: Gold Digger - Barry M, Gold Glitter - Barry M, Black Stamping Polish - Dance Legend, Grey - Barry M, Charlotte - Nails Inc, Cocoa - Barry M, Dead Heat - Barry M, Bronze Bae - Barry M, Copper Mine - Barry M, Colville Mews - Nails Inc

Wednesday 15 September 2021

Back British Farming (the nail art edition)

Today is Back British Farming Day! Introduced by the National Farmers Union as a day to celebrate British farming and it's importance to the UK economy. You can find out more here. I decided to honour this day with some nail art! I saw it all going on last year and thought a simple look with some wheat (the symbol for it last year) would look good. I've gone for something a bit different on the thumb which doesn't entirely go but I'll go into the details below.

I started with a base of green on three of my fingernails, cream on the other and yellow on my thumb. On my ring fingernail I created a decal on my Uber Mat using the Fall In Love 05 stamping Plate from Mo You London. I didn't really have a wheat colour so decided to go for gold instead and give it a bit more of a party vibe! I was quite keen to try out my Uber Chic Farm Fresh stamping plate as well for this so gave it a go on my thumb nail. I saw this design on their website (not sure who by) and thought it would be perfect, I started with green polish, then orange and finally the black tractor. It was surprisingly easy to layer up and place the tracker too.

In conclusion I'm enjoying these and I think they're a good nod towards autumn too! I do think the green (although I was pleased to use this shade again) was perhaps a little dark for the look, and I'm not sure how well the thumb goes with the golden wheat. However I really like the different elements of the look so I have no regrets!

Colours used: Racing Green - Butter London, Cream Soda - Barry M, Yellow - Barry M, Black Stamping Polish - Dance Legend, Gold Digger - Barry M, Watermelon - Barry M, Not From Concentrate - Nails Inc

Friday 10 September 2021

Mermaiding Around

Hey nail people! Aquatic nail art to share today - one of my favourite kinds to do! I recently purchased a few of Mo You London's Atlantis stamping plates and this is the first one I've used (Atlantis 05). It's got lots of lovely mermaid images along with some other ocean images. I love how happy and free the mermaids look, it is the perfect depiction of how I feel when wild swimming! I've been doing a lot of wild swimming this year (and am hoping to keep going over the winter) so am commemorating it with this nail art. I've made the mermaid look like me with long brown hair and pale skin.

To create this look I started with a base of pale blue on all of my nails. I created decals on my Uber Mat for the mermaid scales and the mermaid images. You can see how here. I love this stamping plate, the mermaid images are so fabulous - it was hard to choose which ones to use! This mermaid tail pattern is lovely too, something a little different from the standard. So in conclusion, as you can tell, I love these! Looking forward to using this plate some more!

Colours used: Mermaid Parade - Nails Inc, Ocean Ever After - Nails Inc, Black Stamping Polish - Dance Legend, Bronze Bae - Barry M, Cobalt - Barry M, Bright Purple - Barry M, Angelfish - Barry M, Pinktail - Barry M

Monday 6 September 2021

Terrazzo Tales

Hey everyone! Back with something that's not stamping for a change! I've seen a few people doing Terrazzo nail art recently on Instagram and thought I'd give it a go. I love that it can work with all sorts of colour combinations so went for a mixture of summery and autumnal colours as a sort of transitional nail art look. It's come out quite summery looking which is great as the warm weather has come out again here in the UK!

I started wish a base of off white (colours listed below the pictures). On a mini silicone mat I painted a line of each colour fairly thickly and left them to dry. Once dry I peeled them off and cut them into small pieces with some nail scissors, collecting them onto another mini mat. Next I painted a layer of clear nail polish (not quick drying) on my thumb nail and used tweezers to pick up pieces to apply. I followed this step for all other nails, one nail at a time, and then went back to my thumb nail as it was a bit more sparse than the others! It had to be careful not to dent the wet top coat too much with the tweezers but it worked pretty well.

To conclude, I really like these! I'm pleased with the colour combination and the look overall. It's really fun and I'd definitely try it again, the options are endless! I think in some of the others the pieces have been a little finer and neater but that will come with practise I'm sure. These are not bad for a first attempt I reckon!

Colours used: Cream Soda, Greenberry, Acai Smoothie, Watermelon, Gold Digger, Plum - All from Barry M