Showing posts with label Gel Polish. Show all posts

Sunday, 16 January 2022

A chill in the air

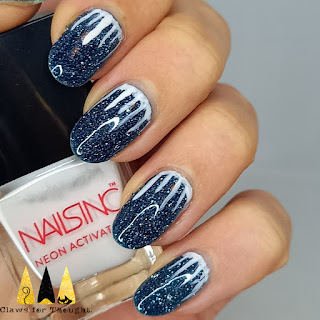
Hi everyone! I'm back so soon as I have more Glam Nails Challenge nail art to share. Today's prompt is icicles. This was a tricky one as there is one very obvious look (which I've chosen to do) but any more interesting ones I could think of seemed to difficult! I liked the idea of having icicles on the side of a house but wasn't sure how to portray that on my nails, especially with freehand not being my strongest technique.

I started with a peel off base coat followed by one layer of reflective gel polish (colours listed below the pictures). I was pleased to find it was a one coater! I'm not entirely keen on the texture of gel polish I usually end up with so after wiping off the tacky layer I added a regular topcoat which seemed to work fine. This kept it how I liked it till the next morning when I added the nail art. I used white polish and a striping brush to add the icicles and a little white polish at the base of my nails. Once dry I added another regular topcoat. 

This was a pretty straightforward look to create and although it could have been neater I like it! Sometimes the simple looks can be quite striking I think. Also loving the reflective sparkle of this polish! It was a Christmas present I was trying out for the first time.

Colours used: A Chill In The Air - UberChic Beauty, Neon Activator - Nails Inc

Friday, 26 February 2021

Fun Lacquer Platinum Diamond - A Comparison

Hello nail people of the world! Today I'm doing something a little different from my normal stamping nail art, and reviewing/ comparing a couple of nail polishes by Fun Lacquer. Back in 2020 Fun Lacquer released a new magnetic gel polish (Platinum Diamond) with a really pretty silver glitter effect that is different to any other glitter I had seen before, it has a sort of crushed velvet look to it and sparkles like crazy when you move your hands! I was waiting for it to come back in stock again on Rainbow Connection in the UK, and once it did they had also released a regular nail polish version. I had read previously that the gel one was better for getting the true 3D shimmer effect, but the pictures of the regular one look pretty good too! So I dithered over which one to get and ended up deciding to get both and compare. It seems like a waste of money in some ways but it gives me options and something to do in lockdown!

I'm going to summarise below the key points to compare and my final view, so hopefully if you're struggling to decide which to buy this might help! Underneath all the text I've added pictures, the gel polish is on my thumb and index fingernails. I've tried a few different colours underneath.

Consistency - Very good for both, not too thick in either case but just one coat needed.

Price - £14 for regular and £19.50 for gel - it's not cheap but it is worth it!

Application - The application of these was really good as usual, though I am less used to gel so probably haven't perfected that yet! I think there's a trick to getting that 3D sparkle effect which I achieved better on some nails than others, it will take some practise and is also pretty hard to capture on camera - but when it works it's wow!

Sparkle - Wonderful! I managed to achieve the sort of crushed velvet flare effect better with the gel but both are beautiful. The regular polish one had slightly closer together particles I thought.

In conclusion, I need to practise my technique with these, but I think I found the gel one slightly better. The unlimited drying time meant it was easier to get the effect I wanted before curing, and I think the sparkle effect is more unique. However, the difference is small, both are gorgeous and you have to look closely to tell the difference. It may even be that I'm just not well practiced enough in creating the effect. Therefore I would recommend choosing the one you're most comfortable working with - it will look gorgeous either way!

Colours used: Black Gel - FairyGlo, Pale Pink Gel - FairyGlo, Lady In Black - OPI, Fascinating - Fun Lacquer, Cobalt Jelly - Cirque Colors, Platinum Diamond Gel - Fun Lacquer, Platinum Diamond - Fun Lacquer

Saturday, 14 November 2020

A Liquid Crystal Galaxy!

 Hey everyone! Got some more first time nail experiences to share with you today! This was another of  the options on my birthday poll and I've been keen to try it out for some time! I'm not used to using gel polish either so it's a bit of an experimental one for me!

I started with a peel off base coat as I don't fancy soaking off the gel - so we'll see how long these last! I then applied 2-3 coats of gel polish to my nails. It is a little lumpy but I'm definitely getting better at it! I rarely work with gel and have often found I've ended up doing it too thick. After my final layer of black gel I used silver foil effect polish from Barry M and an image from my Kelli Marissa and Bundle Monster  (now Maniology) collaboration stamping plate to apply the star image. I was really pleased with how well it came out, I liked it even before the liquid crystal!

The next step was to apply the liquid crystal. Mine is a little bottle from Dance Legend, and I used the brush to gently swipe some of the liquid over my nails in wavy lines. It was quite runny and took a while to dry so took some getting used to, but once it dried I got the lovely multi-coloured effect you can see below. It;s quite hard to capture and doesn't always show up but when it does I love the way the colours change just like the mood rings I used to have as a child! I finished the look with a gel top coat to seal it in and am still enjoying wearing them!

Wednesday, 12 December 2018

Oh Christmas Tree!

Oh Christmas tree oh Christmas tree, how sparkly are your branches! These were my work Christmas party nails and to be honest I wasn't a fan, good job I loved my outfit! :D

I started with a peel of base coat (UNT ready for take off) followed by gel polish. I felt like the base wasn't thick and it would be tricky to get off but it was actually quite easy and satisfying to remove the next day! I used two layers of black gel polish, and then a gold chrome powder over the top. It was a cheap one I got on eBay so I suppose it's always a risk, but I just didn't think it looked that special. I thought it was going to be a mirror chrome! I have other cheap eBay ones where I can see my face in them, but I guess you can't always win!

To add something to the rather bland gold I made a decal using my Uber Chic Christmas-01 plate and some glittery green (Fun Lacquer Secret), and stuck a star on top using some top coat. I used regular top coat over the trees as I wasn't sure how well more gel would work over the regular polish I used for the trees. Anyone got any tips for getting a chrome powder to be shinier?

Sunday, 29 April 2018

How not to do gels/chrome!

Hello all! Hope you've had a good weekend. Mine has been good but went too fast as usual! I'm dreading work tomorrow as it's crazy busy at the moment. Today's post is about something I tried quite some time ago! The pictures have been sat in my nail blogging folder for ages. I guess as they didn't turn out how I expected I wasn't particularly excited about sharing them.

So, there are two parts to this, gel polish and chrome powder, both of which I am fairly inexperienced in. I have successfully applied chrome powder over normal nail polish, but have heard it works better over gel so thought I would give that a try. I also wanted to have a go at getting some different colours, as I've been people apply silver chrome powder of a variety of colours to get different effects.

I started off with a couple of layers of gel polish, blue on one hand, turquoise on the other. I haven't quite mastered gel. It probably doesn't help that I'm using a cheap brand from Amazon, but I always seem to end up with it quite think and slightly rounded round the edges. I started by applying silver chrome powder, and soon realised that although it applied well, it completely blocked out the base colour! I therefore made a last minute plan to do the middle two fingers silver, and on the others use my new unicorn chrome powder for a more see through look! This worked better and I think it looks good with these colours. I do wish I could find a chrome powder which would pretty much chrome-ify any colour. That's all for now. I'm sure I'll be back on the chrome again soon!
Usually here I list the colours I used for the above images, however in this case I'm not actually sure of the names, so I can say is that they're from a brand called FairyGlo and I got them on Amazon!

Monday, 6 February 2017

Adventures In Gel Polish

The Christmas just gone I asked for a gel lamp, as I was keen to see what it was like after discovering the joy of peel off base coats! I'm by no means converting entirely to gel, but I know it offers some advantages, like super shiny nails! I was also curious to see how it all works, and to try chrome nails with gel as it makes a smooth base.

Tonight I'm showing you my first attempt! To the left are the things I used on my much loved 'nail station'. OK perhaps I didn't 'use' the pineapple lamp for this, but it had to
be included!

So I started off with a peel off base coat so that I
could easily remove the gel. The peel off base
works well with thick polishes like gels or
glitters.

I used the Dance Legend peel off base
coat in nude.

The other items I used (shown above) were a gel lamp, gel polish and top coat, small 'gems' and a soft pencil for picking up the gems (from eBay).

I purchased a few cheap gels just to try them out, the colours I bought are from FairyGlo and the top coat is BlueSky.


One of the things I like about the gel/polish/peel off base combo is that if I'm peeling it off anyway I may as well stick things on it! So I decided to try adding gems on top of the gel. Below are some pictures of the result. I was so impressed with how shiny it was! I have some very shiny nail polishes but this really was incredibly shiny! I could see my reflection! You can see some trees outside the window on my thumb nails in the pictures below!

These didn't last long as I couldn't resist peeling them off (very unlike me!). I've included some pointers below the pictures about what I learnt.

  • Use thin layers of gel - you want enough  polish to evenly cover the nail, but not too much as this can cause it to pool at the edges, and once it's cured it can't be undone! Because the polish doesn't dry until it's cured in the lamp you can always add a little more if there isn't enough on the brush.
  • Stick on gems using tiny specs of polish - I placed the gems over a layer of gel polish, which because the layer hadn't tried ended up pushing it into the edges. Using small blobs would mean there isn't enough for it to pool into the edges of your nail.
  • Cure your thumb nails separately - This probably depends how much polish you've used, but I found if I put my whole hand in the gel lamp the gel on my thumb nail shifted to the side a bit as my thumb was on it's side.