Friday 26 February 2021

Fun Lacquer Platinum Diamond - A Comparison

Hello nail people of the world! Today I'm doing something a little different from my normal stamping nail art, and reviewing/ comparing a couple of nail polishes by Fun Lacquer. Back in 2020 Fun Lacquer released a new magnetic gel polish (Platinum Diamond) with a really pretty silver glitter effect that is different to any other glitter I had seen before, it has a sort of crushed velvet look to it and sparkles like crazy when you move your hands! I was waiting for it to come back in stock again on Rainbow Connection in the UK, and once it did they had also released a regular nail polish version. I had read previously that the gel one was better for getting the true 3D shimmer effect, but the pictures of the regular one look pretty good too! So I dithered over which one to get and ended up deciding to get both and compare. It seems like a waste of money in some ways but it gives me options and something to do in lockdown!

I'm going to summarise below the key points to compare and my final view, so hopefully if you're struggling to decide which to buy this might help! Underneath all the text I've added pictures, the gel polish is on my thumb and index fingernails. I've tried a few different colours underneath.

Consistency - Very good for both, not too thick in either case but just one coat needed.

Price - £14 for regular and £19.50 for gel - it's not cheap but it is worth it!

Application - The application of these was really good as usual, though I am less used to gel so probably haven't perfected that yet! I think there's a trick to getting that 3D sparkle effect which I achieved better on some nails than others, it will take some practise and is also pretty hard to capture on camera - but when it works it's wow!

Sparkle - Wonderful! I managed to achieve the sort of crushed velvet flare effect better with the gel but both are beautiful. The regular polish one had slightly closer together particles I thought.

In conclusion, I need to practise my technique with these, but I think I found the gel one slightly better. The unlimited drying time meant it was easier to get the effect I wanted before curing, and I think the sparkle effect is more unique. However, the difference is small, both are gorgeous and you have to look closely to tell the difference. It may even be that I'm just not well practiced enough in creating the effect. Therefore I would recommend choosing the one you're most comfortable working with - it will look gorgeous either way!

Colours used: Black Gel - FairyGlo, Pale Pink Gel - FairyGlo, Lady In Black - OPI, Fascinating - Fun Lacquer, Cobalt Jelly - Cirque Colors, Platinum Diamond Gel - Fun Lacquer, Platinum Diamond - Fun Lacquer

Saturday 20 February 2021

Gothic church window nails with Zeitgeist

HellO there and happy weekend! I've had a pampering sort of morning and am now blogging and watching nail videos before lunch. Hoping to be more productive in the afternoon! I recently purchased this unusual coppery multi-chrome nail polish by Cirque Colors and wasn't quite sure what to do with it nail art wise, till I saw someones swatch where the polish looked quite gothic, so I thought I'd try out an accent nail with my Gothic 10 stamping plate from Mo You London. I love an excuse to use sheer black as well!

So I started with a base of two coats of Zeitgeist from Cirque Colors on three of my nails, and one coat of sheer black on my thumb and ring fingernails. Once dry I stamped a couple of church window images over the sheer black using black stamping polish. I love how opaque my black stamping polish is - the images come out so nice and crisp! I then added a black outline on the two accent nails with black nail polish and a small nail art brush. The outline didn't show up particularly well but still made the look feel a bit more complete.

I'm pleased with the way this turned out and Zeitgeist is so beautiful and unusual. I think it would look really good on it's own with a dark wintery or autumnal outfit. I couldn't really capture the colour shift that well but I captured the shine at least!

Colours used: Zeitgeist - Cirque Colors, Coal - Fancy Gloss, Black Stamping Polish - Dance Legend, Lady In Black - OPI

Thursday 18 February 2021

A puffin in the snow

Hey everyone! Multi-chrome winter vibes today with a lovely nail polish I got in my Christmas stocking, Pixie Parade from Tonic Polish. I actually did these before my Valentines nail art but wanted to share those first so they were appropriately timed. This base polish is gorgeous and so opaque, I'm super impressed with it! I was keen to try out my Noel 08 stamping plate from Mo You London too as it has gorgeous wintery images so decided to pair them together.

After starting with a base of two coats of Pixie Parade, I created decals on my Uber mat for the puffin and branch images (why does puffin and branch sound like a pub name to me?!) - you can see how here. While they were drying I added some other cute images from the plate to my thumb, index and little fingernails in silver. I also used Uber Chic's Basic Shapes 01 plate to add a couple of circles to my middle two nails. I did this as I thought the other images might not stand out well enough against the background, which in hindsight they did, but I'm still glad I added the silver circles as I think they give the look some more depth.

I really like these. The base colour is lovely and I love the Noel 08 stamping plate, it has so many cute wintery images, I particularly like the animal ones. Looking forward to seeing what else I can create with it!

Colours used: Pixie Parade - Tonic Polish, Foil Effect in Silver - Barry M, Black Stamping Polish - Dance Legend, Evergreen - Picture Polish, Red Hot Rio - OPI, Not From Concentrate - Nails Inc

Monday 15 February 2021

The lobsters are back in town!

Hello again! I'm back so soon because I have more (sort of) Valentines nail art to share. I admit this one isn't particularly romantic to look at, it has more of a seaside theme, but I do enjoy lobsters as a Valentines theme because of the whole 'He's her lobster' saga in the popular sitcom Friends. I couldn't keep these on long as they were really catching on things but they were fun for a day!

I started with a base of five different blues (colours listed below the pictures) to add some interest to the base (I thought a pattern would be too much with the lobsters), and then added a layer of Linear Holo Taco which gave a lovely sparkle. To stick the lobsters on I dabbed a bit of clear nail polish on each nail and pressed the lobsters down on top. I thought they'd be a bit more flexible but it was hard to flatten them down, even after a layer of 'glitter grabber' polish and top coat. Worth a go though!

In summary I love the way these look, they have a good seaside/summer vibe as well as being romantic (sort of!). I'd probably only wear them again for a novelty at a social event or something, and probably not in the winter as they're a nightmare with gloves! They aren't technically nail art lobsters so I can't complain, and will look forward to doing some crafts with them :) They were a gift from my sister who always gets me something lobster themed for Christmas (it's become a cute tradition).

Colours used: Laguna - Barry M, Blueberry - Barry M, Cyan - Barry M, Cobalt - Barry M, Indigo - Barry M, Linear Holo Taco - Holo Taco

Sunday 14 February 2021

Valentines Day Comic Nails

Happy Valentines day! Hearts and things aren't really my style so to be honest I'll be glad when my Instagram newsfeed goes back to more normal nail art! That being send I couldn't resist doing a few valentines related looks, and this is the one I was looking forward to the most. I bought this stamping plate a while back as it's got a fun selection of images, and recently had the idea that they would work really well for a valentines look. The idea is that on my middle finger it's me and my man (I've always got mt hair in a bun) and on the others it's people being jealous that I'm kissing him... or grossed out by us kissing - your call! :D

I started with a base of pale pink (colours listed below pictures). Once dry I used black stamping polish to add images from Mo You London's Comics 06 stamping plate. They were slightly on the small side for my nails even though I had filed them down a little, but I rectified this but using another black nail polish and a small nail art brush to round off the images. On my thumbnail I added a line of black at the bottom of images as well and I really like the way it looks.

I had originally intended to use sharpies or watered down nail polish to colour the images in, but like it so much the way it is that I decided to just add a top coat and leave it as it is. I like the kind of vintage look it gives and the images came out so well. I love MYL plates and I'm really loving my Dance Legend black stamping polish too.

Colours used: Vintage Tee - Nails Inc, Black Stamping Polish - Dance Legend, Lady In Black - OPI

Wednesday 10 February 2021

Chroma Rose and Lace

Hi there! Getting closer to Valentines day so although hearts and such aren't really my thing I will be doing some vaguely Valentines themed nail art. The first and perhaps the vaguest are these lacey nails. Lace often has romantic connotations and I was planning on trying this look out already so I may as well try and pass it off as Valentines! I am entering it into the Holo Taco Valentines competition even though I'm not using their polishes (which is daft as I do have some - but was just really feeling this shade for this look!). Their shade Cat's Evasion is pretty similar though so could be used instead.

I started the look with one coat of sheer black on all nails except my ring fingernail where I added Chroma Rose from Cirque Colors. I then used my Fashionista 18 stamping plate from Mo You London to add a lace pattern over the sheer black. I chose the images at random and most worked well. Once stamped I painted a section of most other nails with Chroma rose as well, leaving only my index finger. Once Chroma Rose was dry I used a small nail art brush and black nail polish to paint an outline around each of the lace parts of my nails.

Overall I have mixed feelings about these. Sometimes I look at them and love them, and other times they don't look particularly exciting as the detail doesn't show up that well in dull lighting, especially on my middle finger. Chroma Rose is such a gorgeous polish and I do like the style of these, they're quite grown up for me! I think the same look with glitter instead of multi-chrome would work well too. I do have one other look from a while back which would be so perfect for this competition but my pictures are so bad that I think I'll just stick with this one!

Colours used: Chroma Rose - Cirque Colors, Coal - Fancy Gloss, Black Stamping Polish - Dance Legend, Lady In Black - OPI

Tuesday 9 February 2021

Northern lights in Norway Nails

Hey everyone! More purple nails today. These were done for a collaboration on Instagram for which the theme was Things You Love About Winter. I adore snow but knew lots of people would choose that so chose to do a Norway theme instead, as I love going to Norway in the run up to Christmas (didn't last year for obvious reasons but hope to again in December). I was also keen to use my Noel 06 stamping plate from Mo You London again and it tied in well with this theme.

I started with a base of pale purple on some nails and dark purple on others. I then added a layer of Flakie Holo Taco on all nails, which I love but with everything else on top I'm not sure I should have done! On my index, little finger and thumb nails I layered up some snow and other images from the stamping plate in purple and white. On the middle two nails I added some silver stars and then the Northern Lights Pattern in white. Over the top of the white polish I added some pale green which doesn't show up that well but I'm fine with that as it gives enough of a hint of green to work! I then layered the deer silhouette images in silver and black.

Overall I'm rather pleased with these. I probably didn't need the flakie topper, although it does add a bit of extra sparkle, and at first I thought the deer were a bit too dark but I like it all together as a look. Fingers crossed for a trip to Norway again in December!

Colours used: Wardour Street - Nails Inc, Plum - Barry M, White Stamping Polish - Rainbow Connection, Key Lime - Barry M, Flakie Holo Taco - Holo Taco, Foil Effects in Silver - Barry M, Foil Effects in Gold - Barry M, Black Stamping Polish - Dance Legend

Sunday 7 February 2021

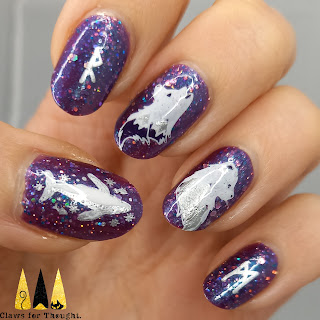
Hungry like the wolf/ whale!

Aaaoooo! (or however you spell a wolf sound!) Some wintery Nordic inspired nails to share with you today with a new glitter purple polish I hadn't yet tried. I wanted to try out some of the rune images on my Noel 08 stamping plate from Mo You London and the lovely little floating whale image too, so decided to pair them up with these wintery wolves and my new purple glitter.

So I started with a peel of base coat and two layers of purple glitter nail polish (colours listed below the pictures). I then used white stamping polish and my Uber Mat to create decals for the wolf and whale images, you can see how here. In the meantime I added a couple of rune images to my index and little fingernails. There were a few to choose from but I went for R and M as they're my initials. After adding the decals to my nails I applied a glossy top coat to complete the look and bring out the purple polish's shine.

Overall I do like these, the images are cute and you can't go wrong with sparkly purple! They're not quite as fabulous as I had hoped for though, I really love the whale image but think it might have been better in other colours so the detail shows up a bit better. Absolutely adore that stamping plate though and will definitely be using it again!

Colours used: Moonlight Status - Femme Fatale Cosmetics, White Stamping Polish - Rainbow Connection, Foil Effects in Silver - Barry M, Plum - Barry M

Wednesday 3 February 2021

Soon may the Wellerman come...

To bring us sugar and tea and rum! The popular Wellerman sea shanty is my theme for todays nail art! I don't know how popular it's been around the rest of the world but in the UK people have gone made for sea shanties, with the most popular being The Wellerman which went viral after a postman's cover of it took off on Tik Tok. Loads of people joined in and made versions, and a dancey version of it is currently number 3 in the UK charts! It's all great fun and I am very much on board with it!

For this look I started with a base of blue on three of my fingernails, and cream on my thumb and ring fingernails. For the whale, whales tail and sailor/fisherman nails I used images from Mo You London's Sailor 18 plate which is one of my all time faves! I created decals of the fisherman and humpback whale so I could colour them in. For my ring fingernail I used the Sailor 01 plate, and for my little finger I used Uber Chic's Bottoms Up stamping plate to represent the tea. I didn't have any images for sugar or rum but I think I captured enough elements of the song! I finished with a matte top coat to make the colours pop.

Overall I'm pretty pleased with these, I think they're good fun and I do love a nautical theme! I'm enjoying the colour scheme too. I think the multi-wave image with the whale tale on my thumb is a little messy but I love the look so much I'm not sure it matters!

Colours used: Can't Find My Czechbook - OPI, Cream Soda - Barry M, Black Stamping Polish - Dance Legend, White Stamping Polish - Rainbow Connection, Cobalt - Barry M, Indigo - Barry M, Cappuccino - Barry M, Cocoa - Barry M, Charlotte Street - Nails Inc

Monday 1 February 2021

Mittens on my fingertips!

Hello all! You can perhaps tell what this is going to be but I just couldn't resist jumping on the bandwagon with all the Bernie Sanders memes going round at the moment! I don't have the exact colours or much in the way of freehand skills, but thought it seemed simple enough to have a try.

I started with a base of pale brown, and found a picture online of the mittens so I could use them as a template. I then got some cream and dark brown nail polish and a small nail art brush, and following the picture made a simplified pattern on my thumbnail. It's a little wobbly but it's practise! Once I had the pattern down I added it to my other nails one line at a time. I alternated the order in which my patterns went to make it less uniform. I finished the look with a matte topcoat as the mittens are woolly and certainly not shiny!

I enjoyed wearing very topical nail art, and the novelty of wearing a very different colour scheme to my usual tastes. I think they look quite 70's! They also remind me of Easter eggs so I've made a mental note to try this sort of thing again in the Spring, maybe with some pastel colours.

Colours used: Cappuccino - Barry M, Cream Soda - Barry M, Cocoa - Barry M