Showing posts with label Metallic. Show all posts

Friday, 24 February 2023

Help From a Magnetic Seal

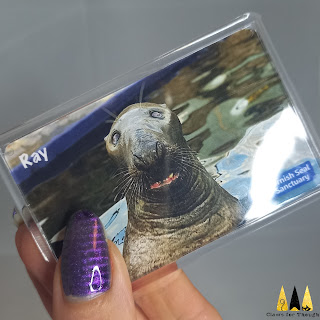
Hey space turtles. Tried something a bit different with this look. I've seen a lot of people on Instagram using magnets to create a stripy effect with magnetic nail polish and thought I'd give it a go. I chose my adoptive son Ray to help with this task (my parents adopted a lovely seal for me from the Cornish Seal Sanctuary for Christmas). I've included a picture of my Ray fridge magnet below - looking splendid!

I started with a layer of beige polish to add some opacity. Meanwhile I had some decals drying on my Uber Mat. I placed magnetic Ray under the mat and then painted nail polish over the top in three different shades (colours listed below the pictures). I then added a layer of clear polish over each decal. Once dry I applied the decals to my nails, trimmed them and tidied the edges with nail polish remover before applying a clear top coat.

As you can probably see from the pictures there is rather a lot of bubbling! It happened once I added the top coat but it was too late for me to do anything about it at that point. I found it quite hard to apply the decals flat as they were quite stiff and were not sticky side down. I probably should have applied a sticky top coat to help them adhere better. I think this was a fun look but I could definitely work on my technique!

Colours used: Paradox - Cirque Colors, Dream Within a Dream - Cirque Colors, Mood Ring - Cirque Colors

Tuesday, 17 January 2023

How Polarizing

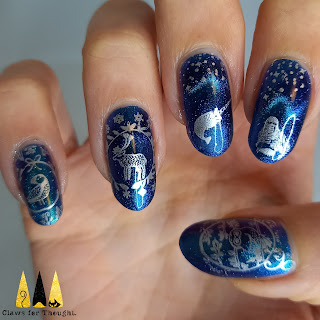
Hello space turtles! It's getting cold again here in the UK and I have some more frosty wintery nail art to share. This one is for the Arctic Animals Glam Nails Challenge prompt and I'm also trying out a new magnetic nail polish I got for Christmas - How Polarizing from KB Shimmer. I couldn't get as a strong a magnetic effect as I'd hoped for but its still a gorgeous polish and I can try again another time.

I started with two layers of the base polish (magnetising the top layer) before adding the images. I used Mo You London's Enchanted 05 stamping plate and silver magnetic polish to add images directly onto three of my nails. On the other two I used a dotting tool to remove the excess image from the stamper and just added the walrus and narwhal images directly onto my nails. I then added some stars from the same plate over the magnetic effect. Much as I'd have liked a stronger magnetic effect I do love these - they're very me!

Colours used: How Polarizing - KB Shimmer, Foil Effect in Silver - Barry M

Saturday, 1 October 2022

Dino Mountain Nights

Hey space turtles! I've had Mo You London's Jurassic Park 04 stamping plate sitting around for a while now and somehow haven't used it yet. Now is finally the time and I'm pleased to finally be creating dinosaur landscape nail art!

I started with a base of blue and then added the silver stars from Mo You London's Sci Fi 10 stamping plate. I then chose the base layer mountain image for each nail and added them in white to create a background for the purple polishes and stop them blending into the blue. I then added a later of light purple over the top, and a final mountain image on each nail in dark purple. I finally added a dinosaur in black to each nail and finished with a glossy topcoat. I'm enjoying the colour scheme of these, the landscape effect and the fact that there's a dino on each nail - so a winner all round!

Colours used: Aruba Blue - Essie, Foil Effect in Silver - Barry M, White Stamping Polish - Purple - Mark, Dark Purple - Mark, Black Stamping Polish - Dance Legend

Friday, 30 September 2022

Space Cat Adventures

Heyy space turtles! Some actual space themed nail art to share today, inspired by a weekend away in Nottingham to visit my Aunt and Uncle. We had a lovely time which included a trip to the National Space Centre and cuddles with their gorgeous cat, Lucy. I knew Mo You London's Sci-Fi 10 would be perfect as it has little cat silhouette's as well as space shapes.

I used silver metallic polish for all of the images which I stamped directly onto my nails. I felt it was missing something so added some colour to the rocket with a dotting tool. I thought it was a bit basic at first compared to the advanced stamping I often do but it's grown on me and I'm enjoying the colours, cats and 'take me away' vibe. I particularly like the cat and stars on my little finger nail.

Colours used: Aruba Blue - Essie, Rain On Me - Barry M

Wednesday, 29 June 2022

Return of the Space Turtles!

Hey space turtles! Perhaps that's how I should address people now? Sometimes I call you nail people but perhaps you are space turtles? A few years ago I was inspired by Kim Joy on the Great British Bake Off to try some space turtle themed nails (after one of her many adorable bakes). While I loved the theme they didn't come out that well, so when Turtle came up as a Glam Nails Challenge prompt I decided to give it a go again but with different techniques.

I started off with two coats of Emily de Molly's magnetic polish Seventh Seal, which I ADORE! It's so beautiful, it looks even better in real life. Once dry I layered up turtle images from Mo You London's Atlantis 02 stamping plate and Uber Chic's Just Beachy stamping plate. I started with white so the turtles would stand out against the darker background. I finished up with some little stars and moons from Mo You London's Atlantis 04 stamping plate in silver. I finished the look with a glossy top coat.

So I love these! I keep looking at them, especially in bright lighting where the base colour really shifts. I like them so much better than my previous attempt and it has many of the components I love in a nail look (blue, ocean themed, cute, space themed etc). Maybe there will be a third set of space turtles :)
Colours used: Seventh Seal - Emily de Molly, White Stamping Polish - Rainbow Connection, Key Lime - Barry M, Watermelon - Barry M, Black Stamping Polish - Dance Legend

Monday, 28 March 2022

Distinguished Fancy Pants Nails (Moustache Edition)

Hey hey! Or should I say how do you do? Fancied wearing Holo Taco's Mint Money again as it's my favourite from the metallic collection and I felt it needed some appreciation! I decided to pair it with some moustaches from a stamping plate I have had in my untried pile for absolutely ages. I went for a variety of moustaches but stuck with fairly classic styles to make sure it was clear what they were. Looking at it now I'm thinking I should have added some eyes!

Not much to say on how I created it as it was a pretty simple one! I started with two coats of Mint Money and once dry used Mo You London's Rebel 01 to add the moustaches with a squishy stamper. I finished the look with a quick dry top coat. I'm glad I finally used this stamping plate and am thinking of other ideas I could use it for - little googly eyes would be a good addition and I like the idea of adding moustaches to other images like little animals or a cactus. Had these on for my Dad's Birthday gin tasting tour so they have fond memories attached :)

Colours used: Mint Money - Holo Taco, Black Stamping Polish - Dance Legend

Sunday, 23 January 2022

Northern Polar Bear Lights!

Hi there! Another Glam Nails Challenge prompt today, this time it's polar bears. This cute little polar bear in a jumper image sprung to mind and I thought that would work well with a Northern Lights look. I was super excited to try out Cirque Colors Mood Ring for this look and I absolutely LOVE it! The shimmer and shift especially under bright lights is incredible! I didn't get quite as clean lines as I intended but I think it still works well.

I started with a layer of magnetic polish, followed by another which I used the magnet on to get the shifty effect. I then created a little polar bear decal on my Uber Mat, you can see how here. Whilst this dried I used star and moon images from Mo You London's Noel 06 stamping plate to create a night sky look. The polar bear is from their Noel 03 stamping plate. I finished the look with a glossy quick dry top coat.

So I love this one! I adore the base polish, and I think the simplicity of the look works well. It has depth from the magnetic polish and the little polar bear and stars make it a whole scene. I love Northern Lights things and cute things and wintery things - so this is a winner for me!

Colours used: Mood Ring - Cirque Colors, Foil Effects in Silver - Barry M, Black Stamping Polish - Dance Legend, Acai Smoothie - Barry M, Cream Soda - Barry M, Bronze Bae - Barry M

Wednesday, 23 June 2021

Stained Glass/ Sweetie Wrapper Nails

Hey everyone! Couldn't really decide what to call this one so I've gone for two things it kind of reminds me of. I'd had the idea of digging out my ILNP Spring 2018 metallic collection again to try a pattern, so when the latest Nail Addicts Collab theme was announced as patterns I had to give this one a go! I tried to create a pattern with the colours as I went across the nails with the colours too but it didn't entirely go to plan.

I started with a base of Soft Focus from Polished for Days. This is a good natural base and I wanted to have something there underneath the decals as I know I can't layer them up for opacity! For the decals I used Mo You London's Crystal 01 plate and the advanced stamping technique, you can see how here. I feel like planning the colours had an almost mathematical element to it which is probably why I struggled with it! Still, overall I'm happy with this look. You can't really see it in these pictures but it really sparkled in the sun!

Colours used: Hi-Fi, Blueprint, Fun House, Short Circuit, Checkmate, Sugar Coated - All ILNP, Black Stamping Polish - Dance Legend, Soft Focus - Polish for Days 

Wednesday, 26 May 2021

Constellations

Hey everyone! Going to keep this one short and sweet as I have a dreadful back ache and would like to get to bed! I fancied trying one more of the Glam Nails Challenge prompts for this month and settled on today's which is constellations. It was a bit of an experimental look for me!

I started with a base of metallic multi-chrome blue/purple, and then a layer of Fun Lacquer's magnetic polish Platinum Diamond (the regular version). I had a play around with different magnet shaped and got some pretty cool effects. Following this I used silver polish to add mountains (Mo You London Sailor 18 stamping plate) and stars (Kelli Marissa Bundle Monster plate). Finally I used white stamping polish to add the constellations over the top (also from the Kelli Marissa plate)

I have mixed feelings about this look. I think the thumbnail is pretty cool, but I wish I hadn't added stars on my little finger and index finger nails as they hide the magnetic effect and the constellations too. The colours are lovely though!

Colours used: Pixie Parade - Tonic Polish, Platinum Diamond - Fun Lacquer, Foil Effect in Silver - Barry M, White Stamping Polish - Rainbow Connection

Thursday, 18 February 2021

A puffin in the snow

Hey everyone! Multi-chrome winter vibes today with a lovely nail polish I got in my Christmas stocking, Pixie Parade from Tonic Polish. I actually did these before my Valentines nail art but wanted to share those first so they were appropriately timed. This base polish is gorgeous and so opaque, I'm super impressed with it! I was keen to try out my Noel 08 stamping plate from Mo You London too as it has gorgeous wintery images so decided to pair them together.

After starting with a base of two coats of Pixie Parade, I created decals on my Uber mat for the puffin and branch images (why does puffin and branch sound like a pub name to me?!) - you can see how here. While they were drying I added some other cute images from the plate to my thumb, index and little fingernails in silver. I also used Uber Chic's Basic Shapes 01 plate to add a couple of circles to my middle two nails. I did this as I thought the other images might not stand out well enough against the background, which in hindsight they did, but I'm still glad I added the silver circles as I think they give the look some more depth.

I really like these. The base colour is lovely and I love the Noel 08 stamping plate, it has so many cute wintery images, I particularly like the animal ones. Looking forward to seeing what else I can create with it!

Colours used: Pixie Parade - Tonic Polish, Foil Effect in Silver - Barry M, Black Stamping Polish - Dance Legend, Evergreen - Picture Polish, Red Hot Rio - OPI, Not From Concentrate - Nails Inc

Wednesday, 10 February 2021

Chroma Rose and Lace

Hi there! Getting closer to Valentines day so although hearts and such aren't really my thing I will be doing some vaguely Valentines themed nail art. The first and perhaps the vaguest are these lacey nails. Lace often has romantic connotations and I was planning on trying this look out already so I may as well try and pass it off as Valentines! I am entering it into the Holo Taco Valentines competition even though I'm not using their polishes (which is daft as I do have some - but was just really feeling this shade for this look!). Their shade Cat's Evasion is pretty similar though so could be used instead.

I started the look with one coat of sheer black on all nails except my ring fingernail where I added Chroma Rose from Cirque Colors. I then used my Fashionista 18 stamping plate from Mo You London to add a lace pattern over the sheer black. I chose the images at random and most worked well. Once stamped I painted a section of most other nails with Chroma rose as well, leaving only my index finger. Once Chroma Rose was dry I used a small nail art brush and black nail polish to paint an outline around each of the lace parts of my nails.

Overall I have mixed feelings about these. Sometimes I look at them and love them, and other times they don't look particularly exciting as the detail doesn't show up that well in dull lighting, especially on my middle finger. Chroma Rose is such a gorgeous polish and I do like the style of these, they're quite grown up for me! I think the same look with glitter instead of multi-chrome would work well too. I do have one other look from a while back which would be so perfect for this competition but my pictures are so bad that I think I'll just stick with this one!

Colours used: Chroma Rose - Cirque Colors, Coal - Fancy Gloss, Black Stamping Polish - Dance Legend, Lady In Black - OPI

Thursday, 14 January 2021

Very Frosty Frosted Metals

Hey everyone! Back with some Holo Taco polishes to share with you today. I was lucky enough to be given the Holo Taco Frosted Metals collection for Christmas by my partner, and had great fun taking pictures of all their shinyness and of course trying them out on my nails! I decided to start with a skittle mani look so I could try them all at once and was impressed with just how sparkly they are. It's hard to photograph the effect properly but I don't have many metallics quite like them. I thought Fake Date (the pink one) in particular was super sparkly!

After I'd painted two coats of each polish on my nails, I used Mo You London's Festive 02 stamping plate and some white stamping polish to add a selection of snowflakes to my nails. They images come out lovely and clear and crisp, I'm really pleased with them. I finished with a glossy top coat and then had fun taking pictures! Unfortunately most of my pictures were quite blurry in the end, these ones were the best of the lot!

Colours used: Fake Date - Holo Taco, Cold Shoulder - Holo Taco, Mint Money - Holo Taco, Gift Receipt - Holo Taco, Cheap Champagne - Holo Taco, White Stamping Polish - Holo Taco