Showing posts with label Essie. Show all posts

Saturday, 1 October 2022

Dino Mountain Nights

Hey space turtles! I've had Mo You London's Jurassic Park 04 stamping plate sitting around for a while now and somehow haven't used it yet. Now is finally the time and I'm pleased to finally be creating dinosaur landscape nail art!

I started with a base of blue and then added the silver stars from Mo You London's Sci Fi 10 stamping plate. I then chose the base layer mountain image for each nail and added them in white to create a background for the purple polishes and stop them blending into the blue. I then added a later of light purple over the top, and a final mountain image on each nail in dark purple. I finally added a dinosaur in black to each nail and finished with a glossy topcoat. I'm enjoying the colour scheme of these, the landscape effect and the fact that there's a dino on each nail - so a winner all round!

Colours used: Aruba Blue - Essie, Foil Effect in Silver - Barry M, White Stamping Polish - Purple - Mark, Dark Purple - Mark, Black Stamping Polish - Dance Legend

Friday, 30 September 2022

Space Cat Adventures

Heyy space turtles! Some actual space themed nail art to share today, inspired by a weekend away in Nottingham to visit my Aunt and Uncle. We had a lovely time which included a trip to the National Space Centre and cuddles with their gorgeous cat, Lucy. I knew Mo You London's Sci-Fi 10 would be perfect as it has little cat silhouette's as well as space shapes.

I used silver metallic polish for all of the images which I stamped directly onto my nails. I felt it was missing something so added some colour to the rocket with a dotting tool. I thought it was a bit basic at first compared to the advanced stamping I often do but it's grown on me and I'm enjoying the colours, cats and 'take me away' vibe. I particularly like the cat and stars on my little finger nail.

Colours used: Aruba Blue - Essie, Rain On Me - Barry M

Tuesday, 23 August 2022

Trees in the Mist

Hello space turtles! Today's nail art is inspired by my view when I was swimming in the lake near me on a cloudy day. I absolutely love wild swimming and while it's wonderful on sunny days I also enjoyed the view of all the trees in the mist. I've also added birds as we're sometimes joined by birds on the lake.

I started with a couple of layers of sheer white and then added the back row of trees from Mo You London's Noel 16 plate in green. I then added another layer of sheer white followed by some more trees at the front. Once dry I added clouds followed by birds and then a glossy top coat to finish.

I really like the inspiration for this one but it didn't come out as well as I'd hoped. I think there isn't enough contrast between the trees and the base looks a bit dull (although maybe it should since it's mist!). I think I would have benefited from a tinted base coat and maybe more layers of sheer polish between the trees and over the clouds, with the birds added at the end. Great stamping plate though so I look forward to using it again.

Colours used: Allure - Essie, Forrest Green - Mo You London, White Stamping Polish - Rainbow Connection, Black Stamping Polish - Dance Legend

Saturday, 25 June 2022

Ladies on my Nails

Hey everyone! Sharing some nail art from a few weeks ago I hadn't posted yet because of all the Glam Nails Challenge stuff. I'm feeling a bit meh as I was meant to be at a comedy gig tonight with my sister but we couldn't go because of the train strikes. We could get there but not back and we didn't fancy being stranded in London! I did enjoy some relaxing in the garden with a book though and got some gardening done.

For this look I started with a base of pale blue (colours listed below pictures) and then added a stroke of slightly darker blue on each nail. Once dry I used a brighter blue to add images from Mo You London's Le Musee 04 stamping plate. It's got some gorgeous abstract images. Next I added some gold flakes from an old topper I have and finished with a glossy topcoat.

Really pleased with how these came out. I love the blue images and they are so crisp! It was so simple to do but worked well.

Colours used: Borrowed & Blue - Essie, Blueberry - Barry M, Cobalt - Barry M, Treasure Chest - Barry M

Wednesday, 19 January 2022

Winter Wonderland

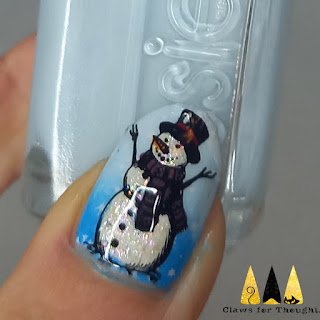
Trying SO hard not to end up with Christmas songs in my head again as I write this! Maybe it's not so bad... it is winter after all! Today's Glam Nails Challenge prompt is winter wonderland, which I think can be interpreted in many ways. I went for a snowy village with deer wandering around and a big friendly snowman!

I started with a base of pale blue and while this was drying I used my Uber Mat to make decals (see how here) for all but my little fingernail. I used Mo You London's Noel 01 plate for all images except the deer on my little finger and the white snowflakes, these were both from their Noel 06 stamping plate. For the snow on the decals I used a shimmery topper and white polish. Sadly you can't really see it very well in the pictures but it's lovely under bright lights! On my thumb and little fingernails I added a blue gradient followed by white snowflakes, before applying the deer and snowman images.

I like these as I adore the cosy house images and wintery scenes in general. I wonder if it needed a little more colour though. Alternatively it has made me think it would be good to try as a fully monochrome or greyscale look!

Colours used: Borrowed & Blue - Essie, Black Stamping Polish - Dance Legend, White Stamping Polish - Rainbow Connection, Good Vibes Only - Nails Inc, Cappuccino - Barry M, Red Hot Rio - OPI, Cyan - Barry M

Friday, 10 December 2021

Santa is on the loose!

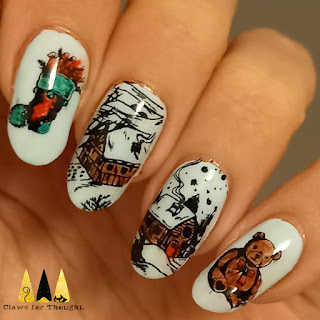
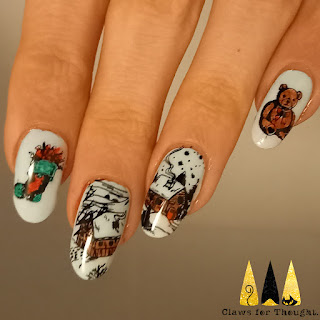
It's beginning to look a lot like... CHRISTMAS! OK so maybe it's past beginning to look like it, we're in full swing Christmas! This look is one of this months Glam Nails Challenge prompts which is Santa Claus. I decided to use Mo You London's Noel 01 stamping plate to create this look depicting Santa delivering presents. I just couldn't resist those adorable little house images!

I started with a base of pale blue, then used black stamping polish to add the festive images. I added a quick dry top coat to protect the images and once dry I used sharpies to colour them in. I wasn't sure how it would look but I actually really like the pale blue effect for the snowy scenes! Unfortunately I messed up the Santa stamp a little and then smudged it which is not ideal, but I do rather like the rest! I did also have some issues with my ring light, leading to these images being a bit yellow!

Colours used: Borrowed & Blue - Essie, Black Stamping Polish - Dance Legend, Various Sharpies

Friday, 29 January 2021

Snowflakes upon snowflakes!

Hello world! Even more winter nail art to share today. I was given a snowflake stamping plate (Mo You London Festive 02) around Christmas time and have used it so much! I love that it has lots of individual snowflakes so you can easily mix and match them, I've been planning a look like this for ages as I loved my sheer Halloween nails and thought I could make a winter version with white instead of black.

I started with two coats of sheer white polish (colours listed below pictures) and then stamped a snowflake onto each nail in white. I then added another snowflake, followed by another layer of sheer white and repeated the steps a few more times. On my ring fingernail I added a couple of different silver glitters as an accent nail. Once dry I used a small nail art brush to add an outline ion the snowflake nails. I was tempted to do this in white but thought these metallic shades would give it a little something extra!

Overall I am quite happy with these, though I definitely don't love them as much as my sheer Halloween nail art, that was a triumph if I do say so myself! :D

Colours used: Allure - Essie, White Stamping Polish - Rainbow Connection, Cosmic Girl - Danglefoot Polish, Diamond Dust - Barry M, Copper Mine - Barry M, Gold Digger - Barry M, Bronze Bae - Barry M, Silver Lining  - Barry M

Saturday, 2 January 2021

Snowy Snow-globe Nails

Hello again! I have some more wintery nail art to share today. This one is actually from between Christmas and New Year, but I got a bit behind and wanted to post my New Year nail art on the last couple of days, so just getting round to it now! I was inspired by a nail tech/artist on Instagram with the account name The Beauty Room by Sarah. She did some absolutely stunning snow globe nail art which I knew I couldn't recreate but thought I'd try and create the same theme with the tools I have available! I'd totally recommend checking hers out they are beautifully done! Mine bear no resemblance at all to be honest, but the theme is the same!

I started with a base of metallic blue (colours listed below the pictures) and then added snowflakes from Mo You London's Festive 02 plate with white stamping polish. For my ring fingernail I created a snow-globe decal using an image from the Uber Chic Happy Christmas (Christmas 04) plate. After applying all the nail art and a matte top coat to my nails I stuck on some gems while the top coat was still wet. I then added another layer of matte top coat to seal them in, and a little blob of glossy top coat on top of each gem to bring the shine back! I also added a couple of layers of glossy top coat over the snow globe to make it look more glass like. It didn't have as strong of an effect as I would have liked, but was a nice touch all the same.

Overall I have mixed feelings. I know they were never going to be like Sarah's ones, but I thought I'd like them a bit more than I did. I think I'd have really liked them if I'd managed to get them a bit neater, not smudged the snowflakes on the thumb with the top coat (my matte top coat is awful for that!) and if the polish had come out a bit better. I'm blaming my matte top coat, definitely need a new one, it's just not quite matte enough and very smudgy!

Colours used: Aruba Blue - Essie, White Stamping Polish - Rainbow Connection, Gold Digger - Barry M, Say Love - ILNP, Cream Soda - Barry M

Sunday, 15 November 2020

Stamping Sunday: Hygge Nails

Hello and happy Sunday! Todays nail art is the last from my birthday nail art poll on Instagram (came joint third with the liquid crystal look from my last post). The theme is hygge, which is what I'd wanted to theme my 30th birthday celebrations around if I could have had a party. According to Google Hygge is a Danish and Norwegian word for a mood of comfort and coziness with feelings of wellbeing and contentment. I'm sure you can see the appeal but it helps that I really love visiting Norway too (such a shame we won't be able to go this year!). Mo You London brought out a hygge themed plate as part of the autumn collection this year (Fall In Love 08) so there will definitely be more of this theme from me!

I started with a base of pale blue (colours listed below the pictures) and then created decals using my Uber Mat for the middle finger, index finger and thumbnails, you can see how here. On my middle and little fingers I used white stamping polish to apply the cosy jumper and speckled images (the speckles don't show up that well but they're on my middle finger - looking forward to trying some other colour variations for that one!). I then added some wording over the top, unfortunately I smudged the words on my middle finger a bit with my matte top coat, it's not a great one! 

Overall I quite like these, I like the cosy vibe (see the picture with my dressing gown!) and the theme, I do think I could do better hygge nails though, they need a bit of glitter to bring me true feelings of contentment! :D I also think the mushrooms on my thumb could have been better, the two colours I used look too similar to each other.

Colours used: Borrowed & Blue - Essie, White Stamping Polish - Rainbow Connection, Indigo - Barry M, Soft Focus - ILNP, Oyster - Barry M, Seven Dials - Nails Inc

Friday, 9 October 2020

Whale On The Nail

Hello and Happy Friday! Bit of a backlog blog post today as I was waiting to post this once the collaboration post had gone up on Instagram. I did these as part of the Nail Addicts Collab on Instagram, where a theme is posted each month, and the pictures are shared together in a collage. This time the theme was the elements: earth, wind fire and water. I went for water as I had this look in mind already, a friend had also suggested I do humpback whale nails, so here they are!

I started with a base of pale blue (colours listed below the pictures) and some sheer shimmer over the top. I then used blue nail polish and the Sailor 18 stamping plate from Mo You London to add some water ripples, a seahorse and a humpback whale. I added some waves first on my middle two nails using white stamping polish to add some depth. I was so impressed with how well the blue nail polish stamped. It's just a regular shade from Barry M but it stood out well and the lines came out really crisp, even the finer details. I also noticed that I ended up using almost all high street brands for a change!

These were pretty easy to do and I'm really pleased with how they came out :) I love the colours and I'm so pleased with how the seahorse and humpback whale came out. Back to more Halloween nails next!

Colours used: Borrowed & Blue - Essie, Cobalt - Barry M, Butterflyfish - Barry M, White Stamping Polish - Rainbow Connection

Monday, 30 December 2019

Traditional Christmas Stamping

Hello all, one more Christmas nail art to share before we're in the new year! To me this look is a bit more classic and not as overtly Christmassy as some of my other looks, I was inspired by someone I saw on a Facebook nail group who did lovely navy and gold nails with a gold accent, and am really pleased that I tried out some more of the classic looking images on my Mo You London Noel 01 stamping plate.

Simplicity was the key to this look, though it still took a little while waiting for all the layers to dry! I started with a base of Bobbing for Baubles by Essie, it needed a bit of a shake and was darker than I remembered but I'm pleased with it, I was going for a sort of muted navy look. On my accent nail I used a gold base and then sponged on some gold glitter, it's a pretty old one so stank the room out a bit - I dread to think what chemicals are in there, definitely not 3-free!

On the navy blue I used gold metallic nail polish to stamp some images from the Noel 01 plate, and a matte topcoat over the top. They are quite traditional looking and I'm really pleased I tried them out without colouring them in as they are quite detailed and I think that really shines through in gold over navy. It's a shame the bottom right picture didn't come out very well but the thumbs were my favourite, I love how the snowman is a perfect fir for my thumb nail!
Colours used: Bobbing for Baubles - Essie, Gold Digger - Barry M, Foil Effect in Gold - Barry M, Gold Glitter - Barry M

Tuesday, 15 December 2015

Winter Forest

Good evening! Todays post is a design from the run up to Christmas last year that I remember fondly. Though there were a few steps to get to the end result it wasn't too complicated and I'm pleased with the way it turned out. The design is copied from one I saw on Pinterest, which looks like it first came from didmmynails.com, you can see the original here.

After starting with Barry M's Cyan blue as a base I sponged on some cobalt blue at the top to represent the night sky. The snow at the bottom was super easy as it was like doing a really wonky French manicure! The trees were painted in a dark green (Essie's Stylenomics), and then a metallic green over the top to make them look a little more three dimensional, and the snowfall was created using dotting tools.

As you can see the trees on the two nails on the right look a little paler. This is because I tried adding snow to them like the original picture, but it didn't really work so I blanked it out! Shh!


Colours used: Cyan - Barry M, Baker Street - Nails Inc, Matt White - Barry M, Stylenomics - Essie, Emerald Green - Barry M

Thursday, 3 December 2015

Throwback Thursday: Subtle Christmas Tree

Hello! I have had a terrible day at work so it's so nice to be sat here peacefully blogging! The bad days are almost worth it for the wonderful feeling of going home! Tonight is my first properly Christmas post, though I admit it's pretty subtle. I think it's a good one for work as it's not too out there.

Not sure how easy it is to tell because it's an old picture but the base colour is actually a super dark green. The modern Christmas tree outline was done with a dotting tool. I also used some thin nail tape to make sure the edges were neatly triangular. On top is a little decorative star which I got in a pack from eBay. I stick these on to my nails with a bit of clear polish, as I find it's actually surprisingly adhesive. Also much easier to remove that way! TTFN!


Colours used: Stylenomics - Essie, Gold - Limited Collection at M&S, Gold Star - eBay

Friday, 23 October 2015

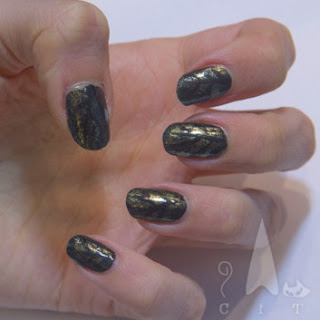
Spooky Branches

It's about time I got some halloween nails up on the blog! These are only subtly halloween themed as they are from a week ago and I didn't want to look too keen. Starting to regret that approach now thought as I don't have long left to rock the halloween look! Will have to start earlier next year.

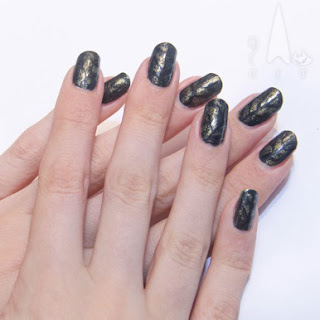
The look I went for below is based on a spooky/ mysterious forest. OooOOoooh! I started with Essie's Stylenomics which is a super dark green. I then lightly sponged on Tophsop's Hidden Treasure with some cling film/saran wrap (bottom left). Of all the shades of gold this one was perfect as it's quite dark and two tone with a hint of green. For the trees/ branches I used a thin brush and gently painted them on in black. I like the way it turned out. Subtle, but still a little spooky. They were super hard to photograph!

Colours Used: Stylenomics - Essie, Hidden Treasure - Topshop, Lady In Black - OPI