Showing posts with label Shimmer. Show all posts

Wednesday, 19 January 2022

Winter Wonderland

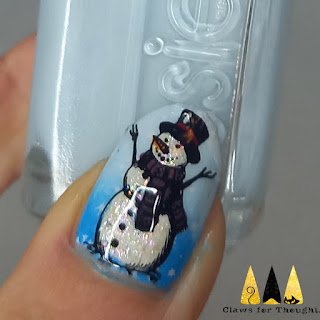
Trying SO hard not to end up with Christmas songs in my head again as I write this! Maybe it's not so bad... it is winter after all! Today's Glam Nails Challenge prompt is winter wonderland, which I think can be interpreted in many ways. I went for a snowy village with deer wandering around and a big friendly snowman!

I started with a base of pale blue and while this was drying I used my Uber Mat to make decals (see how here) for all but my little fingernail. I used Mo You London's Noel 01 plate for all images except the deer on my little finger and the white snowflakes, these were both from their Noel 06 stamping plate. For the snow on the decals I used a shimmery topper and white polish. Sadly you can't really see it very well in the pictures but it's lovely under bright lights! On my thumb and little fingernails I added a blue gradient followed by white snowflakes, before applying the deer and snowman images.

I like these as I adore the cosy house images and wintery scenes in general. I wonder if it needed a little more colour though. Alternatively it has made me think it would be good to try as a fully monochrome or greyscale look!

Colours used: Borrowed & Blue - Essie, Black Stamping Polish - Dance Legend, White Stamping Polish - Rainbow Connection, Good Vibes Only - Nails Inc, Cappuccino - Barry M, Red Hot Rio - OPI, Cyan - Barry M

Sunday, 4 October 2020

Fruit Salad On My Nails

Hello all and Happy Sunday! It is very rainy today in the South of England, and has been all weekend, but I am OK with it as I'm finally getting those autumn vibes! Having said that it will seem a little strange that I'm now sharing some summery nail art, but this is one I've just taken off and wanted to squeeze in before I get onto the autumn looks. There will be Halloween nail art coming very soon!

So I have the Fruit Deco stamping plate from Maniology and I really love it, but have mostly used the whole nail images of lemons and watermelons so far so wanted to have a go with some more of the individual fruits. I was going to do this on a more neutral background but I had this lovely metallic peach on my untried list and wanted to get that in with the summer looks! It's called Peachy Feels and I bought it as my friend Charlotte brought it to my attention that I don't own a metallic peach nail polish, by mentioning that she would like a metallic peach nail polish!

So the technique for this one was pretty straightforward. All the images on the Fruit Deco plate are layerable, so I just stamped the colours on accordingly and then added the black outline. It is a little fiddly getting them lined up sometimes but for the most part it came out well! I've enjoyed wearing them, they remind me a bit of Ibiza!

Colours used: Peachy Feels - Barry M, Black Stamping Polish - Rainbow Connection, Yellow - Barry M, Key Lime - Barry M, Spring Green - Barry M, Pomegranate - Barry M

Tuesday, 31 March 2020

New Barry M Under the Sea

Just a quick one today to show a couple of new Barry M polishes I picked up a few weeks ago, before all the working from home and the subsequent lockdown! I think this was actually my last trip to any kind of shop besides a supermarket before all of that. I saw Barry M advertise these two new polishes on Instagram, so popped into Boots on my lunch break to pick them up. Annoyingly I missed that they were on 3 for 2, and the cashier didn't tell me either, so don't make the same mistake I did! I believe they are still on 3 for 2 now though of course you'd need to order them online.

SO, onto the polishes themselves, first up is Mermaid Tail, which is a gorgeous deep teal-ish metallic green. I have painted both of these colours over a pale pink, so it's pretty close to how they'd be over my natural nails. This one definitely builds up quicker and is less sheer than most of the other Under the Sea polishes, with only two to three coats needed.

The second polish is Underworld, a shimmery blue metallic. This one is more sheer like the other polishes in the collection, and I used four to five coats for the below look. You can of course use less coats and make it a shimmery topper over another colour. I like the formula for both of these and they have the now classic Barry M wide flat brush which in my opinion is perfect! Mermaid Tail is my favourite as it's such a strong colour, but I think they are a good pair, and would recommend :) Great names too!
Colours used: Mermaid Tail - Barry M, Underworld - Barry M

Monday, 4 February 2019

Rose Quartz Granite Nails

Hi everyone, aren't you glad January is over? I certainly am! We've had some snow here which has been good, but not so much that we couldn't get around. Having been to Norway it never seems as much now but I love how pretty it makes everything look!

So this nail art was a pretty simple one, strangely inspired by some walls I saw at a National Trust house. They were a kind of rose pink and white and reminded me of rose quartz. I'd been meaning to use my Mo You London Explorer 33 for some time so this was the perfect opportunity. I used two images from the plate and layered them up for the granite look. I'm pleased with the finished look and it was a fairly quick and easy one to do. I think it would be good for most times of year and is work friendly.
Colours used: Rose Quartz - Cirque Colors, White Stamping Polish - Emily de Molly, Foil Effect in Gold - Barry M

Tuesday, 27 November 2018

Barry M Rainbow Fish Disco

Hey everyone, long time no see! It's out busiest time of year at work so I'm struggling somewhat to fit nail polish and blogging in, This design is one from last week which I did keep on for just over a week, it lasted well but I persuaded myself to take it off in order to start swatching some new A England polishes.

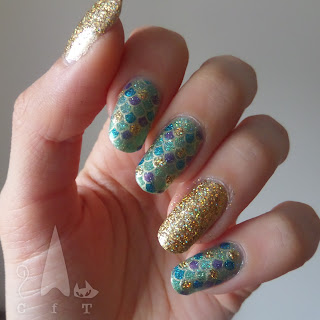
For this design I started with a metallic silver base (colours listed below the pictures) followed by a silver holographic polish. The holo was stronger and more pigmented than I expected so I possibly didn't need the metallic layer. On my index finger I topped up the holo, and on the others I prepared fish/mermaid scale decals.

I used the Bundle Monster twi_star collaboration plate for the scale image. It's a really handy one which I have used for a few designs. You can do a lot with it, and it's quite long so works for my nails at any length! I created decals on my Uber Mat using Barry M's newest additions to their underwater collection. I like the newer ones better than the first lot as they're brighter colours. I left a few scales blank for the holographic polish to shine through. You can see how I created the decals here.

So overall I really liked these, can't go wrong with fish/mermaid scales! The colours make me think of birthday parties.
Colours used: Silver Lining - Barry M, Harp On It - Color Club, Midnight Mischief - Painted Polish, Moonfish - Barry M, Seahorse - Barry M, Pacific Flame - Barry M, Electric Eel - Barry M

Friday, 21 April 2017

Mermaiding Around

Hi everyone, happy Friday! I certainly have that Friday feeling! Today I have some long awaited mermaid nail art to show you, from my new bundle monster & twi star collaboration stamping plate. To be honest it didn't really work as I'd expected, so I had to change the accent nails (see bottom two pictures). You can see my other bundle monster collaboration plate experiments here and here.

So I started with a couple of layers of Bermuda Breeze from ILNP on three of my nails on each hand, and a few layers of Flipper from Urban Outfitters on my thumb and accent nail. I completely forgot to start with a white base under flipper which set me off to a bad start! I used my Uber Mat to create decals for the mermaid scales. You can see my picture tutorial of how to do it here.

On the blue nails I used a water effect pattern and the put more sheer blue over the top. I made decals using gold polish and filled them in with some shimmer. This was a mistake however as the images just didn't show up well at all. It didn't help that I'd forgotten the white base. So I took the blue polish off and opted for a gold base smothered in gold holo glitter! I do really like the final look, and look forward to experimenting more with the stamping plate.
Colours used: Bermuda Breeze - ILNP, Foil Effect Gold - Barry M, Yours Truly - ILNP, High Tide - ILNP, Million Dollar Dream - Fun Lacquer. Gold Digger - Barry M, Flipper - Urban Outfitters

Wednesday, 29 March 2017

Blue Koi Pond

Hi everyone! Got something quite spring like to share today in light of the springy weather we've recently been having. I had a lovely relaxed evening doing these, and then wore them for a conference event at work which I enjoyed, so looking at them makes me feel positive, even though they didn't actually quite turn out how I expected!

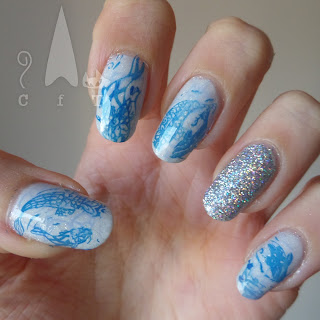
For some time I have been thinking of layering up some images from my koi stamping plate, but in the end I don't think it worked quite as well as I had in-visioned. I don't think that the initial paler blue stamping was very visible under the brighter blue fish. I used a shimmery pale base colour (colours listed below the pictures) which I thought worked well, it does need so many layers though!

I decided to add a bit of glitter as an accent nail, over a layer of off-white. I used Fun Lacquers 24 Karat Diamond for the first time and oh my goodness it is amazing! The pictures don't really capture it but it is such a perfect bright glitzy rainbow holo glitter! I have tried a few amazing holo's now, and this one is definitely the best silver, it really brings out the rainbows! The only downside of using this polish for this design is that it was so bright it was a bit distracting from the subtly of the other nails, I also kind of wanted it on all my nails! So if I do this design again I'll probably use a normal glitter or less intense holo.
Colours used: Lakodom - Picture Polish, Blueberry - Barry M, Cobalt - Barry M, Butterscotch - Barry M, 24 Karat Diamond - Fun Lacquer

Tuesday, 16 February 2016

Monthly Indie Review: A England

Time for this months indie nail polish review! I aim to post these around the 20th of the month, but on the 20th of this month I am moving, so won't have much time between building ikea furniture! So glad to finally post this as I actually bought and tried them a little while ago.

Today i'm reviewing Wuthering Heights and Spirit Of The Moors from A England. Both polishes are from the 'To Emily Bronte' collection which consists of five truly beautiful polishes. It was hard to choose just two, and I can see myself ending up with them all at some stage!

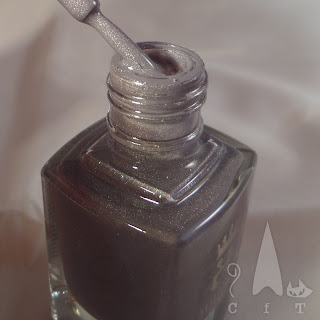
Left are the polishes in their lovely bottles. It's a classy bottle design and the glass is particularly shiny.


So on to the polish, first up is Wuthering Heights. I'm quite a fan of grey nail polish, and this one has a lovely twist of slightly holographic shimmer so had to give it a try. I'd describe it as a medium grey with lots of shine. the shimmer is subtle and catches the light nicely. Consistency is smooth and not too thick, two to three coats required.


Next up is Spirit Of The Moors, I knew this would be the favourite from the outset, and I was right! Bright cobalt type blues are my favourite colour so when I saw this shimmery one it was love at first sight! As with Wuthering Heights this one has a subtle holographic shimmer, it's slightly stronger in this one which might just be to do with the vibrancy of the colour. I don't know what more to say, a truly beautiful polish! It's like a more glam version of Barry M's denim effect.


So, did I like them? As you've probably gathered the answer is yes! I have already purchased three more (there was an offer, I couldn't help myself!), including one from the To Emily Bronte collection. I look forward to trying them and sharing the results.