Showing posts with label Picture Polish. Show all posts

Thursday, 8 December 2022

Winter Animals Feeling Festive

Hey space turtles! More Christmas nail art to share today, as will be the case for the next few weeks. I have too many ideas and not enough time! As I will be moving onto more classic Christmassy colours I wanted to do a lighter look before that. I love the cute little animals on Mo You London's Noel 09 plate so they are the focal point of this look.

I started with two coats of blue with gold shimmer, and then added some star, snowflake and plant images from the same stamping plate in silver. For the animal images I created decals on my Uber Mat which I then applied to my nails. I like how these turned out. They don't look massively Christmassy I don't think but they do feel festive and of course cute!

Colours used: Fool's Gold - Picture Polish, Black Stamping Polish - Dance Legend, Little Bo Peep - Rimmel, Red Hot Rio - OPI, Cream Soda - Barry M, Cappuccino - Barry M, Ruby - Barry M, Amethyst - Barry M, Foil Effect in Silver - Barry M

Wednesday, 16 November 2022

Night Swimming Nails

Today's nail art is inspired by a night swim I did not too long ago. It was actually a Halloween one so I could have done a more spooky design, but I liked the idea of doing an overall night swim look as it's such a cool experience!

I started with two layers of deep aquatic green (could have probably got away with one) while the decal for my thumbnail was drying on my Uber Mat. I then added some spotty patterns from Mo You London's Atlantis 04 to my middle two nails and the hand, star and moon nails on my other fingernails. For the mermaid silhouette's I stamped one directly onto my nail and for the other I made a decal - this is so that I could turn the images the way I wanted and make them face each other. The silhouette's are from Uber Chic's Mermaid Life 02 stamping plate and I used a dotting tool to add some sparkle. Finally I added the mermaid decal to my thumbnail (also from Atlantis 04).

In conclusion I like these but I wish the mermaids had shown up better. I added the lilac pattern as I thought the mermaid silhouette's would show up against them but that didn't end up being the case. Shame really as I love the way the index and little finger came out so the mermaids being clearer would have taken it from a look I like to a look I love!

Colours used: Aquatic - Picture Polish, Foil Effect in Lilac - Barry M, Foil Effect in Silver - Barry M, Black Stamping Polish - Dance Legend, Charlotte Street - Nails Inc, Cocoa - Barry M, Underworld - Barry M, Good Vibes Only - Nails Inc

Thursday, 23 June 2022

Deep Sea Fishies

Hey everyone! More Glam Nails Challenge sea themed nails today, this time the theme is Fish. I decided to do something similar to a design I did last year but tweak it a bit by using a slightly different base and some of the images (same plate) are different. I used Aquatic from Picture Polish which is a deep green. All images are from Mo You London's Atlantis 02 stamping plate.

I started with two coats of Atlantis which is gorgeously rich. Following that I chose my fish images and added the base layer of stamping for all of them in white so they'd stand out against the dark background. I then added the other colours one by one. I wasn't sure what colour to do the blue and white fish which I think was supposed to be blue and yellow, but settled on blue and white since I'd already done blue and yellow for the one next to it. I added wording to one side above the crab which I think works well.

Pleased with how these came out. I love the Atlantis stamping plates so much!!

Colours used: Aquatic - Picture Polish, White Stamping Polish - Rainbow Connection, Foil Effect in Silver - Barry M, Beach Hut - Models Own, Papaya - Barry M, Black Stamping Polish - Dance Legend, Yellow - Barry M, Indigo - Barry M, Cobalt - Barry M, Acai Smoothie - Barry M, Shoreditch - Nails Inc

Saturday, 2 April 2022

Accidentally Christmassy Nails

Hello and Merry Saturday! Today I have more Spring themed (in theory) nail art to share featuring another sheer polish from Picture Polish. Pine Bath is a gorgeous forest green sheer polish which is perfect for nail art. I decided to try it on it's own but with an accent nail. The plan was to pick a plant and make it a bit more Spring like, but it seems I've inadvertently chosen mistletoe!! I blame my post Covid brain... I'm not sure what I thought it was but I added peach coloured berries so I guess it's not quite mistletoe!

I started with a base of sheer nude polish (colours listed below pictures) and then three coats of green on all nails except the accent nail. On the accent nail I added a layer of pale pink and created a decal using my Uber Mat for the image. I chose this mistletoe (oops) from Mo You London's Botanical 13 stamping plate and used the same green polish for the leaves for a consistent look.

I did actually really like this despite accidentally doing Christmas nails! I love the shine on the green jelly polish and enjoyed the accent nail too.

Colours used: Soft Focus - Polished For Days, Pine Bath - Picture Polish, Strawberry Ice Cream - Barry M, Black Stamping Polish - Dance Legend, Papaya - Barry M

Wednesday, 30 March 2022

Spiced Wine In Spring

Hello World! I am currently recovering from Covid and as a result have been ordering quite a lot of nail polish! In fairness the first order was before I came down with it, but I've since ordered more! I've had my eye on a couple of lovely sheer polishes from Picture Polish for a while but was waiting for something else to come back in stock to order them. As a result they are a bit out of season now as they're quite wintery colours but I wanted to give them a Spring twist, which is what my next two nail art looks will be attempting.

I started with a base of sheer nude polish, followed by two coats of Spiced Wine on most nails and a coat of pale pink on the ring fingernail. While this dried I created a decal on my Uber Mat, you can see how here. The image is from Mo You London's Botanical 13 stamping plate which I hadn't used yet. I tried to choose colours in keeping with it's sort of vintage look though they're a little bright.

I like these, I like that shiny squishy effect of the sheer polish and look forward to creating some layered looks with it too.

Colours used: Soft Focus - Polished For Days Spiced Wine - Picture Polish, Strawberry Ice Cream - Barry M, Black Stamping Polish - Dance Legend, Yellow - Barry M, Key Lime - Barry M, Papaya - Barry M, Angelfish - Barry M

Saturday, 15 January 2022

Fool's penguin!

Hello nail people! Some more winter nail art to share with you today. This is a delayed one for Wednesday's Glam Nails Challenge prompt which was penguins. The base colour is one that's been on my radar for a long time and received for Christmas, so am enjoying trying it out. Penguins are such a classic and cute winter nail art theme which I have a few stamping plate options for, so I did go back and forth s bit on what to do.

I started with a blue shimmery base and then added white snowflakes from Mo You London's Festive 02 stamping plate. Next I used their Noel 11 plate for the penguins. No decals required here, just a variety of shapes to layer up to create the penguins. I didn't add all of them as I thought adding the little hats and things would make it a bit too Christmassy. They look like cute tubby little penguins I think! I did realise once I got the second plate out that it also has snowflakes so I could have used those, but never mind.

I'm pleased with these, I like the fun base colour and what's not to like about penguin nails?! Only thing I'd change is maybe adding more to the scarf so you can tell that's what it is. Oh and the strange title of this post is from the nail polish name - as you may have guessed from the pictures!

Colours used: Fool's Gold - Picture Polish, Grey - Barry M, Watermelon - Barry M, Plum - Barry M, Black Stamping Polish - Dance Legend, White Stamping Polish - Rainbow Connection, Beach Hut - Models Own

Tuesday, 24 November 2020

West of Scotland Holiday Tribute Nails

Hello nail people! Today I'm excited to show you some holiday tribute nail art from our trip to the West Coast of Scotland earlier this year. I love to do nail art themed after lovely holidays after we've got back to continue the magic! Our Scotland trip was in August so it has taken me a while to get round to this one! While I was there some new Picture Polish nail polishes came out and I was very tempted to buy them so when I finally decided on these shades after we got back I thought they'd be super appropriate for this nail art. I decided to do a different colour theme for each hand to represent the land and sea parts of the trip.

On my left hand I wanted to capture the views when we walked from the house we stayed in. There were some pretty stunning views from the windows too! We could see a loch, hills and trees, and walking down the road there was a bit where the loch opened out and there were stunning views with the Isle of Bute in the distance, and a few people out on sailing boats enjoying the gorgeous scenery. On my thumb nail I layered up trees from the Mo You London Noel 06 stamping plate. On my middle two nails I used the advanced stamping technique to add the sailing boat and mountain scenes using their Sailor 18 and 01 plates. The block colour nails are in Evergreen from Picture Polish, I've listed all the colours at the bottom of the whole blog post. Unfortunately whatever I tried I couldn't capture the true green shade of this one, it kept coming out teal, but it's more of a forest green in real life!

On my right hand I captured the more watery elements of our trip! Every beach we went to we saw jellyfish washed up! They varied in size and were certainly not blue and sparkly as I've depicted here! They were brown or reddish brown. We also saw seals! We went to a beach where we knew we could walk to a viewing point, but then one popped up when we were swimming, it was amazing! They are such lovely creatures. On this hand I used Maldives from Picture Polish on my index and little finger nails. On my ring finger I used a water image from Mo You London's Sailor 18 plate. For the other two I used the advanced stamping plate with Animal 04 on my middle finger and Bundle Monsters 504 plate on my thumb nail.
Colours used - left hand: Evergreen - Picture Polish, Floral Street - Nails Inc, Black Stamping Polish - Rainbow Connection, Maldives - Picture Polish, Tickled Taupe - Painted Polish, Taupe Temptation - Picture Polish, Key Lime - Barry M, Spring Green - Barry M
Colours used - right hand: Maldives - Picture Polish, Floral Street - Nails Inc, Black Stamping Polish - Rainbow Connection, Indigo - Barry M, Grey - Barry M

Friday, 11 October 2019

New York to London Nails

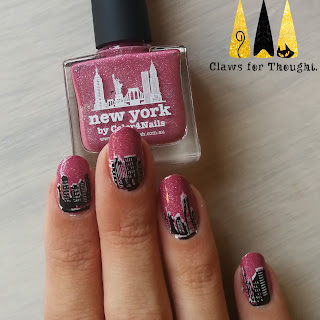
Hello nail people! I have been so behind with my blogging since our holiday, and am hoping to catch up a bit this weekend. This nail art is the first I did after getting back from the US. We flew back from New York so I decided to do a New York to London themed look, with Picture Polishes London and New York shades. I also used the Clairestelle8 plate from Maniology for the first time. It was one of those things I was so keen to get my hands on but then didn't end up using for ages! I look forward to trying some of the other images.

Anyhoo, this look was straightforward to achieve. I painted grey on one hand and pink on the other. Then for the skyline images I used white stamping polish to do London over the grey and New York over the pink. I then followed up with the black stamping polish, placed slightly lower than the white so that it shows through a bit behind and makes it look a bit more 3D. I was pleased with the final look and enjoyed wearing these lovely polishes again.
Colours used: London - Picture Polish, New York - Picture Polish, White Stamping Polish - Rainbow Connection, Black Stamping Polish - Rainbow Connection

Thursday, 28 June 2018

Sharpie Flutterby Nails!

Hello everyone - hope you're enjoying some sunshine! I still so behind with nail things, this one feels like it was ages ago! Still working through my untried polishes and this is my first use of Kitty, a sparkly blue polish from Picture Polish. I saw a design on Instagram with some butterflies alongside blue nails and thought I'd give it a go myself.

On my middle fingers I used butterfly wing images from Mo You London's Kitty 12 plate which I covered over with a clear top coat and then coloured in with sharpies. Initially I tried the usual approach of mixing with some nail polish remover on foil, and then painting it on with a brush, but I found that some of the colours I chose were a bit pale for that. Turns out colouring directly onto the nails with sharpie works well too! There were some lines visible but taking a tiny bit of polish remover on a brush I could gently smooth those out.

Once all dry I covered the butterfly designs again with a clear top coat to seal the image in and stop the sharpie parts rubbing away. Overall I like this design, especially the colours, though I possible wish the images were a little bigger/longer.
Colours used: Kitty - Picture Polish, Floral Street - Nails Inc, Midnight Mischief - Painted Polish, Assorted Sharpies

Saturday, 21 April 2018

Sparkling succulents

Hey everyone, happy Saturday! Today I'm excited to bring to you some of my favourite nail art for some time. I'm trying to get through a list of untried nail polishes (which is proving to be great fun!) and thought it would be a good opportunity to try sparkly cactus nails, especially as I had an untried succulents plate as well. You can see the full list of colours used below the pictures.

I used the Hipster 16 (untried) and 18 plates from Mo You London to make nail decals on my Uber Mat. You can see how here. As the images on plate 16 are a little short for my long nails I added a bit of colour at the bottom of the pattern on my ring finger. It's a backup solution but I really like the look. I particularly like that pattern as well, I think it's meant to be like the pattern of little glass panes in a terrarium.

I haven't quite managed to capture it in these pictures but in the right lighting the cacti are so lovely and sparkly  with little shimmering flakies, and the pots are super shiny too. This nail art is just so meee!!
Colours used:  Moscow - Picture Polish,  Floral Street - Nails Inc,  Midnight Mischief - Painted Polish by Lexi,  Someday - ILNP, Checkmate - ILNP 

Monday, 5 March 2018

A Nail Art Ode To Snow!

Hello world! I'm in a super chirpy mood today as I have just ordered some more nail polish! My third order this month and it's only the 5th! Oops!! (I see a buying ban coming on) So I have a bit of a nail art back log, but want to show you my current nail art as it's themed around the recent weather. If you're reading this outside of the UK, you are probably aware that here in the UK we are not good at coming with extremes of whether, or even some snow! However we also get pretty excited about it :) So I just had to do one last winter mani, or 'ode to snow'!

I started with the lovely shimmery bluish grey London from Picture Polish (I adore the bottle for this!). It was my first time wearing this polish so I've included some pictures at the bottom of it in all it's glory. This nail art was a simple stamping design using Uber Chic's Lovely Leaves 01 plate. I chose the tree image and layered the falling leaves over the top. I love this image as it's so versatile, you can do designs for all seasons as it looks like snow if done in white!

I am off to Krakow with work for the rest of the week from tomorrow so I except this may be weather appropriate there too!
Colours used: London - Picture Polish, Cocoa - Barry M, White Knight - Mo You London