Showing posts with label Grey. Show all posts

Sunday, 14 May 2023

Seal Print!

Hey space turtles! Today's nail art is an unconventional animal print look. I absolutely adore seals and after another trip to the Cornish Seal Sanctuary was inspired by their lovely little flanks to try some seal print nails. I really wasn't sure how they would come out but am very pleased!

I started with a base of pale grey and then created a gradient with medium grey and pale grey over the top. I then chose the most seal like image from Uber Chic's Warm Blooded animal print stamping plate and applied it over the top in dark grey. Before pressing the stamper onto my nails I used a dotting tool to remove some of the spots so they were a bit less dense. I finished the look with a glossy top coat. I was tempted to try a matte top coat over the top but asked for advice and people thought shiny was better as seals are shiny when they're wet.

I really love this - I wasn't sure how well it would work but I don't think it could have gone that much better. Some people even guessed what animal they were right away! (I thought it might be hard to guess as seals don't have the most distinctive pattern). I would love to do this celebration of seals look again!

Colours used: White Horse Street - Nails Inc, Grey - Barry M, Dragster - Barry M

Saturday, 3 December 2022

Cosy Chrome Powder Nail Art

Hey space turtles! I was inspired by some nail art by two.peas.and.polish who used a matte background and added some leafy images in bronze. I don't have a bronze nail polish that stamps well so I decided to try out chrome powder nail art again. Previously I've tried it but the powder has stuck to the whole nail to some extent and not just the image.

I started with two layers of grey polish and then used black sticky stamping polish to add images from Mo You London's Fall In Love 08 stamping plate which I absolutely love for this time of year, and any time to be fair - it has some great images. I then used an eye shadow applicator to rub some gold chrome powder into my nails, and brushed of the excess with a soft brush. I was so pleased with how well it stuck to the images! I love the super shiny effect it gives and how being on a dark background made it a rich dark gold. It didn't last longer than a couple of days as I added no top coat but a great look for a night our or something like that where it doesn't need to last long.

Colours used: Grey - Barry M, Sticky Stamping Black - Dance Legend, Gold Chrome Powder

Sunday, 31 July 2022

Stamping Sundays: A Pirate's Life For Me

Hey space turtles! I formulated todays nail art in my mind a good few days before I did it which is unusual for me at the moment, I've got out of the habit. It's for the final Glam Nails Challenge theme for July 2022 which is Pirates. I dug out an old pale grey polish I love for the base but didn't notice till I added the pictures how bubbly it's gone! I was particularly excited to try the ship and wave on my thumbnail.

I started with two coats of pale grey on all nails, and while they dried I created decals on my Uber Mat using Uber Chic's Mermaid Life 02 stamping plate. I then used my new Kads 011 stamping plate to layer up some wave designs on my thumb and ring finger nails. The base blue I used didn't stand out that well against the grey but I still like the look. I added the decals over the top and then used a nail art brush to carefully add a gold outline. Pirates do love gold so I hear!

I'm pleased with how these came out. The thumb nail doesn't look quite as spectacular as I'd envisioned but it still looks pretty good I reckon and I can always try again. They do look like they're in a spot of peril!

Colours used: Little Bo Peep - Rimmel, Laguna - Barry M, Cyan - Barry M, White Stamping Polish 0 Rainbow Connection, Black Stamping Polish - Dance Legend, Oyster - Barry M, Cappuccino - Barry M, Ruby - Barry M, Emerald Green - Barry M, Gold Digger - Barry M, Cream Soda - Barry M, Dead Heat - Barry M 

Tuesday, 20 July 2021

Dun dun dun dun dun dun SHARK WEEK!

Hey all! So I'm aware I have just missed shark week but having seen lots of lovely shark themed nail art over the last week I couldn't resist adding some of my own. I was inspired by Happily Polished on Instagram to try this grey shark look. I've always gravitated towards doing shark nails on blue. Looking at it now it seems obvious to do grey shark nails but I hadn't thought of it and I like it!

I started with a base of grey on my index and little fingernails and silver on the rest. I then added a sprinkling of silver glitter over the grey nails. While this was drying I used a multi-shark image from Uber Chic's Just Beachy stamping plate to add a white shark pattern on my thumb and ring fingernails. I used the same plate to layer up a toothy shark image, and then used a dotting tool to add eyes. The contrast isn't strong but I'm glad it's enough to be visible.

In conclusion I rather like these, I'm glad I got the eye placement right and am enjoying the various elements of the look. Chomp chomp!

Colours used: Grey - Barry M, Diamond Glitter - Barry M, Silver Lining - Barry M, Black Stamping Polish - Dance Legend, White Stamping Polish - Rainbow Connection

Saturday, 8 February 2020

An Alpine View On My Nails

Hello everyone and happy Saturday! I hope you're enjoying your weekend. Something fairly simple to share with you today, and something that is for once still on my nails! Not too long ago I saw themermaidpolish on Instagram use this alpine image in dark blue over light blue and it looked sooo good! I had always thought of using it filled in with colour, and hadn't tried it out yet, but after seeing that I thought I'd give it a go with just the outline as well. The image is from the Bundle Monster clairestelle8 plate which I love.

I started with a base of Chateau by ILNP which was an untried polish for me, and I think the french name kind of fits with the alpine scenes too. It was a little darker than I expected but pretty. I then used white stamping polish to apply the image across my four finger nails on each hand, the image is well sized to fit four nails I think. For my thumbnail I used the snowflake image from Mo You London's Noel 06 plate which I've used a few times, it's a good one for combining with things.

I was pleased with the way it turned out though I don't think it's as expertly done as the ones by themermaidpolish. You do have to have a proper look to see that it's an alpine scene (and I have to keep my hands still!) but it's not necessarily a bad thing. It seems very fitting for all the ski holidays I'm seeing on Instagram at the moment! I love the look of the snow and the mountains and snuggness but I don't fancy taking to the slopes myself!
Colours used: Chateau - ILNP, White Stamping Polish - Rainbow Connection

Saturday, 3 August 2019

Snazzy Snake Print Nails!

Hi nail people! Hope you're having a good weekend. I am feeling nice and relaxed after a couple of days off, Thursday to be a bridesmaid at my bestie's wedding, and Friday to chill out and go for afternoon tea with a couple of friends. The nail art I'm sharing today is not from the wedding, I was in a lilac dress so this wouldn't have gone with it! It's from a week or so ago and was my first use of the new Uber Chic Wild Luxury/ Cold Blooded stamping plate. I was inspired by an umbrella I had a few years ago and was quite fond of. It had a grey snake print pattern and a neon yellow round handle.

I started of with a base of pale grey (colours listed below the pictures), then chose a couple of images from the Wild Luxury plate, and stamped them onto my nails in grey. Using the same images and black stamping polish I applied the images again, slightly above or below the grey pattern, to give it some more depth. For the neon triangles I used my Mo You London Holy Shapes 03 plate. I took one of the images and each time I stamped it I removed any of the lines around the triangle shape from the stamper with a dotting tool, before adding them to my nails. As there was a dark background, I stamped it in white stamping polish first, then the neon yellow afterwards. Finally I finished it off with a matte top coat

I was pretty pleased with how these turned out though they were a bit messy on my left hand, so if I do it again I'll try and neaten up the images a bit before stamping. I have some more ideas in my mind to try with the Wild Luxury stamping plate so hopefully will be sharing those soon. Thanks for reading!
Colours used: White Hose Street - Nails Inc, Grey - Barry M, Midnight Mischief - Painted Polish, White Stamping Polish - Emily de Molly, Daisy - Cirque Colors

Tuesday, 13 March 2018

Magical Mystical Symbolic Rune Thingy Nails!

Hello nail people! I've been away the last week with work, and then busy over the weekend so I have a bit of a backlog of nail stuff to try and get to this week. This one is from a few weeks back, using a new stamping plate I got just before Christmas. I had been planning this nail art  for ages so it was good to finally give it a go.

I started with a pale grey base, and then used clingfilm (saran wrap) to splodge some medium grey over the top for a mottled effect. Meanwhile, I created decals on my Uber Mat and coloured them in with a dotting tool. You can see how I did that here. I covered the design using a matte top coat, and then went over the pattern part again with a clear top coat to bring back the intense shine on the coloured sections. Not sure how well that shows in the pictures, but it was good in person! 

I'm pleased with how these turned out, and looking forward to using the Mo You London Minimal 07 plate again, although it might be a while as I have a few untried plates!
Colours used: White Horse Street - Nails Inc, Grey - Barry M, Midnight Mischief - Painted Polish, Estate - Cirque Colors, Who Needs Love - Colors by Llarowe,  My Car Has Navy-gation

Monday, 5 March 2018

A Nail Art Ode To Snow!

Hello world! I'm in a super chirpy mood today as I have just ordered some more nail polish! My third order this month and it's only the 5th! Oops!! (I see a buying ban coming on) So I have a bit of a nail art back log, but want to show you my current nail art as it's themed around the recent weather. If you're reading this outside of the UK, you are probably aware that here in the UK we are not good at coming with extremes of whether, or even some snow! However we also get pretty excited about it :) So I just had to do one last winter mani, or 'ode to snow'!

I started with the lovely shimmery bluish grey London from Picture Polish (I adore the bottle for this!). It was my first time wearing this polish so I've included some pictures at the bottom of it in all it's glory. This nail art was a simple stamping design using Uber Chic's Lovely Leaves 01 plate. I chose the tree image and layered the falling leaves over the top. I love this image as it's so versatile, you can do designs for all seasons as it looks like snow if done in white!

I am off to Krakow with work for the rest of the week from tomorrow so I except this may be weather appropriate there too!
Colours used: London - Picture Polish, Cocoa - Barry M, White Knight - Mo You London

Tuesday, 16 February 2016

Monthly Indie Review: A England

Time for this months indie nail polish review! I aim to post these around the 20th of the month, but on the 20th of this month I am moving, so won't have much time between building ikea furniture! So glad to finally post this as I actually bought and tried them a little while ago.

Today i'm reviewing Wuthering Heights and Spirit Of The Moors from A England. Both polishes are from the 'To Emily Bronte' collection which consists of five truly beautiful polishes. It was hard to choose just two, and I can see myself ending up with them all at some stage!

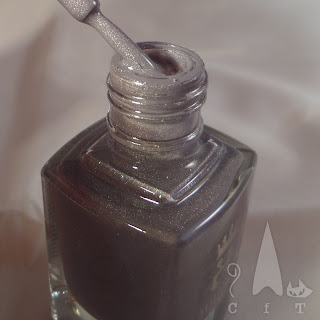
Left are the polishes in their lovely bottles. It's a classy bottle design and the glass is particularly shiny.


So on to the polish, first up is Wuthering Heights. I'm quite a fan of grey nail polish, and this one has a lovely twist of slightly holographic shimmer so had to give it a try. I'd describe it as a medium grey with lots of shine. the shimmer is subtle and catches the light nicely. Consistency is smooth and not too thick, two to three coats required.


Next up is Spirit Of The Moors, I knew this would be the favourite from the outset, and I was right! Bright cobalt type blues are my favourite colour so when I saw this shimmery one it was love at first sight! As with Wuthering Heights this one has a subtle holographic shimmer, it's slightly stronger in this one which might just be to do with the vibrancy of the colour. I don't know what more to say, a truly beautiful polish! It's like a more glam version of Barry M's denim effect.


So, did I like them? As you've probably gathered the answer is yes! I have already purchased three more (there was an offer, I couldn't help myself!), including one from the To Emily Bronte collection. I look forward to trying them and sharing the results.

Friday, 29 January 2016

HBP Presents: An Arctic 'Grey-dient'

So the time has come for another Hobby Polish Bloggers link up. The HBP Facebook group is a great place for sharing and learning tips and tricks on anything nail art/nail blog related. This months theme is gradients. I usually associate gradients more with spring/summer but have fancied trying a grey one for a while now so this was my chance. I used three grey shades (detailed at the bottom of this post) to create the gradient with some nail art sponges from Ebay, and then used a Mo You stamping plate (Enchanted Plate collection 05) for the design.

I had so many nail fails doing this! All went well to start with but I tried a peel of barrier for the first time, and on a couple of my nails where these touched the nail varnish, it peeled part of it off when I tried to remove it, you can see the effect of this on my thumbnail below. I also had a couple of Cellotape miss-haps (I was using it to clean my stamper) where it became stuck to and peeled off little bits of polish, so I had to try and patch them up. Mostly hidden by the stamping but it was obvious to me, so this mani didn't last long! I'm thinking these things happened because the polish wasn't quire dry enough so at least there is a lesson learnt.

Overall I like the gradient, the stamping images and the colours, but thing this may have worked slightly better with a wintery pattern (from the same plate) rather than the animals, as in some lights they weren't very clear. Also less nail fails would be good! I liked the super shinyness of the silver against the darker grey.


Colours Used: Little Bo Peep - Rimmel, Grey - Barry M, Dragster - Barry M, Dazzle - Orly

Check out all the other lovely designs below!