You can see the final design below. I used black over the striped so that it would show up well, and brown and white for the others. I love all the images on this plate, I'm particularly fond of the boat ones. The ferry (or perhaps it's meant to be a cruise ship I'm not sure) reminds me of summer holidays to France as a child.
Showing posts with label Mo You. Show all posts
Sunday, 10 July 2016
Stamping Sunday: Nautical Nails
Happy Sunday everyone! Today I'm showing you a design I was really please with, with one of my new stamping plates from Mo You London. I used the nautical plate Sailor Plate Collection 01. I usually go for full plates with full pictures/patterns on but really liked the individual images on this plate and think it will be a firm favourite. Besides I'm a big fan of anything nautical or sea themed. Below is the stamping plate super shiny and reflective before being used. As you can see I was excited to try it...
For this design I used a mixture of images over a plain background, and images over a stripy background. Used some of my trusty striping tape as you can see to the left. I couldn't find any of the colours of tape I'm not as keen on so ended up using this lovely bronze. I need to try using this as part of nail art some time.
You can see the final design below. I used black over the striped so that it would show up well, and brown and white for the others. I love all the images on this plate, I'm particularly fond of the boat ones. The ferry (or perhaps it's meant to be a cruise ship I'm not sure) reminds me of summer holidays to France as a child.
Colours used: Blueberry - Barry M, Alpine Snow - OPI, Red Hot Rio - OPI, Cocoa - Barry M, White Knight - Mo You London, Black Knight - Mo You London
You can see the final design below. I used black over the striped so that it would show up well, and brown and white for the others. I love all the images on this plate, I'm particularly fond of the boat ones. The ferry (or perhaps it's meant to be a cruise ship I'm not sure) reminds me of summer holidays to France as a child.
Sunday, 19 June 2016
Stamping Sunday: Steampunk
Happy Fathers day! I'm not sure in which countries is is fathers day today, maybe just the UK? Happy Sunday is maybe more fitting! Today I am showing my first try of some new nail mail I got from Mo You London. I am on a nail polish buying ban, but that does not include stamping plates, so I ordered four to mark being halfway through the ban! The first I am showing is Steampunk Plate Collection 02, pictures below.
I decided to try them out over a gradient, and went for blue as it's my favourite! For the stamping I used Models Own limited edition polish I got a while back in TK Maxx, Burnt Toffee. It is absolutely perfect for stamping. I liked having something a bit different from the standard gold or silver. As always with Mo You London, the images are lovely and picked up really well. The only thing I would change about this mani is the strength of the background colours. The below pictures are in daylight, followed my sunlight, so you can see the images well, but in some lights it was a bit too dark so the images weren't as clear, especially at the top of the gradient.
Colours used: Blue Moon - Barry M, Cyan - Barry M, Cobalt - Barry M, Burnt Toffee - Models Own
I decided to try them out over a gradient, and went for blue as it's my favourite! For the stamping I used Models Own limited edition polish I got a while back in TK Maxx, Burnt Toffee. It is absolutely perfect for stamping. I liked having something a bit different from the standard gold or silver. As always with Mo You London, the images are lovely and picked up really well. The only thing I would change about this mani is the strength of the background colours. The below pictures are in daylight, followed my sunlight, so you can see the images well, but in some lights it was a bit too dark so the images weren't as clear, especially at the top of the gradient.
Sunday, 12 June 2016
Stamping Sunday: Feeling Koi
Hi everyone, happy Sunday! Today I am showing you my first attempt a creating a Koi pond manicure with my BM-725 stamping plate from Bundle Monster. I've included a picture of the stamping plate wayy down at the bottom of this post, it's a pretty one!
For my first attempt I wanted to try a classic Koi pond pattern over black, with orange and white fish, and green plant life. For this design I used the advanced stamping technique, stamping the images onto my Uber Mat and filling them in using a dotting tool. Once dry, I filled each image with white stamping polish, this gave a background to the images that would make the colours pop even over a black background.
For the fish I used a neon orange, which I actually got for about 2 euros in a supermarket in Ibiza a few years ago. No idea what's in it but it's actually not bad! I like how vivid it makes the koi, but it was possibly a tad too bright in some lights. On another occasion I might try a less neon shade, but then that might not be bright enough, trial and error I suppose!
Colours used: Lady In Black - OPI, Midnight Green - Mo You London, Key Lime - Barry M, White Knight - Mo You London, W18 - Color Cosmetic
< So here is the stamping plate I was raving about. Most of my plates are from Mo You London so this is a little different. I really like that the images make up one big image, I love plates like that but often end up getting separated designs as they can be easier to use.
Thanks for reading! I have a few other idea for manicures I can do with this plate, and look forward to trying them out. Next attempt at the Koi pond mani to follow.... sometime!
For my first attempt I wanted to try a classic Koi pond pattern over black, with orange and white fish, and green plant life. For this design I used the advanced stamping technique, stamping the images onto my Uber Mat and filling them in using a dotting tool. Once dry, I filled each image with white stamping polish, this gave a background to the images that would make the colours pop even over a black background.
For the fish I used a neon orange, which I actually got for about 2 euros in a supermarket in Ibiza a few years ago. No idea what's in it but it's actually not bad! I like how vivid it makes the koi, but it was possibly a tad too bright in some lights. On another occasion I might try a less neon shade, but then that might not be bright enough, trial and error I suppose!
< So here is the stamping plate I was raving about. Most of my plates are from Mo You London so this is a little different. I really like that the images make up one big image, I love plates like that but often end up getting separated designs as they can be easier to use.
Thanks for reading! I have a few other idea for manicures I can do with this plate, and look forward to trying them out. Next attempt at the Koi pond mani to follow.... sometime!
Sunday, 5 June 2016
Stamping Sunday: Floral Patterns & Barry M Coconut Polish
Happy Sunday everyone! I must admit I'm not looking forward to being back at work, going to be a busy week! Today I'm showing a bit of ad-hoc stamping and my belated thoughts on Barry M's coconut infusion polish. I'm currently on a nail polish buying ban (nooo!) so haven't been able to buy any of the coconut infusion polishes to try. Fortunately I was given Surfboard as a gift so have been able to try just one!
As expected, and hoped for, it includes the wide brush shape which makes it paint on smoothly, and it's nice and easy to get neat edges. Although it was pale it was nice and opaque, below is two coats. I was really impressed with the formula, it paints on well and is lovely and shiny. I like the lid colour too!
For the stamping I used a silvery rose metallic polish, which gave a very girly finish! A lot girlier than the sort of thing I usually go for. I used my Mo You London Pro Plate 06 for the patterns. I hadn't used all of them yet so enjoyed giving them a try. I particularly like the images on my middle fingers. What do you think?
Colour: Surfboard - Barry M, Kings Road - Nails Inc
As expected, and hoped for, it includes the wide brush shape which makes it paint on smoothly, and it's nice and easy to get neat edges. Although it was pale it was nice and opaque, below is two coats. I was really impressed with the formula, it paints on well and is lovely and shiny. I like the lid colour too!
For the stamping I used a silvery rose metallic polish, which gave a very girly finish! A lot girlier than the sort of thing I usually go for. I used my Mo You London Pro Plate 06 for the patterns. I hadn't used all of them yet so enjoyed giving them a try. I particularly like the images on my middle fingers. What do you think?
Monday, 30 May 2016
Origami Sea Creatures: Inspired By Paperchase
The manicure I'm showing you today was inspired by a lovely passport cover I saw online, and just had to get when shopping yesterday. Glitter and sea creatures are two great loves of mine, so I couldn't resist! I didn't quite stick to the colour scheme as you can see. I went for Eye Candy by Danglefoot Polish as I hadn't yet tried it. It is wonderfully sparkly!
![]() |
Sunday, 3 April 2016
Stamping Sunday: Cathedral Nails
Today's stamping Sunday manicure I would call a kind of Gothic Easter manicure...ish! I still have a few dark colours I wanted to try before it gets into Spring colours, so quickly getting those in now! The main colour in this manicure is Jane Eyre by A England. It's a red/black with tiny flecks of red shimmer. It is so dark though that it looks black at a small distance, and a kind of chocolate minstrel brown up close. It was only really in the bottle that I could see the red.
For this design I decided to use my Uber Mat again for some advanced stamping with my Mo You Gothic Plate Collection 10. I love the stained glass patterns on this plate and was also curious to see how the face image would look (see below on my thumb - came out fairly well). I've still got a bit to learn with advanced stamping, particularly when the image covers the whole nail, but standard stamping comes easily to me now. Finally!
On my ring finger I used a white base (colours listed below pictures) and stamped an image onto my Uber Mat in gold. I used a dotting tool to colour some small areas of the design blue, and the rest in a teal/green. I did a few images to see which came out best, so when I placed them on to my nails and missed a corner, I was able to patch up the gap with part of another image/decal. I finished off with my favourite topcoat (Nails Inc's Kensington Caviar) to seal it all in.
Colours used: Jane Eyre - A England, Alpine Snow - OPI, Uptown Glamour - Nails Inc, Warwick Way - Nails Inc, Baker Street - Nails Inc
For this design I decided to use my Uber Mat again for some advanced stamping with my Mo You Gothic Plate Collection 10. I love the stained glass patterns on this plate and was also curious to see how the face image would look (see below on my thumb - came out fairly well). I've still got a bit to learn with advanced stamping, particularly when the image covers the whole nail, but standard stamping comes easily to me now. Finally!
On my ring finger I used a white base (colours listed below pictures) and stamped an image onto my Uber Mat in gold. I used a dotting tool to colour some small areas of the design blue, and the rest in a teal/green. I did a few images to see which came out best, so when I placed them on to my nails and missed a corner, I was able to patch up the gap with part of another image/decal. I finished off with my favourite topcoat (Nails Inc's Kensington Caviar) to seal it all in.
Monday, 21 March 2016
HPB Presents: Spring
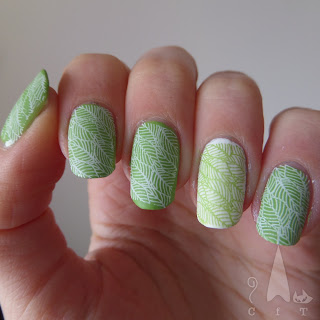
I can't believe it's turning towards Spring time already! I'l be honest, it doesn't feel like it yet here in the UK, our office heating was broken today and it was freeezing! Today I'm taking part in another of the Hobby Polish Bloggers link ups, this months theme is spring. I've chosen a simple design for this one, partly due to time and partly because I love this pattern and couldn't wait to give it a try.
I used my Pro Plate Collection 06 stamping plate from Mo You, and gave it a contrasting accent nail to add interest. I finished off with a matte top coat to bring out the colours. I haven't used my matte top coat in a while so was missing it! Beleive it or not the same green is used for all of the design (Barry M's Key Lime), I was surprised how different it looked after stamping but I suppose it's because the accent nails are over white and the rest are not. Part of me things it clashes, and part of me rather likes it!
Colours used: Key Lime - Barry M, Alpine Snow, OPI, White Knight - Mo You
I hope you like my simple Spring design! Check out the lovely designs everyone else is doing below.
I used my Pro Plate Collection 06 stamping plate from Mo You, and gave it a contrasting accent nail to add interest. I finished off with a matte top coat to bring out the colours. I haven't used my matte top coat in a while so was missing it! Beleive it or not the same green is used for all of the design (Barry M's Key Lime), I was surprised how different it looked after stamping but I suppose it's because the accent nails are over white and the rest are not. Part of me things it clashes, and part of me rather likes it!
I hope you like my simple Spring design! Check out the lovely designs everyone else is doing below.
Labels:
Barry M,
HBP Link Up,
HPB,
Mo You,
Stamping
Sunday, 13 March 2016
Stamping Sunday: Fans Of Indie
Todays stamping Sunday nail art is actually from a few weeks ago, and already holds fond memories of my business trip to Madrid (it was my first business trip abroad, I'm sure they won't always be fond :P). Because of being away and moving around the same time this one did have to last a little while, and I'm pleased to say it did.
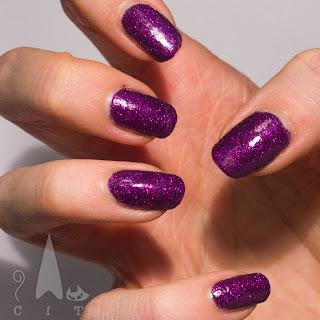
The base colour/glitter is Scream Queen from Danglefoot Polish (swatches at the bottom of this blog post). I ordered this just after new year and it was the first chance I got to use it. I was a little worried it would turn out to be quite pink when I saw it in the bottle, but it's is a beautiful bright purply shade with pink shimmer :).
I was a little sad to cover this with such a strong pattern, but got over it pretty quick as I like the way it turned out :) Looks like quirky sparkly wall paper! I used the decorative fan/plant pattern on my Mo You stamper and plate number 06 from their Pro Collection with a Barry M foil effect polish. The glitter polish dried a little textured so I used a top coat before and after stamping to smooth it over.
Colours used: Scream Queen - Danglefoot Polish, Gold Foil Effect - Barry M
And here is Scream Queen in all it's glory! So beautiful and bright :) It's quite a thick glitter (because there is so much sparklyness packed in!) so is full cover, only base coat underneath.
The base colour/glitter is Scream Queen from Danglefoot Polish (swatches at the bottom of this blog post). I ordered this just after new year and it was the first chance I got to use it. I was a little worried it would turn out to be quite pink when I saw it in the bottle, but it's is a beautiful bright purply shade with pink shimmer :).
I was a little sad to cover this with such a strong pattern, but got over it pretty quick as I like the way it turned out :) Looks like quirky sparkly wall paper! I used the decorative fan/plant pattern on my Mo You stamper and plate number 06 from their Pro Collection with a Barry M foil effect polish. The glitter polish dried a little textured so I used a top coat before and after stamping to smooth it over.
![]() |
![]() |
![]() |
![]() |
And here is Scream Queen in all it's glory! So beautiful and bright :) It's quite a thick glitter (because there is so much sparklyness packed in!) so is full cover, only base coat underneath.
![]() |
![]() |
Thursday, 11 February 2016
He's Her Lobster
It's valentines mani time! I wanted to do this design for actual valentines day, but am going to a wedding the day before so wanted something that would work with the dress I'm wearing. At least this gives me a chance to enter the So Nailicious edgy valentines nail art competition!
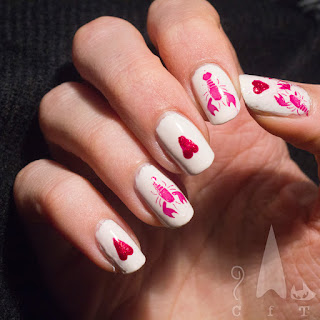
Like many I am absolutely obsessed with the TV programme Friends and find the idea of lobsters growing old together adorable! So this was an obvious design for me, particularly since getting a stamping plate with a little lobster image.
Nothing too complicated going on here, used dotting tools and a fine brush for the hearts (1st time I'd tried this as I don't usually do hearts, so they're a bit wobbly!), and stamping plates for the lobsters. The plate I used was from Mo You, Cookbook Collection 12, I'd rather not think of anyone cooking these adorable little creatures though!! I'm particularly fond of the thumb nails with the little lobsters holding claws, just too cute!
For the stamping and hearts I used Barry M's Sparkling Ruby, it stamps really well with a subtle shimmer. Looks a bit like two different polishes though as the hearts are so much thicker. Looking forward to seeing the other entries!
Colours Used: Coconut - Barry M, Sparkling Ruby - Barry M
Like many I am absolutely obsessed with the TV programme Friends and find the idea of lobsters growing old together adorable! So this was an obvious design for me, particularly since getting a stamping plate with a little lobster image.
Nothing too complicated going on here, used dotting tools and a fine brush for the hearts (1st time I'd tried this as I don't usually do hearts, so they're a bit wobbly!), and stamping plates for the lobsters. The plate I used was from Mo You, Cookbook Collection 12, I'd rather not think of anyone cooking these adorable little creatures though!! I'm particularly fond of the thumb nails with the little lobsters holding claws, just too cute!
For the stamping and hearts I used Barry M's Sparkling Ruby, it stamps really well with a subtle shimmer. Looks a bit like two different polishes though as the hearts are so much thicker. Looking forward to seeing the other entries!
![]() |
![]() |
![]() |
![]() |
Colours Used: Coconut - Barry M, Sparkling Ruby - Barry M
Sunday, 31 January 2016
Stamping Sunday: Birds Of A Feather
Today's stamping Sunday design was actually done on Thursday evening, but I am still wearing it, so clearly a success! This was my first attempt at layered stamping and I'm pleased with the results. I started with Nails Inc's White Horse Street from the 'New White' collection. The two New White's I have are sooo beautiful and just lovely to paint with and wear. The type of polish where I just keep looking at my hands!
Next I used white stamping polish from Mo You to stamp feathers onto three nails on each hand, (the feathers are from Mo You Explorer Plate Collection 14) and black stamping polish for the feathers on the thumb, from the same stamping plate. I used one of Nails Inc's 'feathered' effect polishes to go around the thumb feathers and on my accent nail. I had a couple of feather polishes already but came across this sparkly gem in TK Maxx not too long ago.
Finally I used my Mo You Gothic Plate Collection 10 plate for the birds (except on my little finger, those also came from the Explorer plate). I used my clear jelly stamper to carefully place the birds where I wanted them. This took quite a long time and it was getting late so unfortunately there is a little smudging where the top coat was applied.
Overall I really like this design and it's nice to have something a bit different to all the dark colours I've been wearing lately. Please excuse the quality of the fourth photo below, I wanted a nice picture of the feather polish as it's such a nice bottle but I think my photography requires some work!
Colours Used: White Horse Street - Nails Inc, White Knight - Mo You, Black Knight - Mo You, Henley - Nails Inc
Next I used white stamping polish from Mo You to stamp feathers onto three nails on each hand, (the feathers are from Mo You Explorer Plate Collection 14) and black stamping polish for the feathers on the thumb, from the same stamping plate. I used one of Nails Inc's 'feathered' effect polishes to go around the thumb feathers and on my accent nail. I had a couple of feather polishes already but came across this sparkly gem in TK Maxx not too long ago.
Finally I used my Mo You Gothic Plate Collection 10 plate for the birds (except on my little finger, those also came from the Explorer plate). I used my clear jelly stamper to carefully place the birds where I wanted them. This took quite a long time and it was getting late so unfortunately there is a little smudging where the top coat was applied.
Overall I really like this design and it's nice to have something a bit different to all the dark colours I've been wearing lately. Please excuse the quality of the fourth photo below, I wanted a nice picture of the feather polish as it's such a nice bottle but I think my photography requires some work!
![]() |
![]() |
![]() |
![]() |
Colours Used: White Horse Street - Nails Inc, White Knight - Mo You, Black Knight - Mo You, Henley - Nails Inc
Friday, 29 January 2016
HBP Presents: An Arctic 'Grey-dient'
So the time has come for another Hobby Polish Bloggers link up. The HBP Facebook group is a great place for sharing and learning tips and tricks on anything nail art/nail blog related. This months theme is gradients. I usually associate gradients more with spring/summer but have fancied trying a grey one for a while now so this was my chance. I used three grey shades (detailed at the bottom of this post) to create the gradient with some nail art sponges from Ebay, and then used a Mo You stamping plate (Enchanted Plate collection 05) for the design.
I had so many nail fails doing this! All went well to start with but I tried a peel of barrier for the first time, and on a couple of my nails where these touched the nail varnish, it peeled part of it off when I tried to remove it, you can see the effect of this on my thumbnail below. I also had a couple of Cellotape miss-haps (I was using it to clean my stamper) where it became stuck to and peeled off little bits of polish, so I had to try and patch them up. Mostly hidden by the stamping but it was obvious to me, so this mani didn't last long! I'm thinking these things happened because the polish wasn't quire dry enough so at least there is a lesson learnt.
Overall I like the gradient, the stamping images and the colours, but thing this may have worked slightly better with a wintery pattern (from the same plate) rather than the animals, as in some lights they weren't very clear. Also less nail fails would be good! I liked the super shinyness of the silver against the darker grey.
Colours Used: Little Bo Peep - Rimmel, Grey - Barry M, Dragster - Barry M, Dazzle - Orly
Check out all the other lovely designs below!
I had so many nail fails doing this! All went well to start with but I tried a peel of barrier for the first time, and on a couple of my nails where these touched the nail varnish, it peeled part of it off when I tried to remove it, you can see the effect of this on my thumbnail below. I also had a couple of Cellotape miss-haps (I was using it to clean my stamper) where it became stuck to and peeled off little bits of polish, so I had to try and patch them up. Mostly hidden by the stamping but it was obvious to me, so this mani didn't last long! I'm thinking these things happened because the polish wasn't quire dry enough so at least there is a lesson learnt.
Overall I like the gradient, the stamping images and the colours, but thing this may have worked slightly better with a wintery pattern (from the same plate) rather than the animals, as in some lights they weren't very clear. Also less nail fails would be good! I liked the super shinyness of the silver against the darker grey.
![]() |
![]() |
![]() |
![]() |
Colours Used: Little Bo Peep - Rimmel, Grey - Barry M, Dragster - Barry M, Dazzle - Orly
Check out all the other lovely designs below!
Subscribe to:
Posts (Atom)