Thursday 29 October 2020

Halloween Nails - Werecat-person-thing!

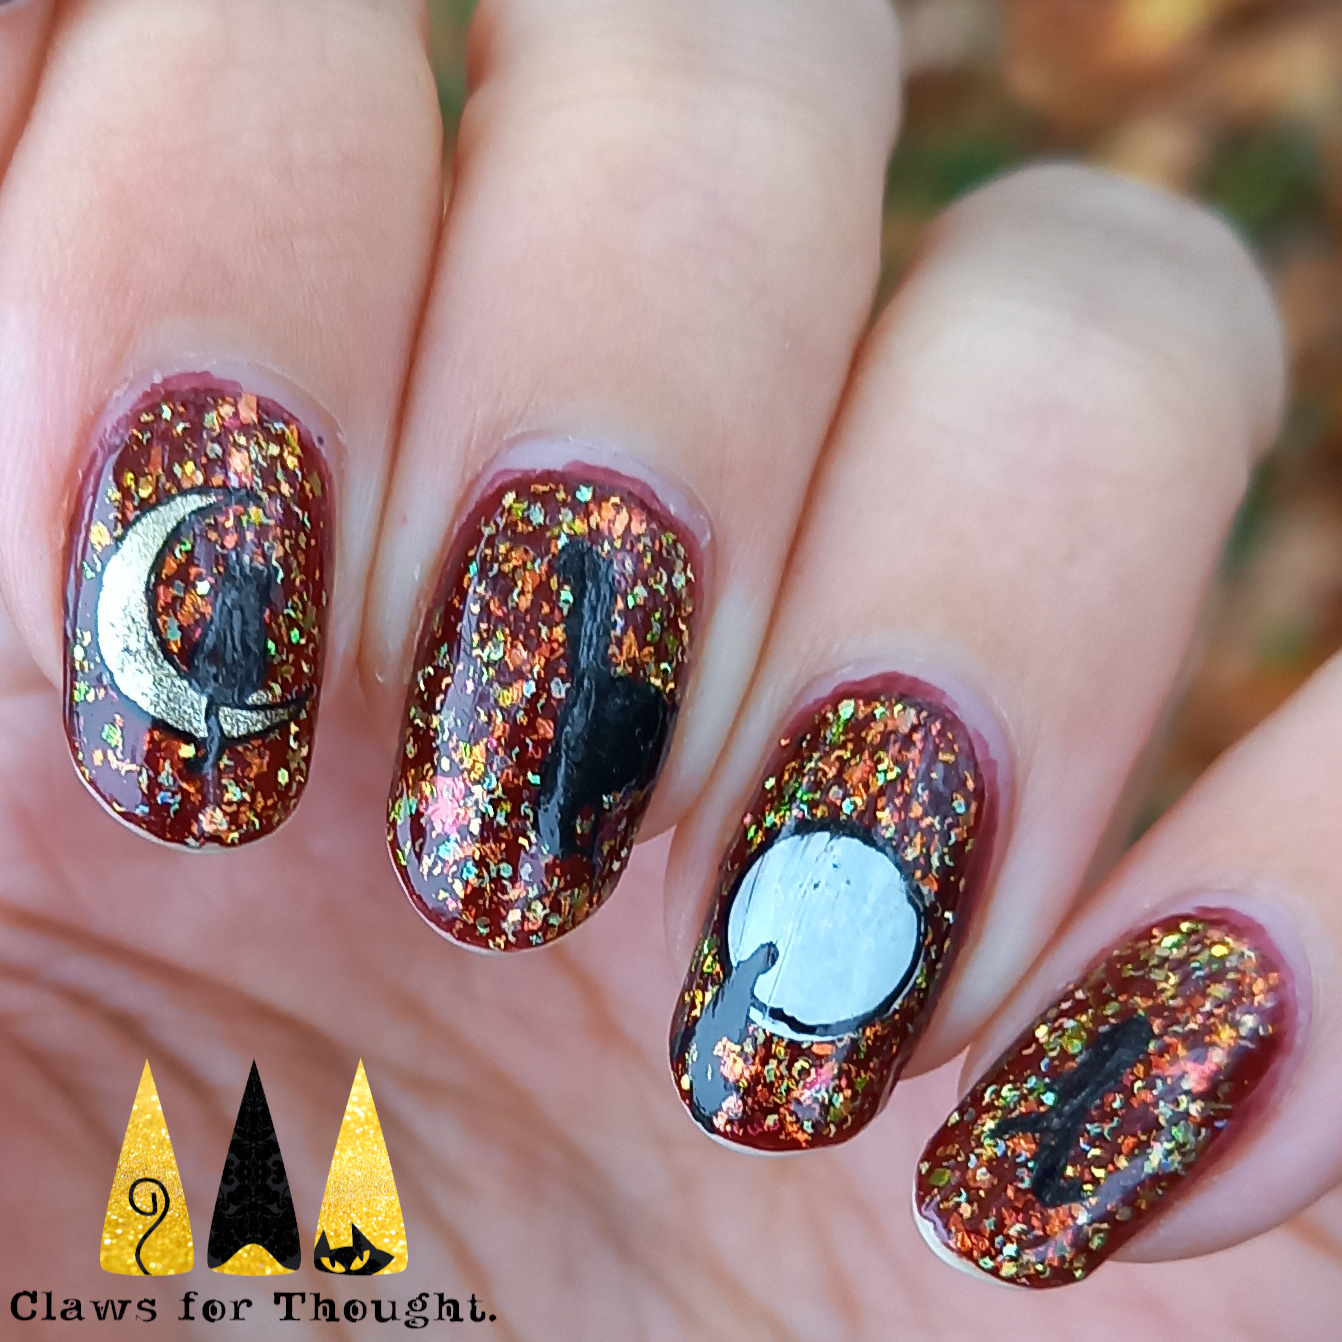
Hey everyone! I'm going to say Happy Halloween to you now as this is my last Halloween nail art to share with you this year - October has flown by! I squeezed this last look in so I could enter it into the Holo Taco Holoween nail art competition, and wanted to do something using their products. I've also wanted to try the Solar Unicorn Skin topper over dark red for some time, and I have to say I am so pleased with how it came out, it's incredibly autumnal! I also added the Gold Flakie Taco which gave it an extra sparkle.

The theme I was going for was a sort of werewolf type thing, but with a cat instead of a wolf! I also did the cat becoming a person at full moon instead of the other way round, as I wanted to use the cat sitting on the moon image again, I love it! On my index finger I used advanced stamping to fill in the crescent moon and cat, and I did the same with the middle finger where the cat is walking off my nail. I had to cut that image down a bit and did add to the tail to make it bushier. For the full moon I used layering images from the Uber Chic Basic Shapes 01 stamping plate, and for the little figures I used an old Mo You London plate which is actually themed around The Beatles. The figures are a bit small but I didn't trust myself to paint people freehand! The images are from the famous image of them walking across the road. but they're a bit small to figure out who the cat is turning into! I left the thumb nail art free to appreciate the lovely sparkly top coats!

I'm fairly pleased with how these came out though the people could certainly have been done better! I just adore the sparkly base colour which is what really makes this look for me!

Colours used: Red Black - Barry M, Solar Unicorn Skin - Holo Taco, Gold Flakie Taco - Holo Taco, Black Stamping Polish - Rainbow Connection, White Stamping Polish - Rainbow Connection, Gold Digger - Barry M

Wednesday 28 October 2020

Halloween Nails - Autumn at the Haunted House

Happy nearly Halloween! This nail art is what I've been planning as my 'official' nail art for Halloween this year, although I have actually already had to take it off because it chipped as I used a peel off base coat, at least I have time to squeeze in some more nail art as I have loads of ideas at the moment! I was inspired earlier in the year by some nail art I saw on the Rainbow Connection Facebook page, which encouraged me to buy the flakie polish I've used here (colours listed below the pictures) and I already had my eyes on the sheer black. I then kept this idea in my head for the next few months, tweaking it a little by using slightly different types of images and adding the outline.

To create the look I started with one layer of sheer black, and then used images from the Halloween 13 and Festive 16 stamping plates from Mo You London over the top in black. I was pleased to use the two Victorian figures image as I think it's so perfectly spooky! Next I used flakie polish to make the autumn leaves/ flames effect at the bottom. I used Magma from Fancy Gloss which has a gloriously dense consistency of flakes, so I had to make sure I didn't have too much on the brush at one time. Finally, for the part I thought I'd probably mess up entirely, I used a thin nail art brush and black nail polish to create an outline around my nails - this went a lot better than I anticipated! I think using a brush with longer bristles was useful for the outline, as previously I've struggled more using my usual shorter brushes, but maybe I was just having a good day!

In conclusion I am super happy with these! I really wasn't sure how the outline would come out but I think it finished the look off perfectly (if I do so so myself!), so they look kind of like spooky scenes through windows. I'm definitely going to try outlines for more nail looks. I would definitely have struggled to ever take them off if they hadn't chipped, and for future it would be worth the flakie polish removal challenges to use a regular base coat so they last longer. I find thin layers of polish with a peel off base do chip quite fast.

Colours used: Coal - Fancy Gloss, Black Stamping Polish - Rainbow Connection, Magma - Fancy Gloss, Lady In Black - OPI

Sunday 25 October 2020

Halloween Nails - Bats in the Dark

Hi everyone, I'm feeling super autumnal today, it's very leafy and wet outside which is fitting for todays nail art! Todays Glam Nails Challenge October prompt is bats, I have a few bat nail art options but decided to use one of my newest Mo You London stamping plates, Halloween 13. I was inspired by some bat nails I saw on Instagram to do a sheer white base but I'm not sure that was particularly visible in the end. It did give them a bit off a jelly look.

I started of with a few coats of sheer white, and then added some shimmer using five of the Under the Sea shimmery polishes from Barry M (colours listed below the pictures). Once dry I used black stamping polish to add the bats. I used the same image on each nail but placed it differently for some variety. I then applied a quick dry top coat to seal in the design without smudging the bats. The next part felt a bit weird, especially as I haven't used this black thermal polish before, I painted one coat of it over the top of all my nails. It was really strange putting black over my nail art! The polish is quite thick so one coat was perfect. I finished the look with a glossy top coat.

Once my nails were dry I went downstairs to try out the colour change effect, my nails had remained black until that point as I was a bit cold, so it was SUPER satisfying to see the bats reappear under the hot tap! It honestly made me so happy :D My boyfriend was quite taken with it too! I'll be sharing a colour change video of it on Instagram, but you can see it in it's varieties in the pictures below too. The plain back one is bats in the dark nail art!

Colours used: Allure - Essie, Angelfish - Barry M, Jellyfish - Barry M, Moonfish - Barry M, Butterflyfish - Barry M, Pinktail - Barry M, Black Stamping Polish - Rainbow Connection, Black Thermal Topcoat - Fancy Gloss

Wednesday 21 October 2020

Halloween Nails - Mystic Witches

HellooOo again - more Halloween nail art is here! Today's Glam Nails Challenge October prompt is Witches, and I decided to use images from one of my new Mo You London Halloween plates, Halloween 09. I spent some time trying to decide the base colour for this as I didn't want anything two dark, but wanted a bit of sparkle and an autumnal feel. I discovered this ILNP shade from a year or two ago and just had to get it out again. Fired Up is silver holographic sparkle with a hint of red running through it, so it glows orange and red at certain angles, and a little bit of green too.

I made witchy decals to go on top of Fired Up, using my Uber Mat. you can see how here. I was really pleased with how the Christmassy red colour came out as the cape. The shimmery beige I used for the skin for the witch on the broom doesn't really show up over Fired Up but worth a go! I really like the star images on this particular stamping plate so enjoyed giving it that theme. I'm also enjoying keeping my nails long for Halloween, I haven't reached the point where they annoy me yet but can't be too far off!

Colours used: Fired Up - ILNP, Black Stamping Polish - Rainbow Connection, Gold Digger - Barry M, If You've Got It Haunt It - UberChic Beauty, Say Love - ILNP, Tickled Taupe - Painted Polish, Concord - Cirque Colors

Sunday 18 October 2020

Halloween Nails: I Bleed Nail Polish!

Hello everyone, short but sweet blog post today as we edge closer to Halloween! Todays Glam Nails Challenge prompt was blood. This was my least favourite of all the prompts as I'm not really into gory Halloween stuff. I decided to keep it simple and use this deep blood red Barry M polish I haven't used for aaages, with a drip effect stamp on what was previously my only Halloween stamping plate, Festive 16 from Mo You London.

I started with a deep red base and then stamped the drip effect over the top in gold. Once I'd added this to all fingernails I used a small nail art brush to dab gold glitter nail polish over the gold drips. Once dry I added a shiny top coat and that was it! My boyfriend said they remind him of Christmas puddings... I like them as Halloween nails though, I'm loving wearing something really vampy again and the gold glitter completes it! I guess I did enjoy todays prompt after all!

Colours used: Red Black - Barry M, Foil Effect in Gold - Barry M, Gold Glitter - Barry M

Wednesday 14 October 2020

Halloween Nails - Sugar Skulls & Passionfruit Tea

HelloOOooO everyone! More Halloween nails today of course! Todays prompt for the Glam Nails Challenge October is Sugar Skulls. I have done sugar skull nails a couple of times before, always freehand, and I've always liked the way they came out. The first time was a full set which reminds me of a holiday I went on in the run up to Halloween one year, you can see them here. The others I did last year, with the same base I used for these ones, and some autumn leaves too, you can see them here. I used a tutorial by Hannah Rox It nails for the shapes.

This time I did the Hannah Rox It skulls the other way up to last time, the same way as she does it in her tutorial. I think it looks better this way as it suits the shape of my nails better. I also missed the outline of the eyes with this one and I think they look better for it. While the first time I did multi coloured eyes, then chrome ones, this time I picked the pastel shades of my two new Cuticula polishes, and finished the look off with a matte top coat to bring out the details and colours. I enjoy the simplicity of it and I'm pleased with how the skulls came out, I definitely don't want to take them off!

Colours used: Passionfruit Tea - Cuticula, Sugary Sweet Death - Femme Fatale, Lady In Black - OPI, Honeydew Tea - Cuticula

Sunday 11 October 2020

Halloween Nails - There Are Ghosts In My Tea!

Hello all and happy Sunday! Sun is very much shining here today which is lovely, but definitely feeling very autumnal still. I am fully embracing it now! Today I'm back with another prompt for the Glam Nails Challenge October on Instagram. Today the theme is ghosts, and I was keen to use my new Cuticula nail polish as a base. This gave me the idea of making them tea themed as well, as it's from a tea themed Cuticula collection. I also recently purchased some autumn stamping plates with tea images, as well as some Halloween ones, so it seemed like a perfect combination.

As above I started with a base of Honeydew Tea from Cuticula. I then used the advanced stamping technique to make decals for the tea and book images, as well as the teapot, all images from the new Mo You London Fall In Love 08 stamping plate. On my ring finger I just used the top half of the pile of books image as I had less nail space. I then used white stamping polish and the Halloween 13 plate, also Mo You London, for the ghosts. I couldn't quite fit it on my thumb so it looks a bit more like steam than a ghost, but I still like it! I finished the look with a matte top coat as it makes the colours pop and I thought it worked well with the book images too.

In conclusion I really like these! The shade of green is unlike other polishes I have, and I love the images from the stamping plates. I had fun combining two different themes and I really like the way it looks. I also enjoy the Cuticula tea themed polishes too, I love a concept collection! There are six pictures today instead of my usual four, as I wanted to get a couple with my little ghost in a bottle, Boo-vier!

Colours used: Honeydew Tea - Cuticula, Black Stamping Polish - Rainbow Connection, Laguna - Barry M, Cobalt Blue - Barry M, White Stamping Polish - Rainbow Connection, Basil Street - Nails Inc

Friday 9 October 2020

Whale On The Nail

Hello and Happy Friday! Bit of a backlog blog post today as I was waiting to post this once the collaboration post had gone up on Instagram. I did these as part of the Nail Addicts Collab on Instagram, where a theme is posted each month, and the pictures are shared together in a collage. This time the theme was the elements: earth, wind fire and water. I went for water as I had this look in mind already, a friend had also suggested I do humpback whale nails, so here they are!

I started with a base of pale blue (colours listed below the pictures) and some sheer shimmer over the top. I then used blue nail polish and the Sailor 18 stamping plate from Mo You London to add some water ripples, a seahorse and a humpback whale. I added some waves first on my middle two nails using white stamping polish to add some depth. I was so impressed with how well the blue nail polish stamped. It's just a regular shade from Barry M but it stood out well and the lines came out really crisp, even the finer details. I also noticed that I ended up using almost all high street brands for a change!

These were pretty easy to do and I'm really pleased with how they came out :) I love the colours and I'm so pleased with how the seahorse and humpback whale came out. Back to more Halloween nails next!

Colours used: Borrowed & Blue - Essie, Cobalt - Barry M, Butterflyfish - Barry M, White Stamping Polish - Rainbow Connection

Wednesday 7 October 2020

Halloween Nails - Black Cats On The Moon!

Hello again and I hope you're ready for more Halloween nail art! These are probably a bit more versatile than just being Halloween nails, but I have had this design on my mind for a while, so when the Black Cat prompt came up in this months Glam Nails challenge it seemed like the perfect time! I saw this look on the Nail It Mag Instagram account, and then recreated by srg.nails. It didn't entirely go to plan for me but I think it came out OK in the end.

I started off with a grey-ish base, one I got from Topshop when they had their gorgeous matte metallic shades out years ago, it's been a while since I've used it! The next step was to paint a rough outline around my nails using a generous amount of black nail polish. I then used a wide flat brush to try and blend it into the middle a bit. This was the first part where I thought it went wrong, some came out too dark, and all of them looked pretty scruffy. Next I used a small nail art brush and white polish to draw the moons, and at this point I seriously considered giving up on this one, they are pretty wonky, freehand really isn't my strongest skill! I powered through and added some little stars and spots. It was only once I added the cats (using a dotting tool and nail art brush) that I thought it looked OK!

As I wasn't 100% sure on this look I added some shimmer over the top to jazz it up. The last picture shows it before the shimmer/glitter. So overall I adored the original look, mine was not so good but it did get a lot better once I added the cats! Good freehand practise too!

Colours used: Easy Peasy - Topshop, Lady In Black - OPI, White Stamping Polish - Rainbow Connection, Crystal Shimmer - Accessorize 

Tuesday 6 October 2020

Halloween Nails - It's Pumpkin Time!

Hi everyone and happy Halloween nearly a month early! I usually only do a couple of Halloween looks, and a lot closer to Halloween, but this year I'm doing the Glam Nails Challenge on Instagram, I love the prompts for this month. The first prompt is pumpkins as you may have guessed from the title. I was super excited for my latest order from Rainbow Connection to turn up just before I did these, as I wanted to use this beautiful orange Halloween shade from UberChic - which is wonderfully called If You've Got It Haunt It!

For this look I used one of my new stamping plates from Mo You London, Halloween 13. The bats were stamped onto my nail directly and for the pumpkins I used the advanced stamping technique, you can see how here. I was so pleased with how well the orange showed up over purple. This orange shade was truly delightful, it was so smooth and opaque and has a gorgeous holographic flare in the right light! I love purple and orange as a Halloween combination, it's probably not something I'd do at any other time of year!

Colours used: If You've Got It Haunt It - UberChic, Concord - Cirque Colors, Black Stamping Polish - Rainbow Connection

Sunday 4 October 2020

Fruit Salad On My Nails

Hello all and Happy Sunday! It is very rainy today in the South of England, and has been all weekend, but I am OK with it as I'm finally getting those autumn vibes! Having said that it will seem a little strange that I'm now sharing some summery nail art, but this is one I've just taken off and wanted to squeeze in before I get onto the autumn looks. There will be Halloween nail art coming very soon!

So I have the Fruit Deco stamping plate from Maniology and I really love it, but have mostly used the whole nail images of lemons and watermelons so far so wanted to have a go with some more of the individual fruits. I was going to do this on a more neutral background but I had this lovely metallic peach on my untried list and wanted to get that in with the summer looks! It's called Peachy Feels and I bought it as my friend Charlotte brought it to my attention that I don't own a metallic peach nail polish, by mentioning that she would like a metallic peach nail polish!

So the technique for this one was pretty straightforward. All the images on the Fruit Deco plate are layerable, so I just stamped the colours on accordingly and then added the black outline. It is a little fiddly getting them lined up sometimes but for the most part it came out well! I've enjoyed wearing them, they remind me a bit of Ibiza!

Colours used: Peachy Feels - Barry M, Black Stamping Polish - Rainbow Connection, Yellow - Barry M, Key Lime - Barry M, Spring Green - Barry M, Pomegranate - Barry M