Showing posts with label Femme Fatale. Show all posts

Wednesday, 24 August 2022

Northern Nights

Hey space turtles! Today's nail art is a bit of a nail fail to me though it's growing on me slightly! It's for two combined Glam Nails Challenge themes of Mountains and Northern Lights. Both great themes but I didn't have time to do them separately. I have done northern lights nails a couple of times before and they've definitely come out better! I think it didn't help that I was on the phone when I did them so I wasn't really concentrating.

I started with a base of sparkly black for a starry night effect. I then used silver polish to add mountain images over the top from Mo You London's Sailor 18 stamping plate. I knew the silver would stand out well against the black. I then used blue and green polish to add some wobbly lines in the sky using a nail art brush. I also added some blue and purple dots underneath with the end of the brush. I finished the look with a glossy top coat.

Colours used: Thunder and Lightening - Models Own, Wicket Witch of the West - Femme Fatale Cosmetics, Audacious Green - Accessorize, Prima Donna - Jessica Polish, Foil Effect in Silver - Barry M

Monday, 25 July 2022

Shy Mermaid

Hey space turtles :) More ocean vibes on my nails today with a shy mermaid. This was for yesterdays Glam Nails Challenge prompt of mermaids and I had quite a few stamping plates to choose from! I settled on this rather shy looking mermaid peeking out of the water. I decided to use some Femme Fatale thermals again although sadly the pinky/lilac one seems to have lost it's thermal effect.

For the mermaids face I created a decal on my Uber Mat and for her tail there were layered images on the stamping plate I used (Uber Chic's Mermaid Life 02) so I could stamp it directly onto my nails. I added the images roughly where my nail line is so that the thermal effect would make it look like they were coming out of the ocean which I think worked pretty well. I added this gorgeous shell design over the other nails in silver.

I think these are a little scruffy in places (e.g. some smudges on the mermaids face) but love the theme and enjoying the polishes too. I do wish they were both still thermal!

Colours used: Hook - Femme Fatale Cosmetics, Bluebeard - Femme Fatale Cosmetics, Foil Effects in Purple - Barry M, Charlotte Street - Nails Inc, Black Stamping Polish - Dance Legend, Foil Effects in Silver - Barry M

Monday, 11 July 2022

Beach Please

Hello space turtles! More Glam Nail Challenge catch up today. This time the theme is beach. I was looking for a fairly simple design for this and came up with the idea of a couple of my nails looking like beach towels and the others like the ocean. I also tried out a thermal polish I've had for a few years and was pleased to see it still works! Colours are listed below the pictures.

I started with two coats of blue/green on my ring finger, little finger and thumb nails and white polish on my index and middle fingernails. Once dry I used white stamping polish to add the ripple image from Bundle Monsters Twi Star stamping plate onto the blue/green nails, I then used a variety of neon polishes to create a gradient with images from Mo You London's Tropical 34 stamping plate. The patterns reminded me of the sort of thing you might see on a beach towel. I'd buy one!

I struggled to get good pictures of these so most of the below are outside in natural light. Good job it;s summer!I am enjoying the fun summery vibes though and still quite like my beach towel idea.

Colours used: A Mantis Shrimps Favourite Colour - Bees Knees Lacquer, Blue Beard - Femme Fatale Cosmetics, White Stamping Polish - Rainbow Connection, Beachy Beachy, My Mate Illuminate, Joyful L'il Jellybean & Bikini So Teeny - All Wikkid Polish

Sunday, 21 November 2021

Woodland Wonderland

Hey nail people! Going to keep this one short and sweet as I'm a little behind and also so ready for an early night! I did this for Glam Nails Challenge's 'Lanscape' prompt. I had quite a few ideas for this and could have done something rather more adventurous, but I didn't have loads of time. I was going to stamp the images over a gradient but then remembered I had some thermal polishes that should work just as well!

I started with three coats of thermal polish (colours listed below the pictures). I've had this thermal shade a few years so although it does have a colour change still it's not a strong one. It wasn't the most stark difference anyway, changing from a pearlescent green to blue. The pictures are closer to the warm shade which is pale green. Sometimes my nail tips have had a darker blue-ish tint to them. The images I added are from Maniology's Clairestelle8 stamping plate.

In conclusion, I'm enjoying the shape of my nails though they feel weirdly short after filing them down a bit (I know they're not really - just an adjustment!). I'm not 100% sure on this look though. The images are gorgeous but it feels a bit to simplistic, which may be purely because I knew it was less effort to create than other nail looks I do!

Colours used: Jasmine - Femme Fatale Cosmetics, Black Stamping Polish - Dance Legend

Sunday, 7 February 2021

Hungry like the wolf/ whale!

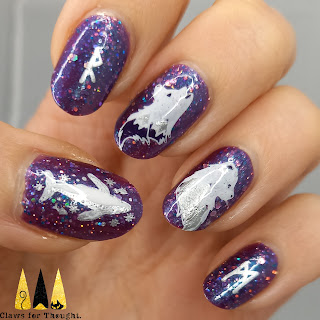
Aaaoooo! (or however you spell a wolf sound!) Some wintery Nordic inspired nails to share with you today with a new glitter purple polish I hadn't yet tried. I wanted to try out some of the rune images on my Noel 08 stamping plate from Mo You London and the lovely little floating whale image too, so decided to pair them up with these wintery wolves and my new purple glitter.

So I started with a peel of base coat and two layers of purple glitter nail polish (colours listed below the pictures). I then used white stamping polish and my Uber Mat to create decals for the wolf and whale images, you can see how here. In the meantime I added a couple of rune images to my index and little fingernails. There were a few to choose from but I went for R and M as they're my initials. After adding the decals to my nails I applied a glossy top coat to complete the look and bring out the purple polish's shine.

Overall I do like these, the images are cute and you can't go wrong with sparkly purple! They're not quite as fabulous as I had hoped for though, I really love the whale image but think it might have been better in other colours so the detail shows up a bit better. Absolutely adore that stamping plate though and will definitely be using it again!

Colours used: Moonlight Status - Femme Fatale Cosmetics, White Stamping Polish - Rainbow Connection, Foil Effects in Silver - Barry M, Plum - Barry M

Wednesday, 14 October 2020

Halloween Nails - Sugar Skulls & Passionfruit Tea

HelloOOooO everyone! More Halloween nails today of course! Todays prompt for the Glam Nails Challenge October is Sugar Skulls. I have done sugar skull nails a couple of times before, always freehand, and I've always liked the way they came out. The first time was a full set which reminds me of a holiday I went on in the run up to Halloween one year, you can see them here. The others I did last year, with the same base I used for these ones, and some autumn leaves too, you can see them here. I used a tutorial by Hannah Rox It nails for the shapes.

This time I did the Hannah Rox It skulls the other way up to last time, the same way as she does it in her tutorial. I think it looks better this way as it suits the shape of my nails better. I also missed the outline of the eyes with this one and I think they look better for it. While the first time I did multi coloured eyes, then chrome ones, this time I picked the pastel shades of my two new Cuticula polishes, and finished the look off with a matte top coat to bring out the details and colours. I enjoy the simplicity of it and I'm pleased with how the skulls came out, I definitely don't want to take them off!

Colours used: Passionfruit Tea - Cuticula, Sugary Sweet Death - Femme Fatale, Lady In Black - OPI, Honeydew Tea - Cuticula

Wednesday, 30 October 2019

Sugar Skulls & Autumn Feels

Hi everyone and Happy Halloween! Predictably I have some Halloween nail art to share with you today. I actually was planning on squeezing in one more design for the actual day of Halloween but am so fond of these that I decided to keep them on a bit longer. They are falling apart a bit now though as I used a peel off base.

On my index and little finger nails I created a gradient with some of the Barry M Molten Metal polishes, and used a reverse stamping image from the Lovely Leaves - 01 plate over the top. I used the same Molten Metal polishes on the sugar skulls on my other nails. The leaf pattern nails were really just a way to spend a bit less time painting freehand, as I'm not very experienced and it takes me a while, but I really like them and the way the images work together as a whole nail art look.

On my other nails I used a base of Sugary Sweet Death from Femme Fatale Cosmetics. This polish is what inspired the look as it reminded me of sugar skulls! I roughly followed a picture tutorial by Hannah Rox It for the skulls, and used some Topshop matte metallic polish as it's consistency for painting is quite good and I can't find my acrylic paint! I used a dotting tool to add the extra colour to the eyes. As I mentioned before I am really pleased with these! More slightly spooky post Halloween nail art to come next week :)
Colours used: Sugary Sweet Death - Femme Fatale Cosmetics, Gold Digger - Barry M, Bronze Bae - Barry M, Copper Mine - Barry M, Black Stamping Polish - Rainbow Connection, Croupier - Topshop

Friday, 19 April 2019

Azteggs! Alternative Easter Nails

Happy nearly Easter everyone! I've gone for some slightly alternative Easter egg nail art this year, alternative in that it doesn't involve pastels, otherwise not that alternative! I fancied trying one of my new purple shades and thought this speckled one is kind of Easter appropriate. I love the colour combination of this type of purple shade against black and white.

For the black and white nails I didn't have any egg shaped images on stamping plates, but didn't think I could freehand a pattern very well so tried something a bit different when creating nail decals. I've included the process I followed below:

  • I started by using a nail art pen to draw egg shapes directly onto my Uber Mat, and gave them some time to dry (tricky to get that timing right as it starts to crack as you can see!)
  • Next I carefully painted a clear layer over the egg shapes, making sure to only just go over the black line, if anything went round the edges I cleared it up with a clean up brush and nail polish remover.
  • Once the clear layer was dry I used images from the Mo You London Explorer 33 to stamp an Aztec pattern onto the eggs - the images stick to the clear polish but not very well to the mat so it was easy to clean up around the edges with the tape.
  • I followed up with a layer of clear top coat over and around the eggs.
  • Once dry I peeled the decals off the mat, trimmed them and applied them to my nails before top coat time.
Although the eggs could be neater I think they've come out reasonably well and am enjoying wearing this nail art. This is also my entry for the clairestelle8 challenge prompt for the 20th (Easter eggs), but blogging it slightly early as I'm busy tomorrow!

Colours used: Floral Street - Nails Inc, Lightning Maroon - Femme Fatale, Midnight Mischief - Painted Polish, Nail Art Pen in Black - Barry M

Monday, 8 October 2018

Holiday Nails: Dolphins & Cocktails In Tenerife

Hey everyone! On this somewhat cloudy day I'm bringing to you my holiday nails for our trip to Tenerife. I got back a week yesterday and am still adjusting to the colder weather and being back at work. I used a few new or long untouched things for this nail art. A thermal blue polish I bought on Facebook, the Uberchic Bottoms Up stamping plate, and Rainbow Reef, one of the 'dolphin glitter' polishes I bought from Ellagee when I was first discovering indie polishes.

On my index and ring fingers I am wearing Crepuscular Awakening, the thermal blue, topped with Rainbow Reef. On my middle finger I used the Tropical 07 plate from Mo You London for a citrussy gradient, and on my thumb nails I used a cocktail image from the bottoms up plate to create a summery gradient there too. On my little finger I used a few of the smaller cocktail images in a variety of colours. I think I probably should have filled them in with a bit more colour but got carried away and stamped the outer images of the layering ones first for some of them!

So all in all these aren't my favourite holiday nails, but I do rather like them, they capture the essence of the holiday I think - plus we saw dolphins! They also give me fond memories. I hadn't been to Tenerife before but would definitely recommend it for a relaxing holiday.
Colours used: Floral Street - Nails Inc, Crepuscular Awakening - Femme Fatale Cosmetics, Yellow - Barry M, Greenberry - Barry M, Papaya - Barry M, Rainbow Reef - Ellagee

Thursday, 17 May 2018

Spring/Summer Garden Nails

I am sooo behind with this! We're over half way through May and this is my first blog post! Here is some nail art I did a few weeks ago now. I haven't been painting my nails as much in general as I'm busy at work and have been doing some things around the house plus some time away. This nail art was done with the purposes of trying out some little stick on bird cages, and reminds me of seeing family friends for the Fleet Half Marathon. The thermal nail polish definitely stayed on it's cold colour while we were out watching the runners!

I started with a layer of blue thermal polish, and then used my Uber Mat to create some floral decals. You can see how here. I used the Flower Power 03 plate from Mo You London. One I had placed the decals, I stuck down some bird cage decorations and then applied a little more top coat over them to stick them down. I found the bird cages didn't work great with my nails, especially as I chose my most curved finger nails to stick them on! They were sticking out a lot at the edges. It worked a little better on my thumb nails as they're wider and flatter.

I loved using another thermal nail polish, and I think this blue one is particularly good!  Overall pretty pleased with this design, but probably won't place the bird cages there again.
Colours used: Blue Beard - Femme Fatale, Midnight Mischief - Painted Polish by Lexi, Alpine Snow - OPI, Pink Lemonade - Barry M, Surfboard - Barry M, Notting Hill Carnival - Nails Inc, Key Lime - Barry M, Berry Ice Cream - Barry M

Saturday, 14 April 2018

Prim & Copper

Hello nail people! Short post today, just showing off one of those rare polishes I wear alone, without any nail art or other adornments. This is Prim & Copper, from the lovely Femme Fatale Cosmetics. It's an exclusive polish for Rainbow Connection (pretty much my favourite shop!). I had my eye on it for a while so I'm glad I managed to get hold of it while it's around, it's still available now if you like the look of it.

The colour as you can see is a burgundy/purple shade, varying depending on the lighting, with flecks of copper glitter scattered throughout. My photography skills still need some work but you can see it below in some different lighting. I need to get some way of capturing really bright lights without making my hands look funny... as this one does sparkle wonderfully under bright lights or sunlight. As always the formula is good, I used two coats for the pictures below. The finish is slightly textured but if this isn't your desired finish it can be smoothed out with a top coat.

Let me know what you think :)

Tuesday, 10 April 2018

Isambard Kingdom Brown Owl

A big sleepy hello to anyone reading this... today I am sharing some owl nail art, appropriately as it's dark outside and I'm sleepy! I was inspired by a trip to The Hawk Conservancy Trust to dig out my UberChic owl stamping plate, and do some owl nail art over a colour changing background (recently got some new thermals which I'm enjoying trying out). This one is Hook from Femme Fatale Cosmetics. I think it has a sort of dusk and dawn effect, which is again very appropriate for owls!

For the wording I stamped it in gold before stamping it again in black slightly below the gold. You can't really see it in the pictures but it has a subtle shadowing effect. For the owls I used a couple of polishes from Painted Polish by Lexi's new Taupe collection, which I still haven't got round to trying out in full! I used the advanced stamping technique with my Uber Mat for the owls, you can see how here, and finished off with my favourite glossy top coat (Nails Inc's Kensington Caviar).

I was really pleased with these, they had all the novelty of colour changing thermal polish (it just never gets old!), plus nail art and a little bit of glitter. What more could I want?! Below you can see the nail art on warm hands, a bit colder at the tip of my nails, and underneath are a couple of pictures to show the cold shade.
Colours used: Hook - Femme Fatale Cosmetics, Midnight Mischief - Painted Polish, Tickled Taupe - Painted Polish, Taupe Temptation - Painted Polish, Bright Lights - Barry M
And if you've ready all the way to the bottom... the strange blog post title is a pun my oh so witty boyfriend though of based on the famous engineer from the 1800's, Isambard Kingdom Brunel. You're welcome ;)