Friday 30 December 2016

Let it snow, let it snow, let it snow!

Hi everyone! It'as getting frosty outside so I've reflected this on my nails! This was one of the many Christmassy designs I was running out of time for, so decided to do them afterwards, it's still Christmas time till the tree comes down! I started with a base of Nails Inc's 'The Serpentine' which is a gorgeous navy blue. I haven't worn it for ages and forgot how lovely it is! There's a bonus picture of it alone at the bottom of this post.

Next I applied two layers of ILNP's 'Mega', a shimmery holo over the polish on my thumb and ring finger, and some snow glitter on my index and pinky fingers. For the snowflakes I used my QA57 stamping plate (no idea what brand - it was my first ever stamping plate and was bought cheap on eBay!). On the silver nails I used The Serpentine for blue snowflakes, and on my middle finger I used Soho Silver from Nails Inc, as Mega doesn't stamp very well. Fortunately they seemed to match well enough!

Once I'd finished I had a bit of a dilemma! I had been intending to put snowmen over some of the snowflakes, but I rather liked the design without them (picture at the bottom of this post). I dithered for a bit and then decided to try the snowmen as that was my original plan, this turned out to be a bit of a mistake, as you will see below. The polish I used was very thick as it was nearly finished and so my snowmen came out very blobby! Still, I kept it on for a few days, new year nails next!!

Colours used: The Serpentine - Nails Inc, Mega - ILNP, Soho Silver - Nails Inc, Snow Glitter - No7 at Boots, Coconut - Barry M, Lady In Black - OPI, Papaya - Barry M

Tuesday 27 December 2016

Guest Nails - Snowman Stamping

Hi everyone! I hope you had a lovely Christmas/break. I'm reeeally enjoying having some time off work and had a lovely Christmas with my family. Super happy with my presents and I'm pleased to say they included some stamping plates, so those will follow in the next few months (yes there are that many - I ordered some today too!).

So the day I finished work for the Christmas holidays I had a half day (ish) so had a couple of friends over to do Christmas nails. I did my Christmas day nails, and these snow themed nails for my friend Jess. We started with a white base on all nails and then put some silver holo over the top on the ring finger, it doesn't show up too well in the picture but it adds a good bit of shine to the design.

I used two Barry M blue shades to stamp overlapping snowflakes on three nails on each hand, using Mo You London's Festive Plate 02. I really love the way the snowflakes came out, it's a shame I'll probably be waiting till next year now before I try it on myself! For the ring finger and thumb I made decals on my Uber Mat using the Uber Chic Christmas-01 plate. I was happy with this design and I know Jess was too so I hope it lasted through Christmas!
Colours used: Alpine Snow - OPI, Black Knight - Mo You London, Blueberry - Barry M, Cobalt - Barry M, Dead Heat - Barry M, Mega - ILNP

Saturday 24 December 2016

So this is Christmas...

So this is Christmas...Eve! I have finally managed to fit in some freehand Christmas nail art! I was hoping to get some more in before Christmas but time is just flying by. I had a couple of friends over for a Christmas nails afternoon with Christmas movies, mince pies and mulled wine. so in a way I'm impressed I managed to do some neat-ish lines!

I used a small nail art brush to paint the outline of each festive item and then colour them in. For the parcels and the outline of the berries I used a nail art pen to get fine lines. Overall I like the design, with the exception of the presents, as they came out a little wobbly. I also think the red is not quite as Christmassy as I had hoped. I should have used one with flecks of gold in instead of flecks of pink!

Wishing you all a wonderful Christmas!
Colours used: Party In Rio - Colors by Llarowe, Cocoa - Barry M, British Racing Green - Butter London. Alpine Snow - OPI, Dead Heat - Barry M, Nail Art Pen In Black - Barry M, Lady In Black - OPI, Uptown Glamour - Nails Inc, Soho Silver - Nails Inc

Friday 23 December 2016

Cosy Christmas Nails

It's Christmas eve eve! Two sleeps till Christmas! I haven't done nearly as many Christmas nails as I would have liked this year as it's been so busy at work, I have a whole list of ideas I'll have to save till next time. I got one of Mo You London's new Christmas plates (Festive Collection 45) as a surprise pre-Christmas gift from my boyfriend, as he new I'd want to use it before Christmas  - he's a keeper! The designs on this plate are adorable, they have a similar look to the ones in the Enchanted collection, with animals, or Christmas creatures, in the middle framed by a pattern.

I used my Uber Mat to make decals for these so I could add colours, the images aren't too fiddly to colour in. I did leave them over night, and had to use my back up clear polish so they were a little brittle in the morning which wasn't ideal. It made them quite thick, but they looked good and that's what counts! A few people have told me they look like wrapping paper, which reminds me I really ought to finish wrapping presents...
Colours used: Emerald Green - Barry M, Party In Rio - Colors by Llarowe, Gold Foil Effect - Barry M, Silver Foil Effect - Barry M, Alpine Snow - OPI, Cappucino - Barry M, W18 - Color Cosmetic

Monday 19 December 2016

Oh Christmas Lights

Six sleeps till Christmas! I really can't wait! Work is not good right now, I'm not even having much time for Christmas nails! The ones I'm showing you tonight lasted me a whole week, and still looked good, but I have an ideas back log so had to change them.

I've been trying to get my hands on Cirque Colors Halcyon for ages so when it appeared again on Rainbow Connection as part of a holiday collection shortly after my birthday I had to have it. There is a picture of it alone below the nail art pictures. It's a super shiny rose gold shade with a hint of copper to it in some lights. Very on trend!

I used my Uber Mat to make nail decals using my Uber Chic Christmas-01 stamping plate. I used dotting tools to fill in the colours using sparkly shades to give a twinkling lights effect. Colours used are listed below the pictures.
Colours used: Halcyon - Cirque Colors, Black Knight - Mo You London, Cosmic Girl - Danglefoot Polish, Dioptase - Cirque Colors, Tanzanite - Cirque Colors, Party In Rio - Colors by Llarowe


Thursday 15 December 2016

Christmas Poinsettia Nail Art

Hi nail people! Predictably I have more Christmas nail art to show off today! There is a lovely plant image on the Uber Chic Christmas-01 stamping plate, which I have since learnt is a Poinsettia. I love the rich red and green colours of the leaves, and the sort of matte velvety look they have. I used some matte metallic nail polish from Topshop to try and re-create the effect. Hadn't used them for some time so it was good to get them out again.

I stamped the images onto my Uber Mat in gold, and then used dotting tools to colour in the leaves. After adding a top coat and allowing to dry, I peeled off the images and placed them on my nails which I had also painted gold. To finish I used a matte top coat to seal it all in.

I'm happy with how these turned out, they look Christmassy without being over the top. Having said that, I really ought to get some over the top Christmas nail art on before it's too late for this year! Bring on the glitter!!
Colours used: Gold Digger - Barry M, Gold Foil Effect - Barry M, Cruel Intentions - Topshop, Shameless - Topshop

Sunday 11 December 2016

Stamping Sunday: It's beginning to look a lot like Christmas... baubles


It's finally here! My first Christmas nail art of the year. I've been delayed posting pictures by a week as work has been manic, so I already have more to share, will try and be a bit better next week! I'd been saving this Fun Lacquer multi-chrome for the big work Christmas party and fortunately the dress I bought went with it perfectly, so it made it's debut appearance at the beautiful Elvetham hotel, amidst many gorgeous gowns and Christmas lights. No multi-chrome polish can beat the shine of chrome powder, but this is definitely the best nail polish multi-chrome I have used, or even seen! It's super shiny and the colour shift is great. Shimmery purple to red is perfect for the party season.
I wore the polish alone to the party as my dress was patterned (black and gold), but once it was over I decided to add some Christmas baubles using my new Uber Chic Christmas-01 stamping plate. I stamped the baubles individually in metallic gold onto my Uber Mat and coloured them in with some metallic and sparkly polishes (colours listed below the pictures). I covered them with clear polish and then once dry peeled them off and applied them to my nails, finishing with a top coat.

The ones on my thumb nails didn't turn out quite as I had hoped, as the silver overpowered the gold, meaning the detailing on some of the larger baubles wasn't very visible. Overall I think this was a nice subtle start to Christmas nails, and I absolutely adore this multi-chrome polish!
Colours used: Cheers To The Holidays - Fun Lacquer, Gold Foil Effect - Barry M, Emerald Green - Barry M, Gold Glitter - Barry M, Teal - Barry M, Silver Foil Effect - Barry M 

Sunday 4 December 2016

Magical Mirror Nails - Mirror Chrome Powder First Attempt

Finally it's mirror chrome time!! So it's the 4th of December and I've not put up any Christmas nails yet... I have some Christmas nail art on now, so it's on it's way! I just couldn't wait till after the festive season to share how I got on with the mirror chrome powder that's been getting everyone excited this year. As ussual witbh a new nail trend that I want to experiment with, I decided to start cheap and get some mirror chrome powders on eBay. I went for a classic silver, a blue/purple (below) and a blue/green.

I had a lot of fun trying this our on my Uber Mat, I had to try a few different ways to get anywhere and had more luck with the silver than the multi-chrome shades. I tried a few techniques and once I found one I was happy with I gave it a go on my nails. I've included some top tips below the pictures. I was astounded how well it worked on my nails, definitely easier than using it on the Uber Mat! Needless to say it was so satisfying to see it come together on my nails.

I've heard a few things about how this doesn't work on normal nail polish, or works better on gel polish. Mine was done using standard nail polish and I have to say I am very pleased with the results! I think I could have got it slightly more mirror'd with practise (and there will be practise!) but already it is noticeably shinier than any chrome/metallic polish I've tried. It's hard to make out in the pictures but at some angles I could see a wobbly version of my reflection in them!

Tips for mirror chrome powder on regular nail polish:


  • Make sure the polish you apply the powder over is smooth and free of imperfections. Any little lumps and bumps are visible through the mirror effect.
  • Apply a top coat over your base colour, and apply the powder when it's still very slightly tacky. A good way to check if it's just right is to touch it lightly with a finger to see if it feels dry, when it does try lightly touching your nails together, if there is a slight tackiness then the powder should stick well to the polish.
  • Don't apply too much pressure when applying the powder. It's surprising how little pressure is needed to achieve the mirror effect. The tip above helps ensure it sticks. As the polish is still very slightly sticky if you press to hard it can move some of it around and create lumps which will certainly upset the mirror effect!
  • Use a water based top coat. This is to stop creases forming in the powder. I used Revolution from Picture Polish which worked well as a top coat. Pretty hard to remove when used as a base coat though!
Thank you for reading! It's been a bit excessive writing wise, I've just got more to say than usual as I'm  so excited about this stuff! A truly gorgeous finish, and much easier to do than I expected.

Thursday 1 December 2016

Cirque Colors Facets Collection - Lazy Swatches

Happy 1st December everyone! Tonight I'm very excited to be bringing you my lazy swatches of the new Cirque Colors Facets collection. I have adored this collection since I first laid eyes on it and don't ussually treat myself to a whole collection, but it was my birthday recently and I just couldn't resist!

The facets collection consists of six glittering gem inspired polishes, full of flakies and shimmer. Due to a very busy time at work at the moment and trying to cram in as much nail art as possible before Christmas, I have opted for a lazy version of swatches! I actually rather liked the way it looked in the end and kept the colours on for a couple of days. Minus the thumb nails the others look quite good together I think.

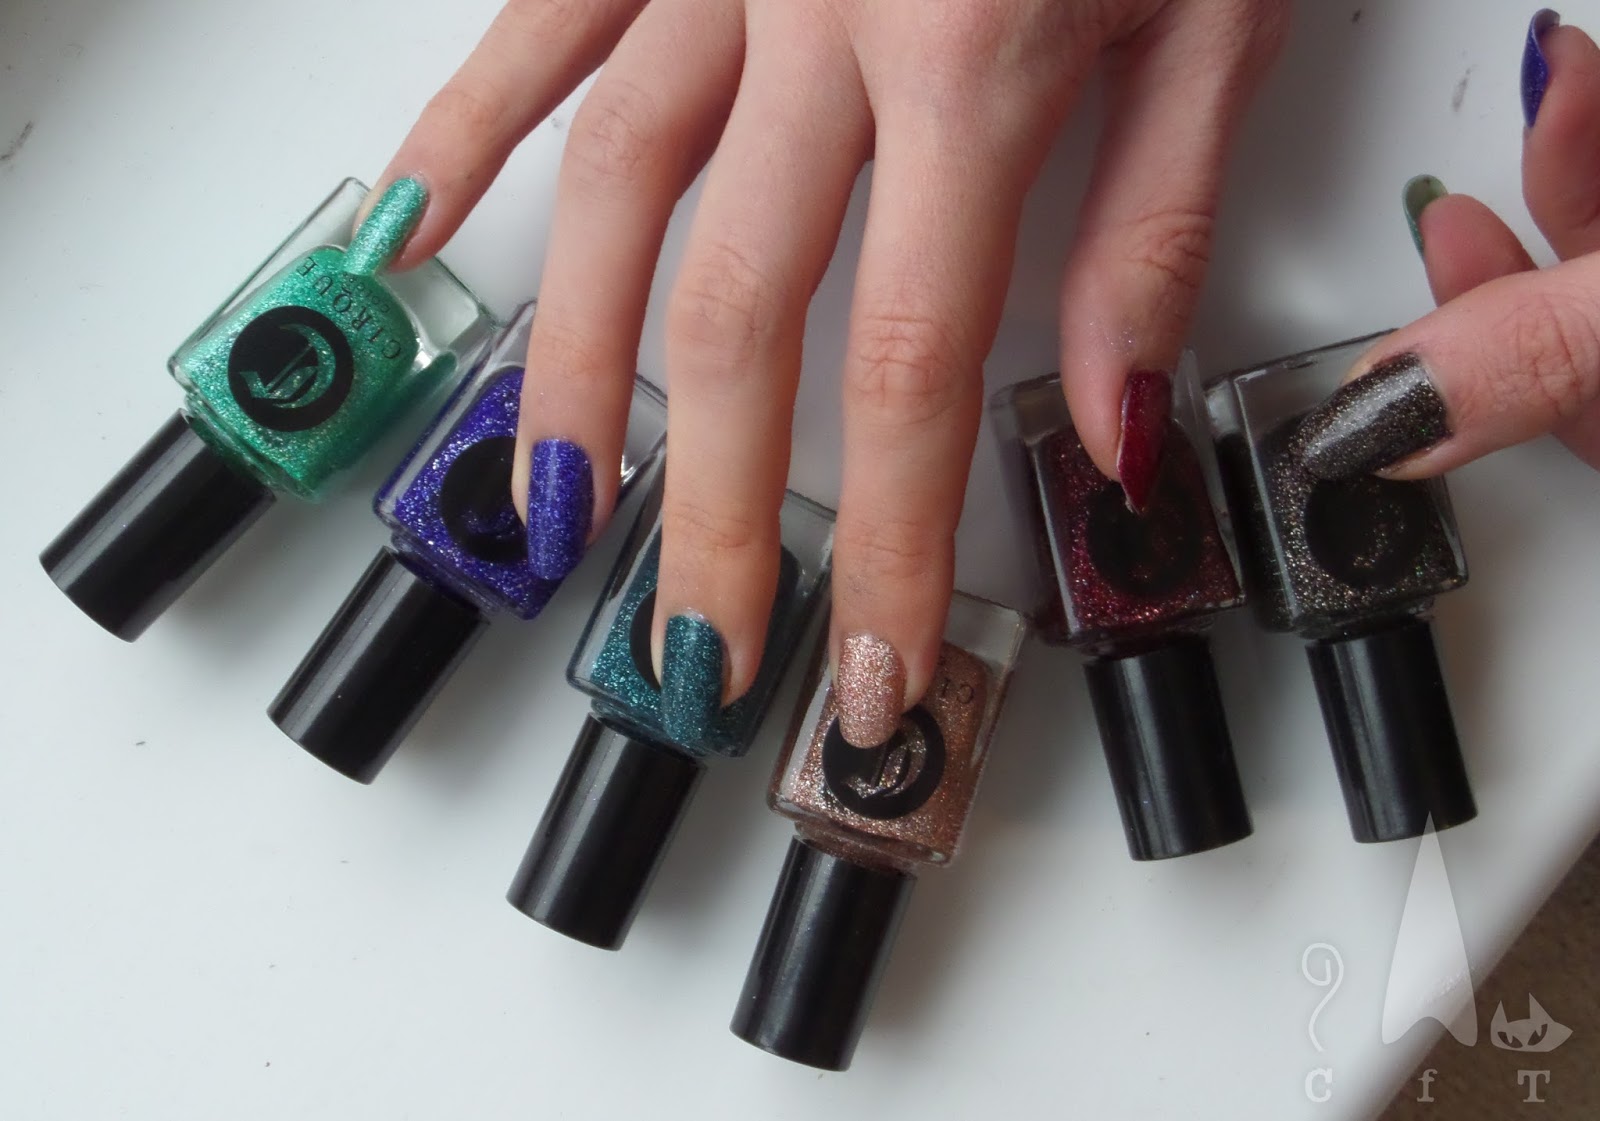
All colours below are two coats of polish with no top coat.
From left to right (1st picture): Paraiba, Tanzanite, Dioptase, Morganite, Garnet, Smoky Quartz


One of the first two colours I ordered was Morganite, a lovely peachy champagne colour. I really like how sophisticated and unusual it looks. It's a perfect party season colour but also a good year round polish.

This one is a little more sheer than some of the others. The picture two the left is two coats but I think in the light the smile line is still visible, so you may want to try three coats of this one for more opaque coverage.


Next up is Dioptase, a tealy green packed with shimmer/flakies. Coverage is good in two coats. I thought of this as a dark teal at first but seeing it next to the others it looks more green. I'd be tempted to use it in some Christmas nail art.


Tanzanite is one I really shouldn't have bought, as I have other colours not too dis-similar, it is exactly the sort of thing I like! It's another good coverage shade that covers well in two coats.

I'm really pleased with this colour as it's just so rich and so sparkly!


Paraiba is certainly the most summery of all the shades in this collection. I was super excited to try it but it probably won't feature in my Christmas nail art.

This shade is the other slightly more sheer polish in the collection. You can see here that with two coats the smile line is still a bit visible, another coat would certainly smooth this out.


Smoky Quartz as you can see is quite different to the other polishes in this collection in colour. It's also quite an unusual colour, with just one coat it's actually a deep brown rather than black. I like that about it but I wish it looked more brown once two coats have been used.

Had it been a more deep brown looking polish I think it would have been good for reindeer nails! That being said it is a lovely polish and has a sophisticated look.


Garnet is a lovely deep red sparkly polish, perfect for this time of year!

I wish I'd got a better picture of this as it is rather lovely. It's such a rich, deep colour, and of course the sparkle and many flakies are always a winner!


So, in conclusion, these colours are utterly gorgeous! I think my favourite is possibly morganite as it's unusual and dainty. However it is a tough choice, I love the bluey greeny colours, Tanzanite is just dazzling!