Showing posts with label Silver. Show all posts

Tuesday, 2 May 2023

Brand New Butterflies

Hey space turtles! Another Glam Nails Challenge look to share today - as you may have guessed the theme for this one is butterflies. I have a layered images butterfly stamping plate (Paradise 07) from Mo You London I've been meaning to try for a while so was pleased to finally use it for this look.

I started with a pale lilac base and then some silver glitter, followed by more silver glitter (colours listed below). I then added a glossy top coat which also has a hint of purple to it so between that and the base colour it gave the silver a bit of a lilac look. Next I added the butterfly images from the stamping plate, layering them up from dark to light before adding another layer of top coat. The pink one didn't really go to plan and I tried a few different colours but otherwise I really like this look. My favourites are the green butterfly and the one on my thumb nail.

Colours used: Lavender Ice - Painted Polish, Cosmic Girl - Danglefoot Polish, Diamond Glitter - Barry M, Wardour Street - Nails Inc, Plum - Barry M, Laguna - Barry M, Cyan - Barry M, Acai Smoothie - Barry M, Pink Lemonade - Barry M, Key Lime - Barry M, Watermelon - Barry M, Black Stamping Polish - Dance Legend, Essential White - Uber Chic

Monday, 5 December 2022

A Snowflake Nail Fail!

Hey space turtles! I'm feeling a bit ill today and I have a nail fail to share - so not my brightest day! After my success with the chrome powder stamping I decided I wanted to try the same with glitter. I started with two coats of black polish and then a matte top coat. Once fully dry I used sticking stamping polish to add some snowflakes from Mo You London's Noel 08 stamping plate, and then dipped each nail in glitter before brushing off the excess and rubbing in those particles that stuck to the polish.

As you can see there are some sort of snowflake-ish shapes but some stuck a lot better than others (it stuck a little too well on my little fingernail!). Unfortunately I couldn't get any more to stick. I wonder if I should have done them one at a time rather than stamping all of them and then adding the glitter, but I expected it to stick to the sticky polish. I also wonder if the glitter particles were too big and I need thinner glitter. Will just have to try again sometime I guess!

Colours used: Lady In Black - OPI, Matte Taco - Holo Taco, Black Sticky Stamping - Dance Legend, Silver Glitter (Holocopter) - Twinkled T

Sunday, 30 January 2022

Frosty Tips

Hey nail people! More wintery nail art to share today for today's Glam Nails Challenge prompt which is frost. I started with a sheer pink base, then a few layers of sheer shimmery blue/purple (colours listed below pictures). Once dry I added a layer of Platinum Diamond magnetic topper and hover the magnet over each nail for 30 seconds. I repeated this with another layer to add a touch more sparkle. Following that I used Mo You London's Festive 02 and Noel 07 stamping plates and white stamping plates to add the snowflakes and frosty branches.

I saw this nail polish combination on ken.nails Instagram and loved it so much that I bought the shimmery blue/purple so I could recreate it! I don't think I added enough layers as hers looked better, but I do still love this - very frosty! I'm pleased with my choice of frosty images too. It is a shame I missed Wednesday's prompt of 'ugly sweater' but I'm just a little too busy at the moment. It's been a great month of themes!

Colours used: Butterfly - Fun Lacquer, Platinum Diamond - Fun Lacqufuner, White Stamping Polish - Rainbow Connection

Tuesday, 23 March 2021

A Sunbeam Snake Attempt

Sssssssss hi! Sssnake nail art to share today so look away if you're not a reptile fan! No snakes were harmed in the making of these very shiny and slightly scruffy nails...

I have had this nail art look on my to do list for years! I originally saw them on So Hot Right Nail's Instagram and then watched the YouTube tutorial a few times. I loved the way the shiny foil shimmered through the snake pattern but didn't have all the appropriate tools for a long time, so I'm glad to have finally given it ago!

I started with a layer of clear gel polish,and while wet added little shards of silver foil I'd cut up using nail scissors, I went for approximately three pieces per nail. I then cured the gel and added a another clear layer which I cured. Next I added one layer of sheer black nail polish, the tutorial says to use gel but I don't have sheer black gel and using normal polish worked fine, I just needed to make sure it had plenty of time to dry. Once dry I stamped snake skin images from Uber Chic's Cold Blooded stamping plate over the top. Once fully dry I added a no wipe gel top coat. I used a peel off base under the whole look as I always do with gels.

My verdict on the overall result is mixed, but to be honest i think they came out pretty well given I was using techniques I'm not used to. I think the pattern on my ring fingernail was a little too wide but the others looked pretty snazzy! You can see already though that some of the foil shards did start to peel up a bit at the edges. Odd as they had layers over them but perhaps I just didn't fully seal in the edges well enough. I definitely enjoyed moving my hands around under bright lighting for the effect and would totally be up for trying these again.

Colours: Bluesky Gel Base Coat, Silver Foil (eBay), Coal - Fancy Gloss, Black Stamping Polish - Dance Legend, Gel Touch High Shine Gel Finish Top Coat

Monday, 7 August 2017

Disco Rainbow! (Inspired by So Hot Right Nail)

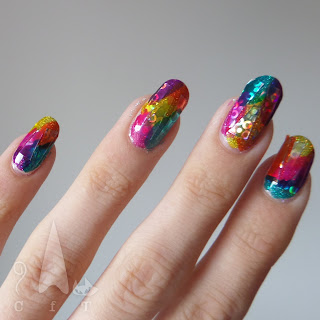
Hello nail world! Today I'm showing you my attempt at disco rainbow nails, as seen on the Instagram and Youtube accounts of So Hot Right Nail. Annoyingly I've noticed a bit of clean up I missed in the first couple of pictures, so please don't notice it! I couldn't take another picture later on as there was some damage, which I will go on to explain a little later.

So I started with a peal off base coat, and then a layer of silver holographic glitter polish (the ones I used are listed below the pictures). I then added a thin layer of a different holo polish to add some dimension, and because it is an even sparklier one! Next I cut some shiny holographic nail foil (bought cheap on eBay) into thin triangular pieces. I added some clear polish to my nails and used tweezers to place three triangles on each nail.

Those of you who have tried a similar technique in the past will have noticed that I missed something! I was meant to remove the clear layer from the nail foils before placing them. I completely forgot this which meant a few of them flaked off over the next few days taking the colour with them. I will definitely being doing similar designs again so at least there is a lesson there!

Finally I used some OPI Color Paints and painted them over the top in just one layer so the holo goodness shined through. I loved the final effect so it's a shame it didn't last longer!
Colours used: Cosmic Girl - Danglefoot Polish, 24 Karat Diamond - Fun Lacquer, Primarily Yellow - OPI, Chromatic Orange - OPI, Pen & Pink - OPI, Purple Perspective - OPI, Turquoise Aesthetic - OPI

And finally, a picture of just the silver, as it was soo shiny, and  a picture which didn't  quite come out right, but I just had to share how it looked with my bright pink Comforter shower gel from Lush!

Friday, 30 December 2016

Let it snow, let it snow, let it snow!

Hi everyone! It'as getting frosty outside so I've reflected this on my nails! This was one of the many Christmassy designs I was running out of time for, so decided to do them afterwards, it's still Christmas time till the tree comes down! I started with a base of Nails Inc's 'The Serpentine' which is a gorgeous navy blue. I haven't worn it for ages and forgot how lovely it is! There's a bonus picture of it alone at the bottom of this post.

Next I applied two layers of ILNP's 'Mega', a shimmery holo over the polish on my thumb and ring finger, and some snow glitter on my index and pinky fingers. For the snowflakes I used my QA57 stamping plate (no idea what brand - it was my first ever stamping plate and was bought cheap on eBay!). On the silver nails I used The Serpentine for blue snowflakes, and on my middle finger I used Soho Silver from Nails Inc, as Mega doesn't stamp very well. Fortunately they seemed to match well enough!

Once I'd finished I had a bit of a dilemma! I had been intending to put snowmen over some of the snowflakes, but I rather liked the design without them (picture at the bottom of this post). I dithered for a bit and then decided to try the snowmen as that was my original plan, this turned out to be a bit of a mistake, as you will see below. The polish I used was very thick as it was nearly finished and so my snowmen came out very blobby! Still, I kept it on for a few days, new year nails next!!

Colours used: The Serpentine - Nails Inc, Mega - ILNP, Soho Silver - Nails Inc, Snow Glitter - No7 at Boots, Coconut - Barry M, Lady In Black - OPI, Papaya - Barry M