Showing posts with label Rainbow. Show all posts

Tuesday, 25 April 2023

A Reflective Rainbow

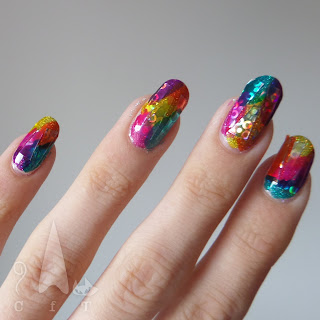
Hey space turtles! Something fun and bright to share today - rainbow nails. This was for a Glam Nails Challenge prompt on Instagram but is also something I'd been meaning to do for a while with my new rainbow reflective glitters (colours listed below pictures). 

I started with a nude base coat for opacity as I knew there's only be one layer of sparkly polish. I then used a small nail art brush to add the striped on my nails one colour at a time. This was easier and came out neater than I expected as the consistency of these polishes is so perfect for it. Reflective glitters tend to be quite opaque and thick so it worked really well. I loved looking at these gorgeous glitters sparkling in the sun too! All of the colours are from the Painted Polish 'At Sea: Rainbow Reef' collection except the red as that wasn't in stock where I buy my indie polishes. The red is from the same brand and finish however so is close enough I think, just slightly darker. Love how these came out :)

Colours used: Soft Focus (nude) - Polished for Days, You Razz My Berries, Shell We Dance, Catch Sun Rays, Can't Kelp Myself, Laguna Matata, Feelin' Knotty - All Painted Polish

Sunday, 11 September 2022

Rainbow Nails for Porto

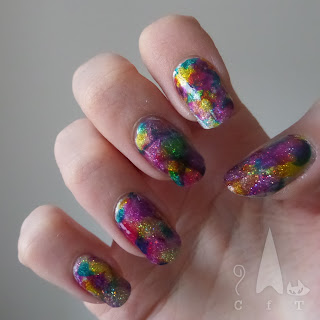
Hi Space Turtles! I'm back after a week away in the beautiful city of Porto in Portugal. These where my holiday nails (along with the Aperol Spritz ones I shared before). I took inspiration from me.time.manis on Instagram who created a gorgeous rainbow look with the Bubbly Collection from Cirque Colors. I decided to attempt a recreation as a fun holiday look and I love it! It's a great collection and the colours are so fun together.

I started by unscrewing the gaps on the ones I wanted to use on the nail I was working on, then applied a line of colour of each polish gently, trying to blend or overlap them slightly without the brushes getting contaminated with other colours. I then held a magnet over the top for 30 seconds. Once all nails were dry I repeated the process with a second coat. I probably didn't need to magnetise the first coat in the end but thought it might help.

I wish I'd managed to blend the colours a little better and perhaps managed to get a better magnetic effect but I did know that would be tricky with the multiple colours as they dry so fast. Despite this I do love these. They are such a fun and bright colour combination and perfect for holiday nails!

Colours used: Aperol Spritz, Sparkling Yuzu, Soda Shoppe, La Dolce Vita, Helter Seltzer, Fizzing Lifting Drink - All Cirque Colors

Wednesday, 1 April 2020

Unicorns & Rainbows for Key Workers & Holo Taco Challenge!

Hello again - I'm back already! I need to get this blog post out in good time as I am entering it in the Holo Taco challenge this week, the first theme being Unicorns. I have a whole list of nail art ideas to do but I put it aside when this challenge prompt came up on my Instagram feed, and I'm so glad I did! I used the Bundle Monster X Nailedthepolish stamping plate for the unicorns, and the rainbows as you can probably tell are freehand. Here in the UK people have been putting rainbows in their windows as a sign of support for key workers during this challenging time. I think it's mostly a thing people have been getting their children to do but I fully intend to do one myself! Some of our neighbors have put a whole rainbow arch of balloons on the front of their caravan which is awesome! So I wanted to add my own little rainbow nails, though obviously no one is seeing them in person, so I need to get a move on with my window rainbow!

I started this look with a peel off base coat, due to the glitter, and then a thick layer of silver glitter, followed by a couple of coats of another glitter to add some depth (colours listed below the pictures). For the unicorns I used the advanced stamping technique (see how here) and my Uber Mat. I coloured them in with white polish, silver horns, and some of Cirque Colors Vice 2019 collection. For the rainbows I used a small nail art brush to paint each of the Cirque Colors Vice 2019 collection polishes over the glitter in a rainbow shape. It's a tad wobbly as freehand isn't my strength, but I think it came out reasonably well. Absolutely loving having the vice colours out again, they are so so bright!

So overall as you can probably tell I am really pleased with these! I'm also finally up to date with my blogging again, this look is actually still on my nails for once (did them on Sunday). I've generally been fine with not being able to show people my nail art in person, as I share it all online anyway, but I love these so much I would have quite enjoyed sharing them, they're pretty hard to miss too being so bright! Anyway, I hope you like them :) Stay well!
Colours used: Cosmic Girl - Danglefoot Polish, Diamond Glitter - Barry M, Black Stamping Polish - Rainbow Connection, A Mantis Shrimps Favourite Colour - Bees Knees, Silver Lining - Barry M, Game Over - Cirque Colors, Vitamin D - Cirque Colors, Electric Daisy - Cirque Colors, High Roller - Cirque Colors, Miami-Dade - Cirque Colors, Rehab - Cirque Colors

Wednesday, 27 November 2019

Nails Inc Blame It On The Rainbow

Hello world! Just a quick blog post today in the form of a review of one of the Nails Inc duo's. I'd been considering this for a while but I'm not much of a pink person, but then I found it in TK Maxx so it was clearly meant to be! I normally wear nail art and decided to try this during the week between a couple of other designs, and ended up keeping it on longer than expected as it was so lovely.

What's Poppin' is a lovely bright yet warm pink with a hint of lilac. I don't usually go for pink but I was so pleased with how this looked. The shade is flattering and so glossy. I was also really please with the consistency and the brush was a great shape making it easy to use. I used two coats as I could just about see some nail line when I held my nails up to the light with one coat, but this could definitely work as a one coater.

Rainbow Sprinkles is exactly what it says on the tin! A mixture of different coloured glitter particles in a clear base. It's super sparkly and fun! The glitter is fairly densely packed so I built this up with a few coats rather than sponging it on. I did use a sheer pink base as I knew my nail would show a little underneath, however I think the glitter distracted my eyes away from that anyway!

So as you can see - a clear winner! I would definitely recommend this duo.
Colours used: What's Poppin - Nails Inc, Rainbow Sprinkles - Nails Inc, Bashful - Barry M

Monday, 7 August 2017

Disco Rainbow! (Inspired by So Hot Right Nail)

Hello nail world! Today I'm showing you my attempt at disco rainbow nails, as seen on the Instagram and Youtube accounts of So Hot Right Nail. Annoyingly I've noticed a bit of clean up I missed in the first couple of pictures, so please don't notice it! I couldn't take another picture later on as there was some damage, which I will go on to explain a little later.

So I started with a peal off base coat, and then a layer of silver holographic glitter polish (the ones I used are listed below the pictures). I then added a thin layer of a different holo polish to add some dimension, and because it is an even sparklier one! Next I cut some shiny holographic nail foil (bought cheap on eBay) into thin triangular pieces. I added some clear polish to my nails and used tweezers to place three triangles on each nail.

Those of you who have tried a similar technique in the past will have noticed that I missed something! I was meant to remove the clear layer from the nail foils before placing them. I completely forgot this which meant a few of them flaked off over the next few days taking the colour with them. I will definitely being doing similar designs again so at least there is a lesson there!

Finally I used some OPI Color Paints and painted them over the top in just one layer so the holo goodness shined through. I loved the final effect so it's a shame it didn't last longer!
Colours used: Cosmic Girl - Danglefoot Polish, 24 Karat Diamond - Fun Lacquer, Primarily Yellow - OPI, Chromatic Orange - OPI, Pen & Pink - OPI, Purple Perspective - OPI, Turquoise Aesthetic - OPI

And finally, a picture of just the silver, as it was soo shiny, and  a picture which didn't  quite come out right, but I just had to share how it looked with my bright pink Comforter shower gel from Lush!

Wednesday, 18 January 2017

Rainbow Oil Slick

Hello nail people! Today I'm recreating a look I've seen around on Instagram a fair bit and couldn't resist trying. The first version I saw was a 'unicorn oil slick' and had more pastely colours. I used my OPI Color Paints for a brighter look. The finished product was less unicorn like so it is a rainbow oil slick!

This design was good fun and easy to do. I started with a silver base, and the added some glitter. I used two different silver glitters. Cosmic Girl from Danglefoot Polish gave a lovely twinkly and somewhat holographic look, and then I added some Diamond Glitter from Barry M for some larger glitter pieces and extra sparkle.

I googled Unicorn Oil Slick and came across a handy video from Nails by Jema. I enjoyed watching the video for tips. I knew how I was going to do the nails but wanted to check out my options! I decided to change my original plan of smooshing the colours onto my nails with a stamper, and followed Jema's advice of using my Uber Mat to create decals instead. This meant I could create more than I needed, and select only the best ones to use. I'm glad I did that as some of the ones on my mat weren't as good as I'd have liked. The ones on my nails were the most multi coloured, still ended up with one very pink little finger though!
Colours used: Silver Canvas Undercoat - OPI, Cosmic Girl - Danglefoot Polish, Diamond Glitter - Barry M, Primarily Yellow - OPI, Pen & Pink - OPI, Purple Perspective - OPI, Turquoise Asthetic