Showing posts with label Smoosh. Show all posts

Thursday, 10 March 2022

A Smoosh of Blue

Hey everyone! Slightly messy nail art to share today and I'm noticing now that the pictures are a bit blurry but I don't really have the energy to do anything about that! I'm feeling quite run down and it's been a busy few days.

I decided to try two of my Spot It polishes together with some Unicorn Skin nail polish to create some fluid nail art. I started by applying some blobs of blue nail polish and flakie polish on my Uber Mat, followed by the two Spot It polishes. I then used a stamper, and in some cases a smaller mat to 'smoosh' the polish together. This involved tapping it reasonably fast and then watching the polishes swirl together. I let it dry and then added a layer of clear polish. Once that was dry I peeled them off the mat, stuck them to my nails and trimmed them with a metal tool & scissors. Finished off the look with a quick dry topcoat.

In conclusion, I like these, though I'm not sure the Spot It effect comes across as well as it could. I love having the flakie effect included though - really makes it glow!

Colours used: Spot It Blue - Dance Legend, Spot It White - Dance Legend, Blueberry - Barry M, Cosmic Unicorn Skin - Holo Taco

Tuesday, 15 September 2020

A Shimmering Pastel Forest

Hello all - I'm back again already, I'm on a roll! Today the nail art I'm sharing is inspired by gabys_nails on Instagram. It's from quite a while ago but has been sitting on my nail art to do list! Mine came out a lot more yellow than hers, and more yellow than I'd intended, but I still like it! I like the pastel take on a forest at night time look so thought I'd give it a go.

I started with 'smoosh' nail art for the base, which involved dabbing nail polish of a few different colours on a stamper, and dabbing it onto my nails. I put the yellow on first which is probably why it came out so strong! I then used purple nail polish and the Noel 06 stamping plate from Mo You London to add the trees. Next up I added a few stars and moons using the same plate, and then a coat of Scattered Holo Taco. I was so impressed with the scattered holo, it's so perfect and even better than what I had hoped for! My boyfriend said it looked like snow, which definitely inspired me to use it on some winter or Christmas designs later in the year.
Colours used: Vintage Tee - Nails Inc, Notting Hill Carnival - Nails Inc, Mint Green, Nails Inc, Peach Melba - Barry M, Blue Moon - Barry M, White Stamping Polish - Rainbow Connection, Wigmore Street - Nails Inc, Scattered Holo Taco - Holo Taco

Sunday, 26 July 2020

Travelling Around The Map Nails

Hello from the map on my nails! This is another Glam Nails Challenge July prompt, this time it's Travel. I was going to do boats but then remembered that I have this Geography themed plate from Mo You London's Scholar collection which has map images, and thought that would be suitable and a little different too. It also gets another stamping plate off my untried pile!

I started with a base of beige (colours listed below the pictures) which was as close as I could get to a that brownish old map colour! To give it that mottled look of old paper (but sparkly) I used some cling film (saran wrap) to dab on some metallic gold and bronze polish. Following that I stamped map images over the top in brown. The one on my thumb didn't come out entirely but I actually think that works quite well, giving it an older map look. I finished off the look with a matte top coat as I've never seen an old map that's shiny!

Overall I quite like these. They're kind of subtle, and contrasted greatly to the bright neon design I had on my other hand! (Palm trees from a couple of posts back)
Colours used: Basil Street- Nails Inc, Cocoa - Barry M, Gold Digger - Barry M, Bronze Bae - Barry M

Saturday, 13 June 2020

A Selection of Nail Art Techniques for Nail Addicts Collab

Hi everyone, hope you've had or are having a lovely day! I have some very bright nail art to share with you today. A few years ago I was part of the Nail Addicts Collab on Instagram, whose first challenge was 'nail art' themed. I did some pastel nails with images of nail art brushes and stamping tools, I believe I bought the plate especially. This year the collab is back, and starting with the same theme, so I thought I'd try something a bit different rather than going back to the same plate, tempted as I was!

On each nail I tried out a different nail art technique, all using the Bring On Spring collection from Wikkid Polish. I enjoyed getting these super bright neons out again! I finished off with a matte top coat to enhance the colour of the neon polishes. I've listed the effects I used below:

Index Finger - Watercolour (nail polish mixed with polish remover on foil & applied with a brush)
Middle Finger - Three colour gradient.
Ring Finger - Stamping (I'd forgotten white doesn't show up well over neon yellow!)
Little Finger - Dry brushing
Thumb - Smoosh (polish blobbed onto a stamper and then roughly pressed on the nail)

The smoosh nail is definitely my favourite and I'm glad to be back doing this challenge again!
Colours used: Cream Soda - Barry M, Bikini Bombshell - Wikkid Polish, Hello Sailor - Wkkid Polish, Joyful L'il Jellybean - Wikkid Polish, Peachy Beachy - Wikkid Polish, My Mate Illuminate - Wikkid Polish, Down At The Deep End - Wikkid Polish, White Stamping Polish - Rainbow Connection

Thursday, 6 September 2018

Bubble Smoosh! (Take One)

Hi again! Today we have something super bright and smooshy on my nail blog! I have been inspired by Hanninator on Instagram, she has been doing a lot of these bubbly colourful nails in a variety of colours and they look awesome! I ended up searching the internet and as soon as my nail polish buying ban was up I ordered the full set of four Spot It polishes by Dance Legend which she uses for these designs.

So this was my first attempt. Some nails have come out better than others which I guess is to be expected. I've tried to get the best ones in these pictures but please excuse the blurring! I used my Uber Mat and a clear stamper to make decals. For each nail I started with a base (varying the colour) then swiped some generous quantities of the other colours over the top. I then pressed the stamper lightly over the top to merge the colours together. I tried varying the pressure and speed of this but couldn't quite work out what worked best. It's easier to see once on the nails!

I've seen this effect described as fluid nail art, which makes sense but I think I will call mine a bubble smoosh! It's a little like the 'smoosh' nail art which people do directly on their nails, but with the addition of bubbles from the Spot It polishes.
Colours used: Spot It Blue - Dance Legend, Beach Hut (Orange) - Models Own, Yellow - Barry M, Claridge Gardens (Neon Pink) - Nails Inc, White - Emily de Molly

Tuesday, 13 March 2018

Magical Mystical Symbolic Rune Thingy Nails!

Hello nail people! I've been away the last week with work, and then busy over the weekend so I have a bit of a backlog of nail stuff to try and get to this week. This one is from a few weeks back, using a new stamping plate I got just before Christmas. I had been planning this nail art  for ages so it was good to finally give it a go.

I started with a pale grey base, and then used clingfilm (saran wrap) to splodge some medium grey over the top for a mottled effect. Meanwhile, I created decals on my Uber Mat and coloured them in with a dotting tool. You can see how I did that here. I covered the design using a matte top coat, and then went over the pattern part again with a clear top coat to bring back the intense shine on the coloured sections. Not sure how well that shows in the pictures, but it was good in person! 

I'm pleased with how these turned out, and looking forward to using the Mo You London Minimal 07 plate again, although it might be a while as I have a few untried plates!
Colours used: White Horse Street - Nails Inc, Grey - Barry M, Midnight Mischief - Painted Polish, Estate - Cirque Colors, Who Needs Love - Colors by Llarowe,  My Car Has Navy-gation

Saturday, 27 January 2018

Fish scale tail nails!

Bubble bubble (what noise does a fish make?) everyone! Tonights nail art is mermaid tail nails. I based this on a dragon scale design I saw on clairestelle80's Instagram. I don't think mine came out as well as hers but I still like it.

I started off with a white base (which was a nightmare as mine's gone rather gloopy!) and then 'smooshed' some colours over the top. I did this using a clear stamper, putting the a couple of blobs of each colour on the head, and pressing it down a few times on each nail. The colours I chose all have a bit of subtle shimmer.

Once this was dry I use the mermaid scales image from my Bundle Monster twi-star stamping plate and added the scales outline on each nail in purple. I then did the same in silver holo, lining up the scales so the holo was just underneath. Unfortunately the silver holo was not as obvious as I would have liked but it showed up quite well in bright light.

Overall was fairly happy with this design, hope you like it too!
Colours used: Alpine Snow - OPI, Succulent Garden - Cirque Colors, Ballet Slipper - ILNP, Dusk Dazzle - Femme Fatale, Wigmore Street - Nails Inc, Harp On It - Color Club

Sunday, 1 October 2017

Stamping Sunday: Pastel Smoosh

Hello all! I'm writing to you in a state of half sleep this evening! I've been away on business in Dublin last week and then out on Friday (which of course takes me two days to recover from now, grr!) so still pretty sleepy!

This was the nail art I wore in Dublin. For the pastel nails I painted them with off white, and then painted purple, blue and yellow onto a stamper, and dabbed them onto my nails. I then used my Back To The 20's 01 stamping plate from Mo you London to stamp some images on top in black. I like the thumbnail best by far, I think I should have used that image on all my nails except the accent.

For the accent I used a lovely shimmery metallic from Cirque Colors. This design was OK but not a favourite of mine. The black smudged a little, and I think the patterns chosen could have worked better. You'll also see a bit of mess round the edges, this was caused by the challenges of a cheap peel of barrier! It made the clean up process more difficult that just using remover and brushes!
Colours used: Cream Soda - Barry M, Blue Moon - Barry M, Notting Hill Carnival - Nails Inc, Wardour Street - Nails Inc, Midnight Mischeif - Painted Polish, Idyllic - Cirque Colors

Thursday, 9 March 2017

Elegant Smoosh

Hi everyone! Something a bit different from my usual today, a smoosh nail art design with a teeny bit of freehand too! I saw a gorgeous white purple and gold smoosh on Sveta Sanders Instagram which I'd been meaning to try for a while, and then a design where someone had used negative space and smoosh (I can't remember who it was!) so I thought I'd combine the two. Smoosh is such a weird word but it does describe this technique well!

I used a clear stamper so I could see where I was placing the colours and tweak it if necessary. I started with a couple of layers of a Sally Hansen french manicure polish (colours listed at the bottom of this post). It had a very ethereal blueish glow which seemed odd for a french manicure but really worked with this design. I had a bit of a nightmare with it though, it took so long to try, and then peeled up in some places and had to be patched up when I peeled the stencils off.

Once the polish was dry (or so I thought!) I used some straight nail stencils to get a straight line and painted the upper two thirds of each nail white. Once dry I lightly applied the stencils again and began the 'smoosh' effect. I dotted white, purple and rose gold onto the stamper and pressed into randomly onto my nails. I love this colour combination, Sveta Sanders had a very good idea!
I used a nail art brush to paint a rose gold line under the smoosh, but felt like it looked a bit incomplete so added an outline around the bottom third of my nail as well. The rose gold (Cirque's Halcyon) is just so gloriously shiny so it stood out really well.

So all in all I was very pleased with this nail experiment! I think it looks elegant but interesting, and have kept it on for nearly a week so far as I can't quite bring myself to get rid of it! As always some nails I prefer to others, I think the thumbs where the best ones on this occasion.
Colours used: Sheerly Opal - Sally Hansen, Alpine Snow - OPI, Wigmore Street - Nails Inc, Halcyon - Cirque Colors

Wednesday, 18 January 2017

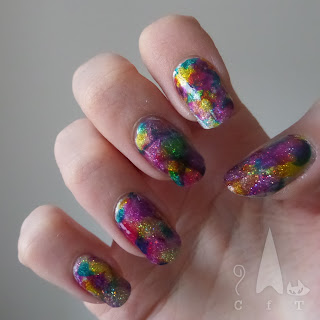
Rainbow Oil Slick

Hello nail people! Today I'm recreating a look I've seen around on Instagram a fair bit and couldn't resist trying. The first version I saw was a 'unicorn oil slick' and had more pastely colours. I used my OPI Color Paints for a brighter look. The finished product was less unicorn like so it is a rainbow oil slick!

This design was good fun and easy to do. I started with a silver base, and the added some glitter. I used two different silver glitters. Cosmic Girl from Danglefoot Polish gave a lovely twinkly and somewhat holographic look, and then I added some Diamond Glitter from Barry M for some larger glitter pieces and extra sparkle.

I googled Unicorn Oil Slick and came across a handy video from Nails by Jema. I enjoyed watching the video for tips. I knew how I was going to do the nails but wanted to check out my options! I decided to change my original plan of smooshing the colours onto my nails with a stamper, and followed Jema's advice of using my Uber Mat to create decals instead. This meant I could create more than I needed, and select only the best ones to use. I'm glad I did that as some of the ones on my mat weren't as good as I'd have liked. The ones on my nails were the most multi coloured, still ended up with one very pink little finger though!
Colours used: Silver Canvas Undercoat - OPI, Cosmic Girl - Danglefoot Polish, Diamond Glitter - Barry M, Primarily Yellow - OPI, Pen & Pink - OPI, Purple Perspective - OPI, Turquoise Asthetic