Showing posts with label OPI. Show all posts

Friday, 6 January 2023

Happy New Year 2023

Happy new year! I have some nail art to share and when I went to do it I realised that I hadn't shared either of my new years eve looks so have decided to share them together in one blog post since I've already got a couple more to catch up on!

Look one - New Years Day. I started with a peel off  base coat followed by a layer of nude polish. I then added two layers of tinsel themed sparkly nail polish and a 'glitter grabber' to smooth it out a bit. I made decals on my Uber Mat for the thumb nail and middle fingernail using Mo You London's Noel 10 stamping plate. I hadn't remembered that it would be a reverse image so it's not really clear that the bottles are meant to say gin! The other images were stamped directly onto my nails and 2023 was freehand. I was pretty pleased with my freehand numbers though I wish the 3 wasn't disappearing into the corner!

Look two - New Years Eve. This look was to capture the still very festive feelings around new year and parties/celebrations. I also had a new red polish I wanted to try so gave that a go. Images are from Mo You London's Noel 15 and Festive 05 stamping plates and stamped in gold (pictured). This was simple and easy to do but I'm pleased with it. Captures the right vibes I think!

Colours used: Tinsel Garland - Fancy Gloss, Black Stamping Polish - Dance Legend, Watermelon - Barry M, Red Hot Rio - OPI, Gold Digger - Barry M
Red - Undisclosed, Bright Lights - Barry M

Monday, 5 December 2022

A Snowflake Nail Fail!

Hey space turtles! I'm feeling a bit ill today and I have a nail fail to share - so not my brightest day! After my success with the chrome powder stamping I decided I wanted to try the same with glitter. I started with two coats of black polish and then a matte top coat. Once fully dry I used sticking stamping polish to add some snowflakes from Mo You London's Noel 08 stamping plate, and then dipped each nail in glitter before brushing off the excess and rubbing in those particles that stuck to the polish.

As you can see there are some sort of snowflake-ish shapes but some stuck a lot better than others (it stuck a little too well on my little fingernail!). Unfortunately I couldn't get any more to stick. I wonder if I should have done them one at a time rather than stamping all of them and then adding the glitter, but I expected it to stick to the sticky polish. I also wonder if the glitter particles were too big and I need thinner glitter. Will just have to try again sometime I guess!

Colours used: Lady In Black - OPI, Matte Taco - Holo Taco, Black Sticky Stamping - Dance Legend, Silver Glitter (Holocopter) - Twinkled T

Thursday, 29 September 2022

Tile Inspired Aztec Nails

Hey space turtles! Some colourful nail art to share as the weather gets colder. These were inspired by lovely tiled houses we saw on holiday in Porto. I wanted to do some nail art based on some of the more colourful tiles but didn't really have any stamping plates with such patterns and didn't fancy trying to freehand them so I chose these Aztec style patterns instead!

I started with a beige background and created decals on my Uber Mat with the patterns. I used Mo You London's Explorer 33 and Explorer 04 stamping plates and black stamping polish, filling them in with some bright block colours and white. You can see how here. Once dried and applied I added a shiny top coat, and then tried a matter one a day or two later. The matte brings out the colours well but I do like this look shiny too. I think they're got late summer nails but can't believe it's nearly October and I've done no snuggly autumn nails yet! Will have to do some after Halloween.

Colours used: Soft Focus - Polished For Days, Black Stamping Polish - Dance Legend, Red Hot Rio - OPI, Spring Green - Barry M, Baker Street - Nails Inc, Yellow - Barry M, Neon Activator - Nails Inc

Wednesday, 17 November 2021

Raindrops Keep Falling on my Nails

Hello nail people! I hope it's good weather where you are - it's raining on my nails! This nail art is for another Glam Nail Challenge prompt with an autumnal theme of rain. I went straight to by UberChic Forecasting Glam stamping plate for this look and decided to use a variety of iridescent shades for the raindrops. I kept most nails the same in the end as I liked the multi coloured raindrops idea so much.

I started with a base colour of dark blue on all my nails (colours listed below the pictures) and then made some decals on my Uber mat, you can see how here. I used a variety of different iridescent shimmers for the raindrops, I thought the sheer consistency of some of them would work well for magical rain. I did want to add a bit more though so decided to do an umbrella accent nail. Simplest one but I think it adds something! Overall pleased with these :) I think they're fun and I could never get bored of this gorgeous shade of blue!

Colours used: My Car Has Navy-gation - OPI, White Stamping Polish - Rainbow Connection, Pinktail - Barry M, Butterflyfish - Barry M, Jellyfish - Barry M, Angelfish - Barry M, Seahorse - Barry M, Electric Eel - Barry M

Monday, 26 July 2021

Polka bubbles

Hi hi! It's been a slightly strange day and I'm glad to be in my PJ's writing a blog post! This is some nail art I did on Sunday and have been meaning to try for absolutely ages!  I saw Trunails275 on Instagram do these bubble effect nails absolutely ages ago and I was blown away! She included a brief description of how to do it so I had to give it a try.

I started with a dark blue base, and then on my Uber Mat mixed some white acrylic paint with water using a nail art brush. I then used my largest dotting tool to pick up some of the watery paint mix and apply it gently to my nails in spots. I then used a cotton bud (or q-tip if you're in the US) to gently remove the excess water from each bubble. This worked pretty well and once dry I used sharpies to add some colour to the bubbles, finally finishing off with a top coat to seal it in.

I'm pretty pleased with how these turned out even if they aren't quite as bubbly as the originals! I think the circles need to be a bit more 'wobbly' and perhaps a bit clearer as well. I reckon I should have used more water. Not bad for a first attempt though!

Colours used: My Car Has Navy-gation - OPI, White Acrylic Paint, Multiple Sharpies

Tuesday, 5 May 2020

Day vs Night Nails

Hey everyone, back again with another entry to the Holo Taco nail art challenge. This weeks theme is Day vs Night. I was not expecting this one, they are getting quite creative with the themes, after the first few themes of Unicorn, Spring and Easter I was expecting something more generic like Mermaids (not dissing the mermaid theme though - I would enjoy that one too!). I decided to do one hand for the Day theme and the other for the Night, details below.

Day - For this I started with a blue base, medium blue on three of my nails (colours listed below the pictures) and a darker blue on my thumb and ring finger nails. Over the darker blue I used an untried polish, a beautiful flakie topper from Cuticula called Candy Crush. I really love the way it looks over navy! The navy polish also holds special memories for me as it was a gift from my boyfriend. On my other fingernails I tried to theme them around things we've seen on our daily walks, so we've got a cat, some bees, and a rainbow. The bees were added using the advanced stamping technique to create decals, for the cat face I used regular stamping, and the rainbow was freehand as you can probably tell!

Night - For the night time nails I used a similar lay out, with a purple metallic base and darker accent nails. You can't really tell very well in the pictures but the black actually has a green/purple/blue metallic shift to it under the silver glitter which I added over the top. I think this base gives the glitter some extra depth, and enjoyed the layering effect. It feels relevant to the theme too as I know Cristine from Simply Nailogical has gone for a layering effect with many of the Holo Taco polishes. I used advanced stamping for the stars and cat on the moon, and regular stamping for the cat face. The cat face showed up better than I expected over the purple, but the stars didn't come out very well, I think I went over the lines too much!
Colours used: Can't Find My Czechbook - OPI, My Car Has Navygation - OPI, No FOMO - Wikkid Polish, Black Stamping Polish - Rainbow Connection, Casablanca - Jessica Nail Polish, Diamond Glitter - Barry M, My Mate Illuminate - Wikkid Polish, Bikini Bombshell - Wikkid Polish, Joyful L'il Jellybean - Wikkid Polish, Candy Crush - Cuticula

Sunday, 22 December 2019

Christmas Jumper Nails & 'Ugly' Nail Polish

Only three days till Christmas! It's all coming towards me very fast and I feel a bit unprepared but excited! I've got all my presents now but haven't wrapped any for those I'm seeing during the holidays. I'm lucky enough to be off from Christmas eve through to the new year but will be working on Monday. So I have kind of ended up with a backlog of Christmas nail art! I will have to do two blog posts in one day if I want to get them all out before Christmas! This is partly due to a lovely trip to Oslo we had from Saturday to Wednesday.

So for this nail art I wanted to do some Christmas jumper patterns as I have a fair few of these between my various Christmas stamping plates. I also thought it would be a perfect opportunity to try Pineapples Have Peelings Too from OPI. I remember when this first came out and I saw it in a department stores and felt... confused... it seems to be a odd mix of glitter colours to have in a gold base! Several years down the line I've seen it come up in various bloggers least favourite polish lists, and when I saw it reduced in TK Maxx I had to have it for that very reason! To be honest it's not the ugliest polish I've seen, and it has some festive fun to it, I'm kind of fond of it in a way! But it was a strange idea to put chunky glitter in metallic gold which then covers the glitter up on 2nd and 3rd layers (which it needs as the gold is thin). The colour choices are also unusual and glitter placement is quite tricky as the glitter particles are heavy in the watery base. Not what I would usually expect from OPI but it has it's own special place in my nail polish collection and it is kind of perfect for 'ugly Christmas jumper' nails. I also don't think Christmas jumpers are ugly, I think they're glorious! :D

I feel like I've waffled on a bit there, for the nails that weren't wearing Pineapples Have Peelings Too I used metallics (colours below the pictures) and white stamping polish over the top. The stamping plates used were Holiday Spirit (Christmas-01) from UberChic, and Festive 06 from Mo You London. My finger nails were just short enough to use the MYL ones and I used UberChic images on the thumbs. I was quite happy with these overall, fairly simple to do and quite fun. Also despite it's questionable formula I do think Pineapples Have Peelings Too is possibly the best name for a nail polish I've ever seen! (Giddy Kipper is a close second)
Colours used: Pineapples Have Peelings Too - OPI, Red Velvet - Mark (Avon), Emerald Green - Barry M, Primrose Park - Nails Inc

Sunday, 19 May 2019

Stamping Sunday: Origami In The Sky

Hello world! I am playing catch up as usual but am pleased to be sharing this nail art today as I loved it! Kept this on for at least a week. It was on my nail art to do list for some time but came out well (if I do say so) and I liked it even more than I expected to. My favourite nail is the thumb nail in the top right picture with the squid and diplodocus. 

I started with a blue base on all nails accept my ring finger nail, where I used a holographic silver base. I followed the silver with a holographic glitter from Barry M, which is surprisingly good holo given it is a mainstream band and is a polish from a few years ago too. For the origami images I used the advanced stamping technique (you can see how here). I tried making entire nail decals together but did have to cut and pasts some of the images separately as I'd stamped them too far apart.

Simple design but I loved it and I think it works well for spring. What do you think?
Colours used: Can't Find My Czechbook - OPI, Midnight Mischief - Painted Polish, White Stamping Polish - Emily de Molly, Harp On It - Color Club, Diamond Glitter - Barry M

Wednesday, 27 December 2017

Trondheim Inspired Christmas Nails

Hello everyone, hope you've had a lovely Christmas break! Today I'm sharing with you my nail art from the week before Christmas, inspired by our weekend break in Trondheim, Norway. I would highly recommend a Christmas trip there, it was like a magical Christmas wonderland! We were lucky that it snowed a fair bit, making it even more picturesque. There were Christmas lights everywhere and there was a rustic cosy theme at many places. We spent a fair bit of time at the Christmas market in the town square. The market stalls were adorable and it was a good size of market to have enough to look at without it being so big you'd get lost! There are pictures up on my Instagram if you'd like to see (link in the top right corner).

So for the nail art I based it on things we'd seen, lights on my index finger, snowy mountains on my middle, snow on my ring finger, trees and hills on my little finger, and Christmas jumper patterns on my thumb. I used the Uber Chic Christmas-01 plate for the lights, snowflakes and jumper pattern. For the hilly scenes I used the appropriately named Scandi 01 plate from Mo You London. I used the advanced stamping technique with my Uber Mat for those images where the colours have been filled in. You can see how here.

I was pleased with how they turned out and they bring back fond memories :)
Colours used: Succulent Garden - Cirque Colors, Surfboard - Barry M, Glacier Blue - Cirque Colors, Midnight Mischief - Painted Polish, White Knight - Mo You London, Estate - Cirque Colors, Grey - Barry M, Alpine Snow - OPI, Spring Green - Barry M

Monday, 7 August 2017

Disco Rainbow! (Inspired by So Hot Right Nail)

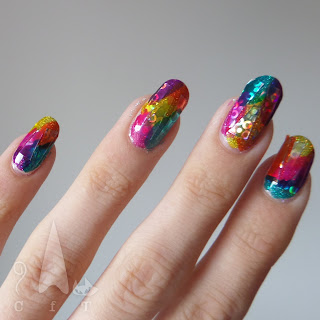
Hello nail world! Today I'm showing you my attempt at disco rainbow nails, as seen on the Instagram and Youtube accounts of So Hot Right Nail. Annoyingly I've noticed a bit of clean up I missed in the first couple of pictures, so please don't notice it! I couldn't take another picture later on as there was some damage, which I will go on to explain a little later.

So I started with a peal off base coat, and then a layer of silver holographic glitter polish (the ones I used are listed below the pictures). I then added a thin layer of a different holo polish to add some dimension, and because it is an even sparklier one! Next I cut some shiny holographic nail foil (bought cheap on eBay) into thin triangular pieces. I added some clear polish to my nails and used tweezers to place three triangles on each nail.

Those of you who have tried a similar technique in the past will have noticed that I missed something! I was meant to remove the clear layer from the nail foils before placing them. I completely forgot this which meant a few of them flaked off over the next few days taking the colour with them. I will definitely being doing similar designs again so at least there is a lesson there!

Finally I used some OPI Color Paints and painted them over the top in just one layer so the holo goodness shined through. I loved the final effect so it's a shame it didn't last longer!
Colours used: Cosmic Girl - Danglefoot Polish, 24 Karat Diamond - Fun Lacquer, Primarily Yellow - OPI, Chromatic Orange - OPI, Pen & Pink - OPI, Purple Perspective - OPI, Turquoise Aesthetic - OPI

And finally, a picture of just the silver, as it was soo shiny, and  a picture which didn't  quite come out right, but I just had to share how it looked with my bright pink Comforter shower gel from Lush!

Sunday, 14 May 2017

Stamping Sunday: I don't know what to call this!

Having writers block with what to call this nail art, so I've gone for a very honest blog title! I ended up thinking of this design because I had a lovely blue glitter, and grey/black metallic I wanted to use and hadn't tried yet, and the combination worked better than I has expected, took me a long time to change these!

So on my thumb and little finger nails I used Black Diamond from Nails Inc , and on my middle fingers I used Saltwater Summer from Painted Polish. I was pleasantly surprised by both of these. The glitter was fuller coverage than expected so didn't need to be sponged on.

For the accent nails I used a white base, and then made decals on my Uber Mat (you can see how here) using my Holy Shapes 03 stamping plate from Mo You London. I filled them in with the same polishes I used on my other nails, stuck them down and used a glossy top coat (Nails Inc's Kensington Caviar) to finish off.
Colours used: Black Diamond - Nails Inc, Alpine Snow - OPI, Black Knight - Mo You London, Saltwater Summer - Painted Polish

Thursday, 16 March 2017

Sutherland Tartan Nail Art

Hi everyone! Today I'm wearing tartan nail art and I rather like it! I meant to do this design for my trip to Edinburgh in February but ran out of time so gave it a try now. I really like the way it turned out. Our trip to Scotland was primarily to visit some of the places where the Outlander TV series was filmed, as me and the girls I went with are big fans of the books and TV series. So I was thinking about doing Fraser tartan, but then I thought as I have a Scottish clan surname myself I'd give that a try! So this tartan is based loosely on Sutherland Tartan.

I started with a base of muted green (colours listed below the pictures). For the blue lines I mixed some coloured polish with clear polish on my Uber Mat. I used a flat nail art brush to dab it onto my nails in thick lines. Once dry I used a striping brush to paint some thin white lines, and then gold lines on each nail. I used a copper, gold and black glitter as an accent nail. I have had this nail art on for four days now and I expect I might even keep it for the weekend, the only downside being that I don't have anything else to put on the blog!
Colours used: Green Park - Nails Inc, My Car Has Navy-gation - OPI, Alpine Snow - OPI, Gold Digger - Barry M, Belgrave Square - Nails Inc