Sunday 27 March 2016

Baby Dino Nails - Cedric or Lime?

Happy Easter everyone! Or happy Sunday to those who don't celebrate Easter! My Easter manicure for this year is a little different to previous ones. I've gone for the classic  baby animals in eggs, but have chosen dinosaurs rather than chicks! This design was inspired by the adorable cuddly dino baby I got for Christmas (Cedric - photo below the nail pics!). You may have seen all over Facebook the various animal or food montages people have been creating (e.g. sloth or pan au chocolat, dog or croissant). My boyfriend and I has discussed creasting a  'Cedirc or Lime' version, which is kind of what these nails are! I'll be honest though I think the one peeking out on the index finger looks more like a pea than Cedric or a lime!

 To create this manicure I used dotting tools, freehand, and some nail stencils. For the egg shells I used some wide zig zag stencils I purchased on Ebay. I then used a dotting tool to decorate the egg shells. I used a small nail art brush to create the little dino faces. On the thumb I have done the back of Cedrics body with his little stubby tail stuck in the air! I used silver glitter on my ring finger to add some sparkle and try out this new glitter I got from Danglefoot Polish. It's called Cosmic Glows and it so pretty plus paints on like a dream! I've included a picture to show the sparklyness next to Cedrics head shot.
Colours used: Blue Moon - Barry M, Coconut - Barry M, Cosmic Glows - Danglefoot Polish, Key Lime - Barry M, Spring Green - Barry M, Seven Dials - Nails Inc


Below is the base layer of my design, to show Cosmic Glows in a slightly better light, and of course the inspiration for this mani... Cedric the dinosaur!

Friday 25 March 2016

Mini Egg Nails - A Classic Easter Manicure

Today I'm showing a design  I did for last Easter, and am very much tempted to try again as I just loved the final effect, and it was so easy to do. This by no means an original design, I have seen it sooo many times online, whoever thought of it first is a nail art genius! Before trying it myself I looked at a number of different tutorials, and then  took the steps I liked best.

Mini Egg Nails - How To
  1. Paint your nails in plain pastel colours, the sort you'd find in a pack of delicious chocolate eggs
  2. On a piece of plastic or tin foil, paint a splodge of dark brown polish (or back if you don't have brown)
  3. Use an old toothbrush (or a nail art fan brush if you think that's too icky!) to pick up some of the brown polish, and lightly dab it on to your nails.
  4. Start lightly and then build up for your desired speckled effect.
  5. Put some white or cream polish onto your plastic/foil
  6. Using cling film/ saran wrap, gently pick up some of the polish and very lightly dab it onto your nails, this gives the effect of a light dusting of sugar.
  7. Finish with a matte top coat. Ta da!
Colours used: Wardour Street - Nails Inc, Coconut - Barry M, Notting Hill Carnival - Nails Inc, Mint Green - Barry M, Peach Melba - Barry M, Cocoa - Barry M

Thursday 24 March 2016

Throwback Thursday: Easy Easter Pattern

Hello nail people! Tonight I'm showing another older nail design, hence the not so good pictures. This one is from not last Easter but the one before, so it's been waiting a while...

For this design I used nail; tape to get the three main colours neatly in place. Once dry I used a nail art pen to carefully draw on the pattern, going for a sort of painted Easter egg pattern. Finally, I used a dotting tool for the finishing touches on the pattern. All colours used are from Barry M, and I still have them!

I liked how this turned out considering how little effort was involved. I think the black perhaps takes away from the Easteryness a little, but it does make a striking pattern. \Not much else to say on this one, makes me a little nostalgic!

Colours used: Mint Green - Barry M, Berry Ice-cream - Barry M,Silver Foil Effect - Barry M, Nail Art Pen in Black - Barry M, Matt White - Barry M

Monday 21 March 2016

HPB Presents: Spring

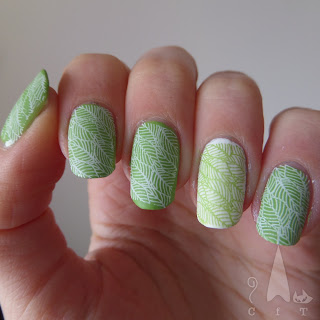
I can't believe it's turning towards Spring time already! I'l be honest, it doesn't feel like it yet here in the UK, our office heating was broken today and it was freeezing! Today I'm taking part in another of the Hobby Polish Bloggers link ups, this months theme is spring. I've chosen a simple design for this one, partly due to time and partly because I love this pattern and couldn't wait to give it a try.

I used my Pro Plate Collection 06 stamping plate from Mo You, and gave it a contrasting accent nail to add interest. I finished off with a matte top coat to bring out the colours. I haven't used my matte top coat in a while so was missing it! Beleive it or not the same green is used for all of the design (Barry M's Key Lime), I was surprised how different it looked after stamping but I suppose it's because the accent nails are over white and the rest are not. Part of me things it clashes, and part of me rather likes it!

Colours used: Key Lime - Barry M, Alpine Snow, OPI, White Knight - Mo You

I hope you like my simple Spring design! Check out the lovely designs everyone else is doing below.


Friday 18 March 2016

Monthly Indie Review: Foxy Paws Polish

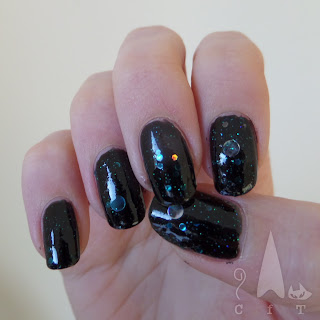
For this months indie polish review I'm showing off the two polishes on the left from Foxy Paws, Dancing In the Moonlight and One More Night, Foxy Paws polish is made in Denmark, but I had no trouble ordering these to the UK and prices were very reasonable.

I love the bottle shape of these, just been on the website again and everything about it is so polished and stylish. I want more! (I'm on a nail polish buying ban which is proving difficult)


On the right is my entire order. I went for a glitter smoothing top coat as well (called Smooth Operator) as I thought this was a splendid idea! I still haven't had a chance to try it yet, but will reviews when I can. The order came with a business card with friendly message, and two little sweeties, which I must say were rather delicious.

The first polish I'll show you tonight is Dancing In The Moonlight, my ramblings are below the pictures!

Dancing In the Moonlight is a lovely shiny black with large circular glitters and a variety of smaller pieces to look like a night sky. I've seen a couple of these large circular glitter polishes around and have been curious to try them so was please to find such an interesting one on the Foxy Paws site. The application was lovely and smooth though I did have to fish out some of the large glitter pieces, as expected from a large glittered polish.  I really like the way the round pieces catch the light.

Next up is One More Night, my thoughts below the pictures.

So this one is the reason I decided to try this brand. I stumbled across some pictures of it online somewhere and just love how much it looks like a galaxy, and it's all one polish. Like doing a simplistic galaxy manicure, straight out of the bottle. The polish is a metallic colour shifter, shifting between purple and blue with a hint of green. There is a light sprinkling of silver glitter to give it that final galaxy effect. The consistency is good and glitter applies evenly.

So all in all another indie brand I would highly recommend. The can be bought from www.foxypawspolish.com. Thanks for reading!

Sunday 13 March 2016

Stamping Sunday: Fans Of Indie

Todays stamping Sunday nail art is actually from a  few weeks ago, and already holds fond memories of my business trip to Madrid (it was my first business trip abroad, I'm sure they won't always be fond :P). Because of being away and moving around the same time this one did have to last a little while, and I'm pleased to say it did.

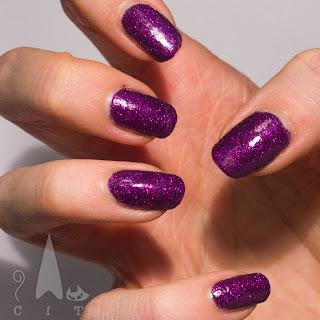
The base colour/glitter is Scream Queen from Danglefoot Polish (swatches at the bottom of this blog post). I ordered this just after new year and it was the first chance I got to use it. I was a little worried it would turn out to be quite pink when I saw it in the bottle, but it's is a beautiful bright purply shade with pink shimmer :).

I was a little sad to cover this with such a strong pattern, but got over it pretty quick as I like the way it turned out :) Looks like quirky sparkly wall paper! I used the decorative fan/plant pattern on my Mo You stamper and plate number 06 from their Pro Collection with a Barry M foil effect polish. The glitter polish dried a little textured so I used a top coat before and after stamping to smooth it over.

Colours used: Scream Queen - Danglefoot Polish, Gold Foil Effect - Barry M

And here is Scream Queen in all it's glory! So beautiful and bright :) It's quite a thick glitter (because there is so much sparklyness packed in!) so is full cover, only base coat underneath.

Saturday 12 March 2016

Barry M Spring Gelly - March 2016

Hello nail world! Tonight I'm sharing my thoughts on a couple of the latest Barry M Gelly colours for Spring. Can't believe Spring colours are coming out already! Still so many darks I want to try!

So the latest colours from Barry M follow a subtle/ grown up sort of theme, and are rather lovely. There are four new Gelly shades, the two I'm showing you today; an off white and a beige. I already have one of their previous cream/off white polishes and the beige one wasn't for me, but I wanted to give these two a try.

Don't usually go for pinks but these are sort of muted which I like. I think they both make really nice classy shades.


Below are the brushes in action. I love that Barry M now has a wider brush in their new polishes. I find them soo much easier for painting with.I thought it was just the new speedy range but the new Gelly colours have this too :)


So on to the polish. The first up is Acai Smoothie, a lovely grown up muted pink. I've included shots of it in different lighting. I'm really taken with this colour. I tried a little nail art over but but regretted it instantly as it's so nice on it's own! I think it would look good with gold stamped over it too though. It's gloriously shiny and in true Barry M style applies smoothly. A very worthwhile buy.


Next we have Pink Lemonade, a muted super pale pink. Again this applies beautifully with the wide brush, and has a lovely finish. I think it looks really elegant and suits my skin tone which is an added bonus! This is lovely on it's own as a chic colour for Spring, or any time of year really, it's quite versatile. Also a great base of nail art or stamping

In conclusion, I am definitely glad I bought them. I haven't bought any mainstream polishes for a while so it was really handy to be able to pop into the local shop and get them on lunch! I also don't have any colours quite like this in my collection, and as time goes on it gets harder to find such a thing! My favourite has to be Acai Smoothie, I think the colours suits me well and it goes with so many things. Perhaps I should be buying more pink!

Thanks for reading :)

Tuesday 8 March 2016

A Spot Of Polish

Today I'm showing off one of my favourite Nails Inc shades. It's nothing new, just think it deserves some appreciation! With the below nail art I'm using Nails Inc's Warwick Way, a lovely deep teal-y green.

On my middle finger I have used one of Topshops matte metallics (love love love them!), and on my ring finger I used these colours over a white base with a dotting tool. Altogether a very simple design, but nice and bright and perfect for this time of year.


Colours used: Warwick Way - Nails Inc, Scream - Topshop, Coconut - Barry M, 

Sunday 6 March 2016

Stamping Sunday: Subtle Nails For Wedding

Hello! Least imaginative blog title ever this evening! I really couldn't think what to call it so just went with a description. Tonight's design I did for a wedding I went to a few weeks ago. It was a beautiful day :) I wanted something subtle but still with something interesting on it, I can never seem to stick to plain nails at the moment!

This design worked well but was more subtle than I intended! In the pictures below you can see the two layers but in most light it just looked like it had a sort of mottled effect, the stamping didn't really show up. I started by stamping on  the leaf pattern (Born Pretty plate 19) in Barry M's Coconut, wish stamps surprisingly well. I've included a picture below, pre clean-up. I then used ILNP's Flower Girl for another layer of the same pattern to give it some shimmery ooph! Unfortunately it was at this point that it seemed to just merge into one and became too subtle! It was a nice design though and worked well for the wedding and a client meeting the next week.

Colours used: Little Bo Peep - Rimmel, Coconut - Barry M, Flower Girl - ILNP

Thursday 3 March 2016

Throwback Thursday: Harry Potter

Todays throwback is one I'd completely forgotten about until someone sent me a link to a whole selection of Harry Potter nails. I sadly can't find the article any more but will add it in the comments if I find it. I did these for our trip to the Harry Potter studio tour, it was soo much fun!

Didn't go for anything particularly original with the design, the main part was inspired by a number of designs on Google images, and the thumb nail from some more! Apologies for the mess on these, as you can see one was taken pre-clean up!

To get the checked effect, based on the colours of the different houses at Hogwarts, I used nail art tape, and for the deathly hallows symbol I used a nail art pen. Had a bit of trouble with it coming out too thick. I think in future I'd just do it freehand as it's a fairly simple shape. That's all there is to it really. can't believe how long ago it was! (summer 2014)

Colours Used: New York Noir - Nails Inc, Matt White - Barry M, Gold Foil Effect - Barry M, Silver Foil Effect - Barry M, Yellow - Barry M. Block Your Green - Rimmel, Cobalt - Barry M, Red - Unknown. Nail Art Pen in Silver - Barry M