Tuesday 30 August 2016

August Meebox Review - Boho

Spoiler warning! Ok that may not be needed as it's now a week since dispatch, but better safe than sorry! Last year I decided to try the Nailbox as a one off in August, review can be found here, so I thought I'd make it a tradition and try the August Meebox this year! Meebox have been taunting me with their awesome boxes for some time, with themes such as Mermaid. This months theme was Boho. Read on for my thoughts.
In the box are three nail polishes, a nail polish remover, a ring (the birthday gift as it's their 1st birthday), some swatch sticks to try the polishes on, and some foil/gold leaf type nail accessories.

First up is Barry M's Greenberry. I actually already have this, but it's such a gorgeous colour I'm quite happy to have a spare! I've really enjoyed having it on my nails again, it's perfect for summer. The difference between this and my other bottle is that it comes with the new wide brush, so at least we know we're getting fresh stock! Below is two coats. I would highly recommend this polish.
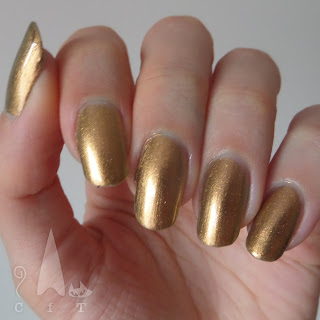
Next up is Zoya's Aggie, I was so excited to get my first Zoya! I've seen them around for a while but they're not the easiest to get hold of in the UK, not in much variety anyway. I would describe Aggie as a dark gold with a hint of bronze. In the bottle there is a hint of green but it doesn't seem to translate onto the nail. This didn't bother me as I already have a gold to green mutli-chrome polish. I like the classy grown-up feel of the polish and it's a little different from things I already have. I found the consistency seemed a bit thin but it ended up being pretty easy to get cover in two coats. The only other slight downside was that the brush was a bit on the thin side. Overall very happy to have received this polish.
The final polish we received this month was Prince You've Been Gone by Cuccio, another brand I haven't tried. I wasn't that enthused to wear this right now as it seems more wintery, but it is a pretty shade. The consistency is good and done right it is a one coater (below is two coats on thumbnails and one coat on fingernails). I think this will be making appearances again around Christmas time for sure! I was pleased to see that it didn't stain my nails, I noticed some of the colour go onto my skin when I removed it but that's much easier to clear.
I don't know if those are the shades that spring to mind for me for the Boho theme, but I'm not quite sure which would to be honest! I like how they all look a similar shade to colours found on the card that you see before getting the box, it's like they're giving little clues/teasers before you choose whether to buy the box.

The gold foil from Miss Cat Nails I really like. I was a little worried it was just going to be plain gold when I first opened it, and I already have something like this, but this one has bluey/green patches surrounded by a browny bronze colour. It's almost as if it's been singed with a really colourful flame! I've tried everything out in some pictures at the bottom of this post (even the nail polish remover to create a watercolour effect!).

The nail polish remover is from Meebox themselves and is scented. I've not heard of a scented nail polish remover before so was intrigued. One thing I would say is that I wouldn't recommend taking a big wiff straight from the bottle (oops!), it is still nail polish remover! I found when using it it gave off a really sweet smell, it reminded me of something from my childhood which made me feel nostalgic, but I couldn't quite put my finger on what it was.
So my experiments ended up looking very Christmassy! I really liked the little pine cone like effect, and think I'll remember that for December. They were meant to be feathers! So would I order a Meebox again? Yes, although I'm leaving next months, the theme is Pumpkin Spice and I'm looking forward to seeing everyone's reviews, but I have quite a few Halloween type colours already. I'll keep a look out in the future though, it is really fun getting a nail themed parcel! Also think I need to build up a supply of that lovely tissue paper that comes in the box!

Thanks for reading!

Sunday 28 August 2016

Stamping Sunday: Uber Chic Succulents

Hello! I hope you're enjoying your weekend. I'm really enjoying a nice relaxing weekend, seeing friends and family and just generally chilling out. I'm pleased to say it has been a very nail varnish heavy weekend so far! Today I'm showing you my first go with the Uber Chic succulents stamping plate. I've wanted this plate for a long time but it's always been a bit expensive to get delivered, or hard to find in the UK. Fortunately a lovely lady in a Facebook ISO group I'm in offered to sell me hers, and it turned up on Friday. I am so happy with it and full of ideas of what to use it for! The images are so cute, hopefully you can just about make them out on the top left image below.

For my first go I decided just to see how the images looked without doing anything complex. I used white stamping polish over this gorgeous bright shade from Barry M (colours listed below the pictures). I really can't decide with images I like best! Some of the larger designs look really good as they go over the whole nail, but I also really like the more floral looking ones. I can't wait to have a go at advanced stamping with these, and using the little plants in pots as they are just too cute! More to come :)
Colours used: Greenberry - Barry M, White Knight - Mo You London

Thursday 25 August 2016

Throwback Thursday: When I had Talons!

Hello nail team! Tonight I'm just doing a quick post as I am overheating somewhat! This will probably sound crazy to many of you, but here in the UK we are not used to heatwaves, and right now it feels tropical! I've enjoyed it for a few days, but it's getting closer and closer and I'm starting to feel a little suffocated! Hopefully it means an epic thunder storm is coming!

So more importantly, onto the nails. I found this picture in my archive, and I reckon it's from about four years ago, back when I'd only recently started venturing into nail art. I used to let my nails get a lot longer then, whereas I prefer them a little shorter now (but still a bit long I admit!). Below is them long talon like in an unnamed teal polish from Accessorise and a gold crescent. I can't remember which the gold polish was, I have too many and it was too long ago!


Clearly I was not as good at clean up four years ago! (oops!) Thank you for reading my ramblings! Next blog post will be fuller.

Tuesday 23 August 2016

HPB Presents: Goldfish!

Good evening nail polishers! Today I'm taking part in another Hobby Polish Bloggers link up. HPB is a Facebook group for bloggers with a passion for nail art, and we do a monthly themed link up. I'm loving this months theme as it is SO random, and gave me a prompt to come up with something new, rather than a design that's already on my to do list.

I was very naughty on Saturday and purchased another nail polish while accompanying my boyfriend to the shops. I've never tried an Urban Outfitters polish, but I've admired the bottle designs for a while. My excuse for this one was it's a sheer I don't have. The polish is called Flipper and I used it to create my first ever pond mani (to represent bubbles), I'm very happy with how it turned out.

For the accent nail I mixed some green polish with polish remover for a watercolour effect, and painted on some underwater plant leaves over white with a nail art brush. On my thumb nail I also used a watercolour effect for the goldfish to give them some texture. I felt they were lacking something so added some gold round the ages and a little gold fin as a finishing touch.

I'm really happy with how this one turned out :) Particularly enjoying the bright blue pond mani! I've enjoyed the quirky theme too! Scroll to the bottom of this blog post to see what wonders the rest of the team have created!
Colours used: Alpine Snow - OPI, Flipper - Urban Outfitters, Key Lime - Barry M, Spring Green - Barry M, Papaya - Barry M, Gold Digger - Barry M, Lady In Black - OPI


Saturday 20 August 2016

Monthly Indie Review: Femme Fatale

So the time has come already for this months indie polish review, summer is going way too fast! This month I have only one polish to review, but a very picture heavy post as it's such an interesting polish! I selected only one polish from this brand as it was part of a bulk order, and I really couldn't justify buying any more! This is my first try of a thermal colour change polish, and I have to say I absolutely loved it. Below are is the polish in heat (pale green) and cold (blue). It's called Jasmine and it's from Femme Fatale.
The consistency was good though fairly sheer. I used three coats to get the above effect. I've included some pictures below showing the colour change effect. It was so much fun trying it all out! When I changed my nail polish I felt quite disappointed that I couldn't see a colour change anymore when I washed my hands! I have already seen another colour change polish by this brand that I have my eye on, the novelty has definitely not worn off yet!
So as you can see this was a good one! The polish quality was good, the colours lovely (particularly the blue); and the novelty of a colour changing polish was great fun. It's good to wear in the summer as I found there was plenty of variation in the different temperatures of different environments, not just cold. I can certainly recommend!

Tuesday 16 August 2016

Olympic Nails

Good evening everyone! I'm currently watching the Olympic cycling, so very appropriate for today's blog post! My boyfriend has been suggesting I try Olympic nails for a while, and I thought I'd get on with it before it's too late! They're not particularly Rio themed (apart from the red polish being called Red Hot Rio!) but these are my first Olympic nails so I wanted to keep it fairly simple! I was also keen to have my first proper go with the Barry M Molten Metals which I have finally got hold of (swatches to follow at a later date).

I started off with a white base, and used a large dotting tool to paint on the medals, starting small and adding more and more. For the medal straps I used a nail art brush and nail polish (all colours listed below the pictures). I then used a small nail art brush to paint on the 2016 and Olympic rings. The rings are pretty wobbly, they were a surprisingly difficult shape to paint! I think in the future I would do the rings with acrylic paints as they would potentially be a bit easier to tidy up.

I'm glad to be doing a bit of freehand again, I think I need more practise but it's so easy to get hooked in by stamping. I do love a bit of advanced stamping! I hope you enjoy the rest of the Olympics! TTFN

Colours used: Alpine Snow - OPI, Gold Digger - Barry M, Silver Lining - Barry M, Bronze Bae - Barry M, Lady In Black - OPI, Cobalt - Barry M, Red Hot Rio - OPI, Yellow - Barry M, Spring Green - Barry M

Sunday 14 August 2016

Stamping Sunday: Papaya and Lace

Hello all! I'm writing this a bit late tonight as I've been out in London all day, was a lovely sunny day, I'm sad that I will be back at work tomorrow! Today's design is one I did for my friends wedding reception. I wanted something feminine and colourful, that would contrast nicely with my blue dress. I'd also been craving a shiny orangey design for a while, it's a very summery look!

After painting my nails with two coats of Barry M's Papaya, I painted a triangle of grey polish at the bottom of each nail. Once this was dry I used my Mo You London Fashionista Plate 17 for the lace pattern. I used a clear jelly stamper and followed the shape of the grey triangle to line up the patterns.

I'm so happy with how these turned out and kept them on for a whole week before the urge to do more nail art was just too much!
Colours used: Papaya - Barry M, Grey - Barry M,  White Knight - Mo You London

Thursday 11 August 2016

Summer Flowers

Last weekend I made my nails look like a floral garden with a set I got for Christmas from my friend. After spending Saturday wondering around the beautiful Painshill Park I was in the mood for something pretty and floral. I believe this kit came from BHS (British Home Stores) so I'm not sure if they're still around, but wanted to share my thoughts anyway! I expect you can get the little stick on flowers from nail art stores and Ebay. Below is the front of the box and what's inside.
The instructions for this set are simple. Paint on one coat of colour and let dry, pain on a second coat and place the flowers while the polish is wet. Then add a top coat. The flowers were easy to place but I think I should have pushed the pink ones down a little more so they would lie flat. I was apprehensive about using a top coat, as I've found in the past that they can ruin this type of nail art. I gave it a go anyway and was pleasantly surprised. The top two of the below pictures are with no top coat, and the bottom two are with top coat. They of course didn't last ages due to the stick on flowers, but they did a 24 hours, and would probably have lasted longer if I hadn't been gardening on Sunday!

Sunday 7 August 2016

Stamping Sunday: Aquatic Wonderland

Hello everyone! Happy Sunday! Today I have a design I was rather fond of to show you, featuring some advanced stamping and the lovely Picture Polish. The base colour I used is Ocean by Picture Polish, and it is just so gorgeous! Is is exactly my sort of polish, blue and sparkly and sea themed! For the stamping I used the Doodles plate 07 from Mo You London. It's one of the first MYL plates I got and I still love it, the little creatures are too cute!

I stamped the images in white onto some clear polish on my Uber Mat, and then used dotting tools to carefully colour in the images (colours listed below images). Once dry I covered it all with another layer of clear polish, let it dry, and peeled the images off to stick on my nails. I find it useful to place them on dry polish as if they're not quite right I can peel it off again and move it. After trimming the edges with scissors, and then clean up brush, I finished with a top coat to stick it all together. I used Kensington Caviar from Nails Inc as it's so glossy, dries fast and lasts well.

I ended up with some spare decals which I put on my toes! I really enjoyed this look and think it's perfect for the beach!
Colours used: Ocean - Picture Polish, White Knight - Mo You London, Blueberry - Barry M, Papaya - Barry M, Seven Dials - Nails Inc, Key Lime - Barry M, Block Your Green - Rimmel

Thursday 4 August 2016

Lilac Lace

Hiya! I've got a bit of a subtle design to show you today. It's another where I've been testing out a new stamping plate, so wanted to try a as many of the images as possible!

After trying out Lakodom from Picture Polish I wanted to try something with it that would be subtle enough to still let some of the shimmer show through. I chose Barry M's purple foil effect polish, which I have had for absolutely ages and very rarely use! The gold and silver ones stamp so well so I thought this was worth a go. Sure enough it stamped great! The shade is fairly pale so I'm not sure how it would work over darker colours, will have to give it a go some time.

The only thing I would change about this mani would be the top coat. I finished off with a nice glossy top coat, but this seemed to make the purple fade a little. It's strange, I wonder if it's because it blurred the edges really slightly or something. Next time I will do top coat free!

Overall I like the look and would wear it again, I think it's good for summer and a nice subtle one for work.
Colours used: Lakodom - Picture Polish, Purple Foil Effect - Barry M