Showing posts with label Pond Mani. Show all posts

Tuesday, 13 June 2023

Sharks Love Ice Cream!

Oh no I'm so behind with blogging again! I'm thinking of stopping the blog to be honest and just sticking to sharing on Instagram and maybe Twitter, but will carry on for now. I love the Glam Nails Challenge themes on Instagram this month and would like to take part but am a bit short on time and have some other ideas too. Therefore I've decided to merge them together in pairs instead! The first two themes are Sharks and Ice Cream so I've tried to depict a hungry shark going for an ice cream and some more hungry sharks circling for ice cream!

I started with a base of turquoise on my middle two nails and sheer blue on the others. On the sheer blue nails I layered up the blue polish with images of sharks from Uber Chic Beauty's Just Beachy plate. I love this effect! I made ice cream decals using their Carnival & Fair Time plate and added one on my index finger and the other over the sharks on my thumb. I also used their layering shark image from the first plate on my middle fingernail, adding eyes with a dotting tool to make it look like it was ogling the ice cream! I finished the look with a glossy top coat.

Colours used: Greenberry - Barry M, Flipper - Urban Outfitters, Black Stamping Polish - Dance Legend, Essential White - Uber Chic Beauty, Grey - Barry M, Acai Smoothie - Barry M, Portobello Road - Nails Inc, Cappuccino - Barry M

Thursday, 4 May 2023

Gold Leaf Strikes Again!

Hey space turtles! Today I'm sharing some nail art inspired by a tutorial I saw by Claudia Hernandez on Instagram. It's been on my to do list for a while. I only realised after looking at the tutorial again more recently that I'd actually used the exact same nail polish (I thought I'd just used something similar). I started with a layer of sheer white then sheer green. I then used my fingers and some tweezers to pull apart some gold leaf which I carefully applied to my nails using my fingers. After a while I found that was actually easier then using tweezers. I added another layer of sheer green followed by another layer of gold leaf and then more sheer green. To finish off I added a few more pieces of gold leaf and then a clear top coat. I love how these came out! They don't have the visible nail line I was anticipating but I like them just as much. They remind me a bit of precious stones.

Colours used: Verdigris Jelly - Cirque Colors, Gold Leaf - Available in craft stores, Soft Focus (White) - Polished for Days

Sunday, 9 January 2022

Snowy Snowy Snow Globe

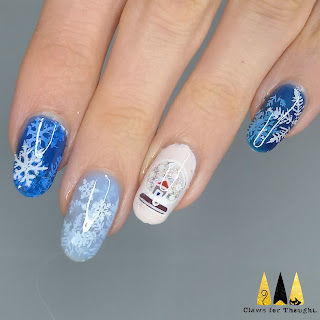
Hey everyone! Back with some wintery nail art which feels appropriate in this frosty weather! I've had a really lovely weekend, with a lovely walk and nut roast yesterday and getting a good run in this morning before lunch with friends. It has however been pretty cold and frosty, but it's to be expected in January I suppose! So today's nail art is for the first two prompts for this months Glam Nails Challenge which has lots of lovely winter themes. It was a busy first week back at work so I didn't get round the the first theme which was snow globes, but it goes pretty well with today's theme (snowflakes) so all is well!

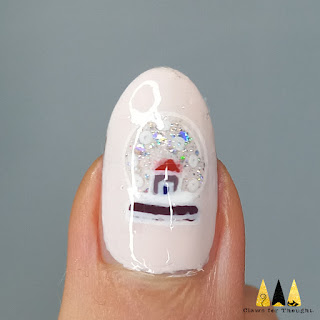
I started with a base of sheer blue polish (in various shades) on three of my nails and a couple of layers of pale pink on the other two. For the blue nails I added a snowflake between each next layer of sheer blue, with different numbers of layers depending how dark the polishes were. The stamping plate used was Mo You London's Noel 08. For my thumb and ring fingernail I made decals using my Uber Mat and Uber Chic's Happy Christmas stamping plate, you can see how here. Given the background is so pale I wonder if I should have done them in black, but never mind! 

Overall I'm not crazy about these, the snowflake nails are fun but the snow globes don't stand out that well. They're OK though, and I am enjoying the wintery vibes!
Colours used: Vintage Tee - Nails Inc, Cobalt Jelly - Cirque Colors, Indigo Jelly - Cirque Colors, Light Blue Jelly - Cirque Colors, White Stamping Polish - Rainbow Connection, Cocoa - Barry M, Indigo - Barry M, Playing Koi - Essie, Diamond Glitter - Barry M

Friday, 29 January 2021

Snowflakes upon snowflakes!

Hello world! Even more winter nail art to share today. I was given a snowflake stamping plate (Mo You London Festive 02) around Christmas time and have used it so much! I love that it has lots of individual snowflakes so you can easily mix and match them, I've been planning a look like this for ages as I loved my sheer Halloween nails and thought I could make a winter version with white instead of black.

I started with two coats of sheer white polish (colours listed below pictures) and then stamped a snowflake onto each nail in white. I then added another snowflake, followed by another layer of sheer white and repeated the steps a few more times. On my ring fingernail I added a couple of different silver glitters as an accent nail. Once dry I used a small nail art brush to add an outline ion the snowflake nails. I was tempted to do this in white but thought these metallic shades would give it a little something extra!

Overall I am quite happy with these, though I definitely don't love them as much as my sheer Halloween nail art, that was a triumph if I do say so myself! :D

Colours used: Allure - Essie, White Stamping Polish - Rainbow Connection, Cosmic Girl - Danglefoot Polish, Diamond Dust - Barry M, Copper Mine - Barry M, Gold Digger - Barry M, Bronze Bae - Barry M, Silver Lining  - Barry M

Saturday, 8 August 2020

Live Every Week Like It's Shark Week!

Hi all, and happy almost shark week! I haven't actually done shark week nail art before, and these images are the main reason I bought the new UberChic Just Beachy stamping plate, so when this came up as part of the Dimension Nails challenge on Instagram it seemed like the perfect time! I am having a month off from the Glam Nails Challenge prompts to focus on my growing nail art ideas list, but this Dimension Nails one only has four prompts so I think it's do-able, and I love the prompts! I am tempted to do two or three of the Glam Nails Challenge ones too but we shall see, clearly I am hooked!

I started this look with a peel off base due to the glitter, and then added aqua glitter (colours listed below pictures) on my thumb and little finger nails, and silver glitter on the rest. There was no advanced stamping on this occasion due to the handy layered images on the Just Beachy plate, so I stamped the images directly onto my nails, and on my middle finger I layered up some sheer blue over the sharks, before adding the image again at a different angle, and adding one more layer of blue. This was to give the illusion that there are more sharks swimming deeper in the water, and was something I have been super keen to do since I ordered this plate.

I was a bit all over the place with image directions for this one as you can probably see! Normally I stamp nail art images so that they're the right way up when I hold my hands upright, but this time I thought I'd give the other way a go. I started with my thumb nail and was actually meaning to do this one my normal way but forgot, I then completely forgot about which way up to do them for all my other nails except my index finger! For the middle two this was fine as the image can go either way, but I guess old habits die hard! You'll see the shark on my little finger is the opposite way up to the text! Anyway, Overall, I'm pretty pleased with these, and look forward to doing more shark nail art in the future :)
Colours used: Cosmic Girl - Danglefoot Polish, Catwalk Queen - Barry M, Flipper - Urban Outfitters, Black Stamping Polish - Rainbow Connection, White Stamping Polish - Rainbow Connection, Grey - Barry M, Acai Smoothie - Barry M

Wednesday, 29 July 2020

Octopus At The Pool Party!

Hello again! One more nail art look for this years Glam Nails Challenge July, this time the theme is pool party. I wanted to use the cute little octopus image on the new Uber Chic Just Beachy stamping plate and for some reason I thought it would work well for this, even though you would not usually expect to find an octopus at a pool party! I wouldn't anyway!

On my index finger, little finger and thumb nails I started with a cream base, and then a couple of layers of Flipper, a sheer blue polish, and pearlescent purple on my other nails (colours listed below the pictures). I stamped an ocean ripples image from the Bundle Monster XL25 plate in white, and then added another layer of sheer blue. I then layered up a deck chair image from the Just Beachy plate on the thumb and some cocktails from their Bottoms Up plate on my finger nails. On the purple nails I layered on the octopus image and added some wording using the same stamping plate. I struggled a bit picking up the outline of the octopus and ended up with some extra black smudging round the edge so did have to try and patch that up a bit with purple polish and a small brush.

Overall I quite like these though they could have definitely been neater! The little octopus is adorable, I hope it enjoyed it's pool party and definitely intend to use this image again! I have used the sheer blue for similar ocean nails before and I really like the effect, though my boyfriend did point out it looks like the deck chair is floating in the sea!
Colours used: Cream Soda - Barry M, Flipper - Urban Outfitters, Rainbow Wishes - Nails Inc, White Stamping Polish - Rainbow Connection - Black Stamping Polish - Rainbow Connection, Key Lime - Barry M, Yellow - Barry M, Dead Heat - Barry M, Pink Lemonade - Barry M,

Wednesday, 10 July 2019

Underwater Nail Art - Pond Mani Variation

Hey nail people! Today I have some rather aquatic nail art to show you. Again from a while back, this one was something I was planning to try for quite some time. I was inspired by a picture I saw on Clear Jelly Stampers Instagram page to try more pond style nail art (where you layer up images under sheer polish) with a sea creature theme. It didn't quite turn out how I wanted but I still liked it. I'll explain how I did it and what I'd have changed below.

I started with a white base, followed by a couple of layers of sheer blue (colours listed below the pictures). To follow I used images from my Mo You London Doodles 07 plate, stamped in white on all nails. After another layer of sheer blue I applied some decals which I'd made using the same stamping plate and my Uber Mat. I finished off with a shimmery top coat which you can't see very well in these pictures, but I liked the subtle sparkly effect.

I think I should have layered these up a bit more, with some spots, followed by sheer polish, then the white patterns, then more sheer polish, before the final see creatures on top. It would have given it more depth and made the blue a bit brighter. Still enjoyed it though - I love things with sea creatures on!
Colours used: Floral Street - Nails Inc, Flipper - Urban Outfitters, Key Lime - Barry M, Spring Green - Barry M, Grey - Barry M, Papaya - Barry M, Harp On It -  Color Club, Notting Hill Carnival - Nails Inc, Wardour Street - Nails Inc

Monday, 15 January 2018

A Winter Pond Mani - Snowflakes

Hi everyone! Today I am sadly presenting to you an index finger nail that just doesn't look right next to the rest! There was an incident with a potato peeler... I filed them all down a bit but couldn't quite bring myself to make them as short as that one. Couldn't quite get the shape right either, but never mind, the show must go on!

Today's nail art is a very wintery pond mani. I had been meaning to do something like this in the run up to Christmas but I think it also works in January. I started off with three coats of Essie's Allure, a sheer white which was a little more sheer than I wanted it to be. Next I used white stamping polish to apply a snowflake pattern from the Uber Chic Christmas-01 plate.

Next to make this a pond mani, I applied more of the sheer white polish. To be a true pond mani I would have kept layering up the white base and snowflakes, but I thought that might just make it look like lace and less like snowflakes. So I applied some more snowflakes in pale blue. For these I didn't use the whole image, I just selected one of two flakes at a time and positioned them on each nail. I used a dotting tool to remove excess snowflake from the stamper. I followed the same process for the darker blue snowflakes.

I finished off with a shimmery topper which was really hard to see unless in really bright light! It was too subtle for the camera to pick up too, I think it'll work better over darker colours. Overall I liked this design with it's multi layers, and slightly see through look, it's as if it had been snowing on my nails!
Colours used: Allure - Essie, White Knight - Mo You London, Blueberry - Barry M, Cobalt - Barry M, My Private Rainbow - ILNP

Tuesday, 23 August 2016

HPB Presents: Goldfish!

Good evening nail polishers! Today I'm taking part in another Hobby Polish Bloggers link up. HPB is a Facebook group for bloggers with a passion for nail art, and we do a monthly themed link up. I'm loving this months theme as it is SO random, and gave me a prompt to come up with something new, rather than a design that's already on my to do list.

I was very naughty on Saturday and purchased another nail polish while accompanying my boyfriend to the shops. I've never tried an Urban Outfitters polish, but I've admired the bottle designs for a while. My excuse for this one was it's a sheer I don't have. The polish is called Flipper and I used it to create my first ever pond mani (to represent bubbles), I'm very happy with how it turned out.

For the accent nail I mixed some green polish with polish remover for a watercolour effect, and painted on some underwater plant leaves over white with a nail art brush. On my thumb nail I also used a watercolour effect for the goldfish to give them some texture. I felt they were lacking something so added some gold round the ages and a little gold fin as a finishing touch.

I'm really happy with how this one turned out :) Particularly enjoying the bright blue pond mani! I've enjoyed the quirky theme too! Scroll to the bottom of this blog post to see what wonders the rest of the team have created!
Colours used: Alpine Snow - OPI, Flipper - Urban Outfitters, Key Lime - Barry M, Spring Green - Barry M, Papaya - Barry M, Gold Digger - Barry M, Lady In Black - OPI