Showing posts with label Link Up. Show all posts

Thursday, 22 June 2017

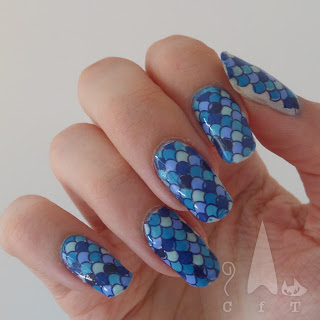
Blue blue mermaid tail nails

Hi everyone! Just a short post today. This is another one I did for the nail addicts collaboration on Instagram. This month the theme was monochrome, using different shades of your favourite colour to create nail art. Small amounts of black or white were also allowed for outlines but I managed to use dark blue for mine.

I used the advanced stamping technique with my Uber Mat to create the pattern (see how here). The image is from the twi-star Bundle Monster mermaid plate. It took a pretty long time to fill in the scales! I also used a white base coat underneath to make the colours stand out.

Head over to @nailaddictscollab to see all the other. designs :)
Colours used: Alpine Snow - OPI, Blue Moon - Barry M, Blueberry - Barry M, Cobalt - Barry M, Cyan - Barry M

Monday, 31 October 2016

All Holo's Eve!

Happy Halloween everyone! I hope you've enjoyed your day. I have been at work but there was a charity bake off so I have had a very sugar fuelled day! Today I am taking part in another Halloween link up, with the most fantastic name, All Holo's Eve!

To fit the holo theme I used a base of Black Holo Witch from Fun Lacquer, a Halloweeny polish with a Halloweeny name! For the design I used white stamping polish to try out some of the designs from my Mo You London Festive Plate 16. I suppose there is not all that much else to say on this one really, it was pretty simple to do! The Black Holo Witch is not as black as I would have liked, but it is certainly sparkly!

Check out all the other lovely designs below the images. I love how we've all gone for a similar colour scheme!
Colours used: Black Holo Witch - Fun Lacquer, White Knight - Mo You London


Friday, 30 September 2016

HPB Presents: Glitter Toppers

Happy Friday everyone! I am so glad it's the weekend! I've not been very good on the blog this month due to some holidays but I'm managing to squeeze this one last blog post of the month in as part of this months Hobby Polish Bloggers link up. As you can see the theme this month is glitter toppers. Not a particularly challenging theme but the options are endless! I have many many glitters so enjoyed digging through them again.

I decided to use two I haven't used for over a year. They were a gift from my boyfriend who got them in TK Maxx (a great place for discount Nails Inc's!). I started of with a dance legend peel off base coat, it doesn't usually work all that well for me, I think as my nails are on the dry side it sticks a little too well! Worth another try though. Next I painted on one coat of Jermyn Street. In theory two thin coats would probably be best, but I cheated and used one thick coat and was pleasantly surprised, no pooling or bubbling.

For my glitter I used Lancelot Place, a chunky silver glitter topper with some black sequins mixed in. I created a rough moon shape at the bottom of each nail with the glitter as I think it's a flattering shape. I like this look as I think it looks grown up but still with a hint of fun! The sort of thing I could probably get away with at client meetings!

Who else is getting excited for all the autumn colours coming out? I'm having a bit of a phase for muted colours at the moment. Not sure if it's just because of the change of season or if I'm getting old! Perhaps a bit of both!
Colours used: Jermyn Street - Nails Inc, Lancelot Place - Nails Inc

Check the other lovely designs this month below.

Tuesday, 23 August 2016

HPB Presents: Goldfish!

Good evening nail polishers! Today I'm taking part in another Hobby Polish Bloggers link up. HPB is a Facebook group for bloggers with a passion for nail art, and we do a monthly themed link up. I'm loving this months theme as it is SO random, and gave me a prompt to come up with something new, rather than a design that's already on my to do list.

I was very naughty on Saturday and purchased another nail polish while accompanying my boyfriend to the shops. I've never tried an Urban Outfitters polish, but I've admired the bottle designs for a while. My excuse for this one was it's a sheer I don't have. The polish is called Flipper and I used it to create my first ever pond mani (to represent bubbles), I'm very happy with how it turned out.

For the accent nail I mixed some green polish with polish remover for a watercolour effect, and painted on some underwater plant leaves over white with a nail art brush. On my thumb nail I also used a watercolour effect for the goldfish to give them some texture. I felt they were lacking something so added some gold round the ages and a little gold fin as a finishing touch.

I'm really happy with how this one turned out :) Particularly enjoying the bright blue pond mani! I've enjoyed the quirky theme too! Scroll to the bottom of this blog post to see what wonders the rest of the team have created!
Colours used: Alpine Snow - OPI, Flipper - Urban Outfitters, Key Lime - Barry M, Spring Green - Barry M, Papaya - Barry M, Gold Digger - Barry M, Lady In Black - OPI


Tuesday, 26 July 2016

HPB Presents: Galaxy Nails

Hello internet! Today I'm taking part in another Hobby Polish Bloggers link up. I try to take part every month and really enjoy the team spirit of the group! This months theme is 'space'. I was going to try something unusual like aliens, but I couldn't resist the obvious opportunity for my first attempt at galaxy nails!

For this design I started with dark blue with a hint of glitter (colours listed below) to make sure my mani was cosmic throughout! I then used small pieces of sponge to sponge on the colours in a vague galaxy-ish pattern! I started with pale blue through the middle, with a bit of silver holo over the top. Then I splodged some glitter randomly across each nail. I am currently on holiday in Wales and forgot my nail art brush, so the stars were done with a tooth pick! I couldn't quite get my camera to pick up the sparkle properly.

Overall I like the sparkly cosmic look of this design, but think it could do with some tweaking to make it look more like a galaxy. I used one of nails inc's galaxy polishes just to complete the look! Just goes to show you can't go wrong with a bit of glitter! Check out the other designs at the bottom of this post.
Colours used: Mustang Eli's On A Roll - Colors By Llarowe, Blueberry - Barry M, Mega - ILNP, Catwalk Queen - Barry M, Westminster Bridge Road - Nails Inc


Tuesday, 28 June 2016

HPB Presents: Glitter Jelly Strawberries

Today I am taking part in another Hobby Polish Bloggers link up, this month the theme is fruit. I think it's a great theme, seasonal and plenty of options, and am glad to be taking part again. I haven't had a proper look yet but I've had a brief glance and I have to say there are some gorgeous designs! Mine didn't go quite to plan, so I'm putting it up before I scare myself by looking at everyone elses!

I spent a lot of time deciding what to do for this theme, I was very tempted to do pineapples again, but then it occurred to me that I could use this to do glitter-jelly-sandwich nails for the first time, so I went with strawberries.

I started with a base of Cosmic Girl from Danglefoot polish, I've included a picture below though I found it hard to capture all the lovely sparkles, hence the weird lighting! Next I painted on a layer of Pen & Pink from OPI's color paints collection. It was very bright at this stage! I painted on the strawberry seeds with white, and then thought they looked too bright so out another layer of pink over the top. I do quite like the subtle effect this left. It's just about a pond mani! Finally I painted on the leaves in white, and then dabbed on some green for a mottled leafy effect.

As you can see from the pictures, the glitter didn't show through, which is a shame as I would have liked sparkly strawberries! I think the textured effect did give it something though. You can see my more successful attempts at fruit nails here: Lemons or Five a day, I've also done a few pineapple designs in the past. Please be sure to check out the other mani's for this theme (links below the pictures), there are some really stunning designs!
Colours used: Cosmic Girl - Danglefoot Polish, Pen & Pink - OPI, Alpine Snow - OPI, Turquoise Aesthetic - OPI


Thursday, 12 May 2016

ME/CFS and Fibromyalgia Awareness Day Nails

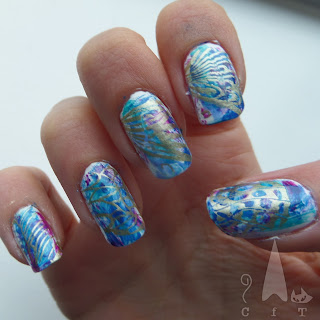
Hello nail world! Today is ME/CFS and Fibromyalgia awareness day, and I am taking part in a nail art link-up organised by Becca at A Certain Becca Nails. I must admit I knew little about these conditions, but have done my research, and am proud to be wearing the official colours in support of those who suffer from them.

The colours associated with this day are purple and blue, so I used these (alongside a bit of green that snuck in!) to try dry brushing for the first time. I think it worked reasonably well, but came out better on my left hand, as you can see below. The right hand looks a bit faded. I've seen that a symbol associated with this day is a butterfly, so decided to use my Mo You Kitty Collection 12 stamping plate for some gold outlines of butterfly wings. Unfortunately the wing patterns are a bit wider than my nails, so it looks more like a sort of paint splatter effect... I think it worked better when I used them for advanced stamping, as the different colours on the wing patterns made them a little more obvious.

Overall though I like this design (just not as a butterfly design!), and am pleased to be taking part in this link up. Please check out the other designs in the link up at the bottom of this post. They put me to shame! TTFN
Colours used: Alpine Snow - OPI, Guava - Barry M, Cobalt Blue, Barry M, Raspberry - Barry M, Gold Foil Effect - Barry M


Friday, 22 April 2016

HBP Presents: Dusty Dino's!

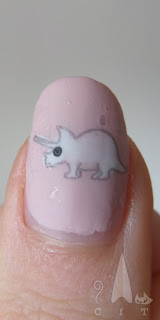
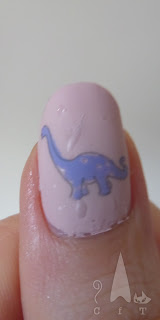
Hello nail world! Today I'm super excited to be sharing the nail design I did as part of this months Hobby Polish Bloggers Link Up. I love having a monthly theme as it gives me inspiration to try things a little differently. This months theme was dusty/muted colours, so I came up with the idea of dusty dinosaur's! I used advanced stamping for this manicure using my new Bundle Monster plate 611. I was looking all around to find dinosaur stamping plates and stumbled across my dream dino plate on Bundle Monster, so ordered it all the way from the US. It was worth the wait!

I used a grey polish to stamp the images onto my UberMat, as I thought black or white might be slightly too harsh against the muted colours. This old Grey polish from Barry M was perfect. I used a dotting tool to do eyes on some of the dino's, and then to colour them in in pale/dusty colours. Once I has placed them on my nails I used a matter top coat to finish the look. Really pleased with how these turned out, and was so sad when I had to take them off for a client meeting! I did have a few issues with a little bit of bubbling, which I have learnt from, as I'm rocking another advanced stamping mani now and it's much smoother :)
Below are close ups of a couple of the dino's and a picture of the stamping plate (excuse the reflectiveness, I struggle to get good pictures of stamping plates!). To see the colours I used, and the designs the lovely ladies of the HPB group have done please scroll past the pictures. It's a lovely and talented nail community so I would recommend you check them out!

Colours used: Pink Lemonade - Barry M, Grey - Barry M, Acai Smoothie - Barry M, Wisteria Haze - CND Vinylux, White Horse Street - Nails Inc, Swan Street - Nails Inc, Pro Matte Finish - Rimmel


Friday, 25 December 2015

HBP Presents: Merry Christmas!

Merry Christmas everyone! I didn't think I'd be blogging on Christmas day but I couldn't stay away! I hope you have all had/ are having a magical day. Today I'm showing you my Christmas Day 2015 nails. Finished these off quite late last night, just in time before Santa arrived :D This post is doubly special as it's not only Christmas day but it's also part of the Hobby Polish Bloggers Facebook groups monthly link up (this is my fourth). I've learnt a lot from this group and love being a part of it.

As you can see from the pictures below this years design is based on a Christmas card. This is one of the ones I got from Paperchase this year. I usually have all kinds of animals on my cards but I liked the semi-traditional feel of this one. I kept it simple and didn't attempt do do the Santa. My freehand skills only go so far!

I started with a blue base and then used sponges to create a slight gradient for the night sky. I then very lightly sponged over the top with cream polish on cling film/saran wrap to give light snow effect. Next step were the gold stars, done with a small nail art brush. For the trees I used a thin detail brush, and the same for the outlines of the houses (then filling them in with another). I did try putting snow on one of the trees but it didn't really work so I changed it back. Finished off with my favourite top coat, Nails Inc's Kensington Caviar (quick dry).

Overall really pleased with how this turned out. It wasn't as complicated as I thought, and the thin brushes were really nice to use. Today I was given a pot to put my brushes in, so hopefully now that they will be more easily accessible (previously kept under my bed!) there should be more freehand to come!


Colours Used: Blueberry - Barry M, Cobalt Blue - Barry M, Coconut - Barry M, Gold - Limited Collection at M&S, British Racing Green - Butter London, Red Hot Rio - OPI, Seven Dials - Nails Inc

Check out the other lovely holiday/winter designs below!


Saturday, 28 November 2015

HPB Presents: Glitterchrome

The time has come for another Hobby Polish Bloggers link up. I almost missed this one as I've been so busy at work I haven't been checking the group as much, glad i've managed to get it done last minute as I really enjoy doing these. This months theme is Monochromatic Mani, creating a design all in one colour (or varying shades).

As it's that time of year I've gone for glitter, I'm having a major glitter moment! I picked blue as it's my favourite colour, and have tried a gradient as i've been wanting to have another go at gradients for a while now, they often seem to end up in my summer designs which feel so far away now! It's only really visible in the close ups but I have done a two tone blue gradient underneath the glitter, and then added to different glitters over the top.

The first blue glitter is one of Barry M's first ever glitters which I've had for years, and to be honest smells a little concerning! But I figured as it was over two polishes already it probably wouldn't do too much damage (fingers crossed!). The final one is a beautiful Nails Inc glitter with varying sizes and it's just so shiny, I wasn't sure about this mani at first but the final glitter made it!


Colours Used: Atlantic Road - Barry M, Bruton Place - Nails Inc, Blue Glitter - Barry M, Royal Archade (Saphire) - Nails Inc

Make sure you check out the other entries below!


Saturday, 31 October 2015

HPB Presents: Na Na Na Na Na Na Na Bat Nails!

The time has come around so quickly for this months Hobby Polish Bloggers blog link up! I'm very excited to be taking part for the second time. Not 100% happy with how mine turned out this month, but it is too late to change them now, I have halloween getting ready to do!

I started out well with my beloved purple Ink by OPI. This colour shines so wonderfully and catches the light really well. Pretty much they shiniest polish I have! (excluding glitters and holo's of course!). On my ring finger I used Orly's Shine, it's the first of their polishes I've tried and I must say I really like it, it's just such a strong shiny silver. I've found it's great for nail art as it stands out against any colour.

For the bats I've used the inside parts of my new nail stencils from She Sells Sea Shells, meaning I seem to have ended up using stickers for the second month running, something trickier next time I promise! On the purple nails I've outlines the stickers with Shine to give the bats a sort of halo look. I have mixed feelings about the outcome, I really love the colours and the shapes, but i think it looks a little scruffy. If I had more time i think i'd try a purple gradient with silver bats instead. There's always next year!


Below is a close up to show off the shinyness of the polishes. So shiny! I can't wait to have a proper look through everyone else's designs this month. Please check them out via the links below. Happy Halloween!


Colours Used: Ink - OPI, Shine - Orly

Wednesday, 23 September 2015

HPB Presents: Owls In The Mist - Autumn/Fall Blog Link Up

Very excited to be taking part in my first ever blog link up with the Hobby Polish Bloggers Facebook group. This months theme is autumn/ fall, and I've decided to go for something not too challenging as it's my first time! I've really enjoyed looking through all the other posts so far, there are some fabulous designs, and a lot of different takes on the theme. My design was done using some owl stickers/decals bought for me by a friend. I think they're pretty adorable!


I started with my trusty Nail Kale basecoat fron Nails Inc, and then painted my nails with Topshop's Easy Peasy matte grey nail polish. Once dry I sponged on some of Barry M's Coconut with peices of srunched up cling film/saran wrap. Next up were the owls, I've included a picture of the stickers below, I believe they are available online. I had some trouble peeling these off at first. After about half an hour prizing three away from the backing to stick down, my boyfriend kindly provided a tooth pick which worked a treat!


Once I'd stuck down all the little owls I finished the look with my matte top coat from Rimmel. I tried a shiny top coat too but I think the matte suited the look better and really brought out the colours of the owls. Which one do you like best?!


I really enjoyed doing this link up and look forward to the next one. Please check out the other entries below, they are fab! :)