Showing posts with label Fun Lacquer. Show all posts

Tuesday, 27 December 2022

Gifts and Gold

Merry Christmas space turtles! Today I'm sharing some nail art I had on for Christmas Day which fits one of the December Glam Nails Challenge prompts which was Gifts. I wanted to do something quite snazzy and sparkly for Christmas so went for a reflective glitter and a stamping plate I was excited to use more of.

I started with a peel off base coat and then a few layers of reflective gold glitter followed by a layer of gold holographic glitter. While all of this was drying I was creating decals on my Uber Mat using Mo You London's Noel 15 stamping plate. I chose all gift themed images and was pleased to try these vintage looking images, particularly the dog and the lady with the big skirt. After I'd applied the decals I added a glossy topcoat and job done! Definitely wasn't as quick as I've just made it sound though :D

I really like these though the only downside is that the images are quite dark so if lighting isn't great the colours and intricate details of the design don't always show up. Pictures below with and without flash so you can see them in natural light and with reflective glitter activated.

Colours used: Flash Platinum Gold - Fun Lacquer, Million Dollar Dream - Fyn Lacquer, Black Stamping Polish - Dance Legend, Cream Soda - Barry M, Red Hot Rio - OPI, My Car Has Navy-gation - OPI, Watermelon - Barry M, Cappuccino - Barry M, Charlotte Street - Nails Inc

Thursday, 22 December 2022

A Candy Cane Deer?

Hey space turtles! More Christmas nail art after a bit of a gap due to a wonderful pre-Christmas trip to Norway. I've wanted to use this little cartoon deer for a while and thought it would go well with festive red and a candy cane image. The candy cane stripes didn't really come out how I wanted but as a whole I like the look.

I started with a peel of base coat and then a couple of layers of cream polish on one nail and red on the others. I added a layer of red glitter over the red nails. For the deer and bells I created decals on my Uber Mat using Mo You London's Noel 15 stamping plate. For the candy cane nail I used their Holy Shapes 19 stamping plate and added the lines one by one. This was a bit fiddly and I didn't manage to get it very neat and even. I finished the look with a shiny top coat. I like this look though  I wish the candy cane part had come out better and I'd added more glitter!

Colours used: Dead Heat - Barry M, Kiss Me - Fun Lacquer, Cream Soda - Barry M, White Stamping Polish - Rainbow Connection, Black Stamping Polish - Dance Legend, Cocoa - Barry M

Monday, 6 June 2022

Crabtastic Nails

Snap-Snap-click-click (or whatever noise crabs make!). Another Glam Nails Challenge prompt to share which will be short and sweet as I still have a few posts to catch up on! As you may have guessed the theme for this nail art was crab. I have a few stamping plates with crab images on and settled for this origami image from Mo You London's Origami 05 stamping plate. I made decals on my Uber Mat for the two crabs and also added the image to my nails directly to show me where I'd need to draw between the two base colours (two lovely reflective polishes - colours listed below the pictures). I then added the white water image from the Bundle Monster Twi Star stamping plate over any areas of blue. I'm pleased with the overall look but it's a shame I may have left too much of a cuticle gap. I think perhaps these thick glitter polishes shrink a bit more after being applied. Overall pleased with the final sparkly look!

Colours used: Flash Platinum Gold - Fun Lacquer, Heartkids - Emily de Molly, White Stamping Polish - Rainbow Connection, Red Hot Rio - OPI, Black Stamping Polish - Dance Legend

Sunday, 13 February 2022

Classic Valentines

Happy Valentines Day in advance! I have a couple of Valentines nail art looks lined up, the other of which I'll share tomorrow. I was lacking a bit of inspiration for Valentines nail art this year so thought I'd give the classic heart tips look a go with a bit of glitter.

I started with a couple of layers of sheer pink, and then added a couple of swipes of red quick dry polish in the shape of a heart. This was surprisingly easy and I'm pleased with how it turned out. I added another layer and then a layer of red glitter. Finally I used another layer of red glitter from one of Fun Lacquer's Valentines Day collections for the final pop of glitter. I finished the look with a 'glitter grabber' top coat followed by a quick dry top coat. I'm enjoying this look - the simplicity works and I'm enjoying being sparkly!!

Colours used: Get Discovered - Nails Inc, Dead Heat - Barry M, Red Glitter - Barry M, Kiss Me - Fun Lacquer

Sunday, 30 January 2022

Frosty Tips

Hey nail people! More wintery nail art to share today for today's Glam Nails Challenge prompt which is frost. I started with a sheer pink base, then a few layers of sheer shimmery blue/purple (colours listed below pictures). Once dry I added a layer of Platinum Diamond magnetic topper and hover the magnet over each nail for 30 seconds. I repeated this with another layer to add a touch more sparkle. Following that I used Mo You London's Festive 02 and Noel 07 stamping plates and white stamping plates to add the snowflakes and frosty branches.

I saw this nail polish combination on ken.nails Instagram and loved it so much that I bought the shimmery blue/purple so I could recreate it! I don't think I added enough layers as hers looked better, but I do still love this - very frosty! I'm pleased with my choice of frosty images too. It is a shame I missed Wednesday's prompt of 'ugly sweater' but I'm just a little too busy at the moment. It's been a great month of themes!

Colours used: Butterfly - Fun Lacquer, Platinum Diamond - Fun Lacqufuner, White Stamping Polish - Rainbow Connection

Monday, 29 November 2021

Some well timed 1st frost nails!

Hi everyone! Got some wintery nail art to share today and I'm excited about moving closer to Christmas nail art! This look was for the Glam Nails Challenge prompt of First Frost, which was very fitting as it's just started getting frosty here in the UK and we even had some snow yesterday which is quite unusual for us in December, in the south anyway! I was totally crazy and went for a lake swim yesterday morning! I love wild swimming and I have done so in the autumn and been fine, but during frosty weather was perhaps a little too far for me!

For the first frost prompt I knew I wanted to try a beautiful look I'd seen on Pretty_Pawlished on Instagram. Mine isn't exactly the same as we had different snowflake images, but I'm really glad to finally get round to it! I started with a base of two layers of blue glitter (colours listed below pictures). I was impressed that I only needed two coats as the glitter was so densely packed. Once dry I added a glitter grabber layer, and then a layer of magnetic polish for that gorgeous colour shift! Finally, I used Mo You London's Festive 02 stamping plate to add some snowflakes towards the edges of my nails - followed by a glossy top coat.

In conclusion - I am very happy with these!! The nail polishes are simply gorgeous and combined (particularly under bright lights) they have the most stunning sparkle and colour shift! I actually bought the blue glitter because of seeing the original look on Instagram. I shall have to see with my work situation but I'd like to keep these on as long as I can!

Colours used: Lifestyle - Fun Lacquer, Fascinating - Fun Lacquer, White Stamping Polish - Rainbow Connection

Thursday, 4 November 2021

Birthday Fireworks and Aquatics!

Hey everyone! Hope you are doing well :) It's just been my Birthday and I've been enjoying a few days off. I wanted to create some Birthday nail art and try something super sparkly but also firework related. I find firework nails really hard to do well so didn't do just fireworks, but tried an abstract aquatic theme as I love ocean themed things! It was very much a make it up as I go along sort of look! Also tried the flakie version of Fun Lacquers reflective polish which was good fun!

I started with a peel off base coat, followed by three layers of silver reflective glitter and a couple of coats of glitter grabber top coat. I couldn't bring myself to file my nails down a bit and all these layers should help keep them strong! I then used black stamping polish and Mo You London's Aquatic 04 and Festive 05 stamping plates to add the images. I particularly love the way the thumb nails came out. Next I used a couple of sheer polishes in purple and blue and a small nail art brush to add some colour.

I quite often don't do that well with my Birthday nails but I'm really pleased with these! I'm really pleased with how the fireworks came out and they were so simple to do. I'm also loving the serious sparkle going on with the base polish! I've included loads of pictures below as I created this look over both hands. I'm looking forward to wearing them for the rest of my Birthday celebrations!

Keep scrolling for thumb nail pictures and polishes used underneath!
Colours used: Flash Diamond Flake - Fun Lacquer, Royal Jelly, Lilac Jelly, Thistle Sheer, Cobalt Jelly, Indigo Jelly, French Blue Sheer - All Cirque Colors, Black Stamping Polish - Dance Legend

Sunday, 26 September 2021

Look Out! Super Reflective Nail Polish!

Hey everyone! Something a bit different to my usual stamping nail art to show you today. I have recently purchased some of these reflective nail polishes which seem to be popping up everywhere at the moment and had loads of fun playing around with them yesterday afternoon! I've got a couple more to try but I wanted to share my thoughts about the ones I tried as it's so much fun trying something new!

I've been tempted by some reflective polishes I saw from Bow Polish for a little while but when Uber Chic brought theirs out with a sparkly deep red version I just had to have it as I thought it would be so perfect for Christmas parties (if we're lucky enough to have any this year). The Uber Chic reflective polishes are gels so I wore a peel off base coat underneath. I'm not very used to gel but this is my favourite one I've tried so for, I do love how shiny they come out!

In the first picture below you can see I'll Be Fireside lit by my ring light, this is how it looks in regular daylight and when you get it under bright lights or a phone torch is does this amazing twinkling thing which I just could not capture on camera... but it's insanely beautiful! It makes me think of the red carpet and paparazzi - very glamorous! The second picture is with flash - the glitter glare is insame! It's less likely to look like this while being worn unless very directly under a bright light, but the twinkly sparkly thing it does it better - trust me! I'm so in love with this polish, it's even better than I expected and absolutely perfect for a party.

Not long after I'd ordered my Uber Chic reflective nail polish to try Fun Lacquer brought out a whole collection! This time I didn't just choose one to try but three, I was so wowed by the pictures and videos I saw! I also know silver polishes are often the most sparkly so wanted to try it out. The Fun Lacquer Flash collection has four different reflective polishes which are available in regular or gel formula. I chose Flash Platinum, Flash Diamond Flake and Flash Gold Diamond Dust. The one featured in these pictures is Flash Platinum.

So as you can see from the pictures below...wow! These pictures are of course under flash, but under any bright lights these are amazing, I love the way they look textured almost as if there's some kind of diamond dust on my nails! In regular light they are still pretty sparkly, but more of a silvery grey colour. I can't wait to see what the Flake and Gold ones are like! This was also easier than I thought it would be to remove with regular nail polish remover, I didn't need to soak it.
I feel like this post is getting a bit long, but want to share one more thing! I was keen to see what this super sparkly nail polish would look with some stamping over it with the polish shining through. I used Uber Chic's Lovely Leaves 01 plate to create the below look, and I love it! Honestly these polishes are so gorgeous and I really look forward to doing full manicures with them :)
I've chosen some of the shiniest pictures for this blog post but also have a few video's which I will put on Instagram. TTFN!

Friday, 26 February 2021

Fun Lacquer Platinum Diamond - A Comparison

Hello nail people of the world! Today I'm doing something a little different from my normal stamping nail art, and reviewing/ comparing a couple of nail polishes by Fun Lacquer. Back in 2020 Fun Lacquer released a new magnetic gel polish (Platinum Diamond) with a really pretty silver glitter effect that is different to any other glitter I had seen before, it has a sort of crushed velvet look to it and sparkles like crazy when you move your hands! I was waiting for it to come back in stock again on Rainbow Connection in the UK, and once it did they had also released a regular nail polish version. I had read previously that the gel one was better for getting the true 3D shimmer effect, but the pictures of the regular one look pretty good too! So I dithered over which one to get and ended up deciding to get both and compare. It seems like a waste of money in some ways but it gives me options and something to do in lockdown!

I'm going to summarise below the key points to compare and my final view, so hopefully if you're struggling to decide which to buy this might help! Underneath all the text I've added pictures, the gel polish is on my thumb and index fingernails. I've tried a few different colours underneath.

Consistency - Very good for both, not too thick in either case but just one coat needed.

Price - £14 for regular and £19.50 for gel - it's not cheap but it is worth it!

Application - The application of these was really good as usual, though I am less used to gel so probably haven't perfected that yet! I think there's a trick to getting that 3D sparkle effect which I achieved better on some nails than others, it will take some practise and is also pretty hard to capture on camera - but when it works it's wow!

Sparkle - Wonderful! I managed to achieve the sort of crushed velvet flare effect better with the gel but both are beautiful. The regular polish one had slightly closer together particles I thought.

In conclusion, I need to practise my technique with these, but I think I found the gel one slightly better. The unlimited drying time meant it was easier to get the effect I wanted before curing, and I think the sparkle effect is more unique. However, the difference is small, both are gorgeous and you have to look closely to tell the difference. It may even be that I'm just not well practiced enough in creating the effect. Therefore I would recommend choosing the one you're most comfortable working with - it will look gorgeous either way!

Colours used: Black Gel - FairyGlo, Pale Pink Gel - FairyGlo, Lady In Black - OPI, Fascinating - Fun Lacquer, Cobalt Jelly - Cirque Colors, Platinum Diamond Gel - Fun Lacquer, Platinum Diamond - Fun Lacquer

Sunday, 27 December 2020

All The Jingle Ladies - Merry Christmas!

Hello all and Merry Christmas! I'm sharing my Christmas day nail art with you today which I meant to share earlier but I have been enjoying some lazy time the last few days! I ended up with different nail art on each hand for Christmas day, this was the new one I did on Christmas Eve, and on the other hand I wore my 'Tree-Rex' nail art which I really like! Although Christmas had to be altered this year I was lucky enough to still be able to see my parents and one of my sisters, and we had a lovely day.

For the nail art I started with a base of red on most nails and gold on one. I then sponged some red glitter over the red nail polish, it came out quite bright as the polish underneath was a bright shade of red. On my middle finger I stamped some wording from the Mo You London Noel 10 plate which matches a Christmas top my sister got me a few years ago, which I wore on Christmas day. On the accent nail I sponged on some gold glitter, and then stamped the reverse bell image from the Uber Chic Happy Christmas/ Christmas 04 stamping plate. It was pretty simple to do but I like the final look.

My partner got me a ring light to use to help me with the lighting in my nail pictures, and it's being used in the first three of these pictures. The effect it gives on the glitter  in these pictures is a little strange but I think I'm making progress. It was a great gift!

Colours used: Dead Heat - Barry M, Kiss Me - Fun Lacquer, Gold Digger - Barry M, Gold Glitter - Barry M, Black Stamping Polish - Dance Legend,  Foil Effects in Gold - Barry M

Sunday, 6 December 2020

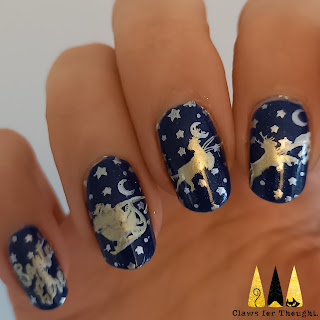
Dashing through the sky!

Hey everyone! More Christmas nail art to share with you today (of course!). This one is the second prompt in the Glam Nails Challenge for December 2020, the theme is 'Santa's sleigh'. I've done a sort of similar look to this before (see it here), which was good fun so I thought I'd try something similar.

I started with a base of blue (colours listed below the pictures), and then used silver nail polish to stamp the stars image over all of my nails. The image is taken from Mo You London's Noel 09 plate, and I love it so much that I didn't layer anything over it on my thumb, so I could appreciate it on it's own. For the Santa's sleigh images and the wording (Santa is here!) I stamped them onto my nails in white, and then layered gold over the top. This didn't work as well as I'd hoped, I think I layered them too directly over the top of them, rather than slightly off to get that layered effect. Also the gold nail polish ended up looking pretty similar to the silver stars.

Overall I quite like them. They could have been better, but I like them better than my previous attempt of this look, and am enjoying the festive vibes!

Colours used: Starry Night of the Summer - Fun Lacquer, Foil Effect in Silver - Barry M, White Stamping Polish - Rainbow Connection, Foil Effect in Gold - Barry M