Showing posts with label Decals. Show all posts

Wednesday, 29 December 2021

Oh Christmas Tree!

Merry Christmas! I hope you had a great one if you celebrate it, and if not I hope you're not sick of all the Christmas nail art! This one was initially going to be part of my Christmas Day nail art look, but what with getting things ready it just didn't happen! To be honest it's maybe for the best as these didn't really come out how I wanted and I really liked the ones I had on before! They were also meant to be for Boxing Day's Christmas Tree Glam Nails Challenge prompt but I didn't do them till Monday evening and then I kept not getting round to blogging! 

I started with a peel off base coat and a layer of sheer pink. I then added a couple of layers of reflective red gel polish as it's so stunning and festive! The thumbnail went well but the two fingernails were a bit lumpy as I'm not great at gels! I then applied decals on my index and little fingernails which I bought some time ago from Charlies Nail Art supplies. They were surprisingly easy to use, I did only use one Christmas Tree though which perhaps wasn't enough for a Christmas tree look. I think this one was all a bit of an experiment to be honest. More Christmas nail art to follow!

Colours used: I'll Be Fireside - Uber Chic, Nail Wraps - Charlie's Nail Art

Sunday, 28 October 2018

Space Turtles! Inspired by The Great British Bake Off

Hi everyone and happy Sunday! Today I'm sharing some nail art I based on my favourite creation so far on this years Great British Bake Off. This is the first year I have watched it (shock, horror!) and I'm really enjoying it. Kim Joy is my favourite to win as I love the beautiful things she creates and the themes. My favourite theme was the 'space turtle' cake she made earlier in the series.

These didn't really turn our how I had intended, unlike Kim Joy's wonderful cake, but they're still cute! I might try again with a different colour scheme another time. I started with an off white base on all nails, and then applied a couple of coats of Barry M's Electric Eel on three fingernails, and Butterflyfish on my ring finger and thumb nails. On the brighter blue nails I used the Kelli Marissa Bundlemonster and some gold nail polish to add some space images. I don't think I chose these colours very well as it doesn't really show up!

On my ringer fingernail I used a turtle decal and some dark green nail polish for the turtle shapes. I stuck the centre of the decals on my thumbs rather than using more stencils as it saves the others for another time. On the turtles I used a couple of different glitters (colours listed below the pictures) to continue the galaxy theme. I used tiny pieces of sponge for this as I hope to create a galaxy look but it was a bit too fiddly so I just ended up with very sparkly turtles!

So these didn't really come out as I'd hoped, and as I'm now onto Halloween nails I don't think I'll have time to try again before the Bake Off ends, but they were still cute and I liked wearing Electric Eel for the first time.
Colours used: Cream Soda - Barry M, Butterfly Fish - Barry M, Electric Eel - Barry M, Catwalk Queen - Barry M, Diamond Glitter - Barry M, Hang Up The Heels - Essie, Foil Effect in Gold - Barry M

Thursday, 6 September 2018

Bubble Smoosh! (Take One)

Hi again! Today we have something super bright and smooshy on my nail blog! I have been inspired by Hanninator on Instagram, she has been doing a lot of these bubbly colourful nails in a variety of colours and they look awesome! I ended up searching the internet and as soon as my nail polish buying ban was up I ordered the full set of four Spot It polishes by Dance Legend which she uses for these designs.

So this was my first attempt. Some nails have come out better than others which I guess is to be expected. I've tried to get the best ones in these pictures but please excuse the blurring! I used my Uber Mat and a clear stamper to make decals. For each nail I started with a base (varying the colour) then swiped some generous quantities of the other colours over the top. I then pressed the stamper lightly over the top to merge the colours together. I tried varying the pressure and speed of this but couldn't quite work out what worked best. It's easier to see once on the nails!

I've seen this effect described as fluid nail art, which makes sense but I think I will call mine a bubble smoosh! It's a little like the 'smoosh' nail art which people do directly on their nails, but with the addition of bubbles from the Spot It polishes.
Colours used: Spot It Blue - Dance Legend, Beach Hut (Orange) - Models Own, Yellow - Barry M, Claridge Gardens (Neon Pink) - Nails Inc, White - Emily de Molly

Sunday, 1 April 2018

Wobbly Easter Eggs!

Happy Easter everyone! Will keep if short and sweet today as I have Easter-y things to be doing! These were my first attempt at Easter egg nails using ILNP's new ultra metallic brights colelction for Spring 2018. To be honest I don't think it turned out all that well as the eggs are quite wonky! Gives them a bit of character I guess...

I started off with a base coat and then one layer of ILNP's Mega. This was to give a sheer effect where you can still see my nails, but with a fair amount of sparkle! In the meantime I painted some clear patches on the Uber Mat, and once dry, painted on the egg outlines in black polish with a small nail art brush. It was a bit challenging to get neat and consistent eggs,  I need to dig out my acrylic paint!Once that was dry I used some of the metallic polishes to paint spots within some eggs, and stripes on others. Once dry I filled in with more metallic polish as a background colour.

After giving them some time to dry I added another layer of clear polish, and once dry, peeled off, trimmed, and applied to my nails. I finished off with a quick dry topcoat to stick the design down and get rid of any cloudy parts. Fortunately the chocolate eggs I've received have been less wonky than this :)
Colours used: Mega - ILNP, Lady In Black - OPI, Hi Fi - ILNP, Funhouse - ILNP, Blueprint - ILNP, Checkmate - ILNP, Short Circuit - ILNP, Sugar Coated - ILNP

Tuesday, 12 September 2017

Tropical Tuesday: Fresh Fruit

So some time ago when I'd just started this blog, and had a big backlog of pictures to use, I did a weekly 'Tropical Tuesday' with various brightly coloured tropical themed nail art ideas. I've not been so good this year, I've had way less tropical themed manicures, but at least I can squeeze one in before the weather gets cold!

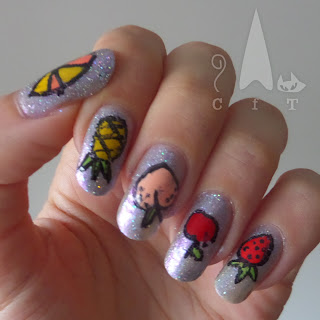
My inspiration for this nail art came from Wah Nails on Instagram. They did a lovely design with peaches over pale purpley glitter. I considered doing peaches on all my nails, but decided to go for more variety, sort of fruit machine style.

To make these I drew the fruit onto my Uber Mat, coloured them in with nail polish and a dotting tool, added clear polish, and then peeled them off to stick onto my  nails. I had real diffuclty as I used a nail art pen to draw them on, which had gone a bit funny. It was taking so long to do them that the outlines started to dry and crack a little, you can see that on some of the picture below.

So overall I think these are OK but not majorly successful. The peaches came out best so I think I should have stuck to them!
Colours used: Nimbus - Illyrian Polish, Nail Art Pen in Black - Barry M, Passion Fruit - Barry M, Dead Heat - Barry M, Peach Melba - Barry M, Seven Dials - Nails Inc, Marylebone Road - Nails Inc, Papaya - Barry M

Thursday, 24 November 2016

Glitter and Cats - How To Use Water Decals

Miaow everyone! Two of the greatest things on tonight's nails - glitter and cats. I recently reviewed two stunning nail polishes from Painted Polish (see the review here). It was a little painful to contemplate putting anything over the glitter explosion that is Painted Polishes 'Crunk On Copper', but I was keen to try out these cat decals and thought they would go well!

I haven't used water decals before so I watched a few video's on YouTube to get an idea of how to do it. There weren't any instructions with the actual decals so I just chose my favourite from what I saw on YouTube. I've included instructions below the pictures. Despite my reservations about covering glitter, I loved how these turned out! Just wish the pictures showed the holo up a bit better!
How to use water decals:

1) Cut around the shapes you will be applying to your nails.
2) Peel off the clear plastic layer.
3) Place each piece in warm water for about 20-30 seconds
4) Gently remove the decal with your finger (it should slide away easily) and place it on your nail.
5) Allow the decal to dry a little (so it stops sliding around!) and lightly add a top coat to keep it in place.


Sunday, 22 November 2015

Stamping Sundays: Stained glass - take one

Todays stamping blog post is another work in progress. I really love the colours but the advanced stamping didn't quite go to plan so only ended up lasting me a day or two. However I think I learnt a fair bit in the process, so hopefully the next time I attempt larger decals it will work a little better. I've generally had better luck with smaller designs, such as the tiny turtle nails I did for my sister a couple of months ago.This was my first attempt at decals using my new Uber Mat so had lots of fun trying that out! The stamping plate used is from Mo You's Gothic collection and is Gothic Plate number 10.

For today's post I'm going to list a few things I learnt from this design and hope will be useful pointers, but before that I would like to rave about Butter London's British Racing Green! I got this as a birthday present and this was the first time I used it. It's got a lovely smooth consistency, as I've found with all the Butter London polishes I've tried, and the colour is so strong and shiny! The pictures below are using two coats, but it's almost opaque in one.


Colours Used: British Racing Green - Nails Inc, Black Knight - Mo You, Sprint Finish - Barry M, Indigo, Barry M, Wigmore Street - Nails Inc

Advanced stamping on Uber Mat - what I learnt:
  • If using a mat to make decals, make sure it is over a light surface. The corner of the mat which contained my decals was over the edge of my laptop, meaning I couldn't see very well if I was leaving little gaps, which as you can see above it turned out I was!
  • Make sure the colours on your decals contrast enough. The dark blue and dark purple I used look quite different in the bottle, but once they are shrunk down onto tiny nail designs they are pretty hard to distinguish from one another, making the design a tad less colourful.
  • When placing the decals on your nail, make sure the bottom of the design is at the bottom of the nail, rather than just placing it on and cleaning the excess after. Cleaning around the sides and top of the nail is easy but trying to clean gloopy decal from the cuticle area is harder!

Sunday, 18 October 2015

Stamping Sundays: Tiny Turtle

Today I have my sister Imogen's nails again modelling some more of my stamping attempts! I've had another go at advanced stamping and went for a simple but cute design. This was ready for her trip to Germany.

I've used my Mo You London Doodles Plate 07 for the decal, and used my stamper rather than an uber mat (I just can't make my mind uop whether I need one!). I have a double ended stamper which was perfect for this. I picked up the design in black and cleared of any excess with sellotape. Getting rid of a narwhal was emotional! I then used dotting tools to fill in the little gaps in two shades of green, and left to dry for about fifteen minutes. After this I painted a thick layer of clear polish over the top, and left for about half an hour.

The decals are suprisingly easy to peel off without breaking, but a bit fiddly to place on the nail. As these are just little ones they were easier than full sized decals. After pressing the decals down gently I topped it all off with a top coat. If you look closely at the bottom left picture here you can see where the edge of the decal comes to. This one was taken before top coat. Also worth mentioning that the top layer of nail varnish is still sticky/tacky when I place the decal, this makes it cling to the nail better.

Colours Used: Wardour Street - Nails Inc, Black Night - Mo You, Key Lime - Barry M, Block Your Green - Rimmel

Wednesday, 23 September 2015

HPB Presents: Owls In The Mist - Autumn/Fall Blog Link Up

Very excited to be taking part in my first ever blog link up with the Hobby Polish Bloggers Facebook group. This months theme is autumn/ fall, and I've decided to go for something not too challenging as it's my first time! I've really enjoyed looking through all the other posts so far, there are some fabulous designs, and a lot of different takes on the theme. My design was done using some owl stickers/decals bought for me by a friend. I think they're pretty adorable!


I started with my trusty Nail Kale basecoat fron Nails Inc, and then painted my nails with Topshop's Easy Peasy matte grey nail polish. Once dry I sponged on some of Barry M's Coconut with peices of srunched up cling film/saran wrap. Next up were the owls, I've included a picture of the stickers below, I believe they are available online. I had some trouble peeling these off at first. After about half an hour prizing three away from the backing to stick down, my boyfriend kindly provided a tooth pick which worked a treat!


Once I'd stuck down all the little owls I finished the look with my matte top coat from Rimmel. I tried a shiny top coat too but I think the matte suited the look better and really brought out the colours of the owls. Which one do you like best?!


I really enjoyed doing this link up and look forward to the next one. Please check out the other entries below, they are fab! :)