Showing posts with label Gradient. Show all posts

Wednesday, 17 May 2023

A Motorway Sunset

Hey space turtles! Today's nail art was inspired by the motorway... sort of. We were on route to one of our recent long weekends by the seaside and the sky looked so lovely over the fields next to us, with the trees silhouetted against yellow and blue. I made a note on my phone to try and recreate it on my nails! I was apprehensive about whether it would work or come out too bright but thought I'd give it a go.

I started with a base coat and then one layer of sheer white as a base. Next I used a gradient sponge and two shades of blue plus orange and yellow nail polish to create a gradient. I sponged on a couple of layers of polish before adding cloud and tree images from Mo You London's Noel 16 stamping plate. To finish the look I added a glossy top coat. I considered making it matte which I do think would look nice, but I love it so much the way it is! I am still wearing it so it's not too late to try I suppose! 

Colours used: Snow (soft focus) - Polished for Days, Beach Hit - Models Own, Yellow - Barry M, Bluebell - Barry M, Cyan - Barry M, Essential White - Uber Chic Beauty, Black Stamping Polish - Dance Legend

Sunday, 11 September 2022

Rainbow Nails for Porto

Hi Space Turtles! I'm back after a week away in the beautiful city of Porto in Portugal. These where my holiday nails (along with the Aperol Spritz ones I shared before). I took inspiration from me.time.manis on Instagram who created a gorgeous rainbow look with the Bubbly Collection from Cirque Colors. I decided to attempt a recreation as a fun holiday look and I love it! It's a great collection and the colours are so fun together.

I started by unscrewing the gaps on the ones I wanted to use on the nail I was working on, then applied a line of colour of each polish gently, trying to blend or overlap them slightly without the brushes getting contaminated with other colours. I then held a magnet over the top for 30 seconds. Once all nails were dry I repeated the process with a second coat. I probably didn't need to magnetise the first coat in the end but thought it might help.

I wish I'd managed to blend the colours a little better and perhaps managed to get a better magnetic effect but I did know that would be tricky with the multiple colours as they dry so fast. Despite this I do love these. They are such a fun and bright colour combination and perfect for holiday nails!

Colours used: Aperol Spritz, Sparkling Yuzu, Soda Shoppe, La Dolce Vita, Helter Seltzer, Fizzing Lifting Drink - All Cirque Colors

Tuesday, 16 August 2022

Sparkly Safari Sunset

Hey space turtles :) I'm a bit behind with blogging at the moment so playing catch up. This one is for a Glam Nails Challenge prompt of Sunset. I had liked the idea of trying sharpies over reflective glitter for a while and thought this would be a good opportunity to try it in gradient form.

I started with a peel off base followed by two coats of reflective glitter and a quick dry top coat. I then used yellow, orange and red sharpies to draw three stripes of colour directly onto my nails. I then took a wide nail art brush and some nail polish remover which I used to blend the colours together. Next I added some tree, giraffe, bird and rhino images in black using Mo You London's Mother Nature 08 stamping plate. I finished the look with another glossy top coat.

I'm super happy with these. The reflective glitter sparkles so nicely through the gradient. I've had a few good compliments on them too :)

Colours used: Platinum Diamond - Fun Lacquer, Various Sharpies, Black Stamping Polish - Dance Legend

Wednesday, 20 July 2022

Disco Palms

Hey space turtles! Today's nail art is for Glam Nails Challenge again and the theme is Palm Trees. I went for something really bright to fit the super sunny weather we're having at the moment. Also think that neon shades go particularly well with the images on the stamping plates I used - Mo You London's Tropical 30 and Uber Chic's Mermaid Life 02 (thumbnail).

I'm not going to go into great detail of how I did this as it was pretty straightforward. I created a gradient with orange and yellow using a gradient sponge, and then stamped the images over the top in black. Voila! You can see how it looks both matte and shiny below, I'm not actually sure which I prefer. I like these but they don't blow my mind. I did receive a few compliments on them though which is always nice :)

Colours used: Beach Hut - Models Own, My Mate Illuminate - Wikkid Polish, Black Stamping Polish - Dance Legend

Friday, 1 July 2022

Mermaid Gradient - Mermaidient?

Hey space turtles (lets see if this sticks :D)! Some more sea themed nail art today after one of my last designs came out very dark so I decided to re-do them with something different. I have a trio of polishes from Native War Paints which are good for gradients and I haven't used for a few years so I thought it would be fun to get them out again. They're the only polishes I have from this brand (not sure if they still exist) as I had a bit of a nightmare getting them to the UK.

So I started with a base of magenta and then layered up a gradient with blue, purple and magenta. I did two layers of gradient on each nail and used a peel of barrier to protect my skin. I then cleaned up around my cuticles with a brush and some nail polish remover. I added mermaid images from Mo You London's lovely Atlantis 05 stamping plate in silver. I did these in the evening so didn't want to embark upon something like advanced/reverse stamping which would take longer.

I'm pleased with these and they look good with my space turtle nails (which I'm still wearing on the other hand). Glad I tried these polishes out again. They are still in good condition and do make a great gradient. Also as I've said many times, I love these Atlantis plates!!

Colours used: Officer Handsome -Native War Paints, Shot By Cupids Crossbow - Native War Paints, I'm Dating A Daredevil - Native War Paints, Foil Effects in Silver - Barry M

Sunday, 24 October 2021

A Spooky Night in the Nail Forest...

Hey everyone! Today's nail art is another Glam Nails Challenge prompt and probably the last one I do this month. The prompt is 'spooky night sky' which is quite frankly awesome! I've seen so many gorgeous designs for it already as I thought I would! 

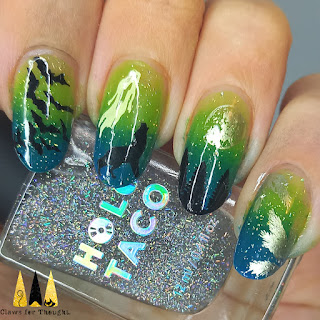
I started with a layer of green and then created a gradient over the top using blue and green. I topped this with Holo Taco's Flakie Taco to create a sort of starry night effect. I then used Mo You London's Halloween 13 and Noel 06 stamping plates to create the haunted forest scene. If you look closely on my thumb nail you can see there is another layer of trees behind the black ones - but unfortunately it didn't show up very well! My nails have got so long now that I misjudged my plans for the wolf nail and had to add an extra ghost so it wasn't too empty!

I have mixed feelings about this design. The gradient came out better than I expected and I'm pleased with the background colours, they're good fun and not too dark for the images to stand out. However I think I should have planned the images a bit better and I'm not sure the silver polish works that well in the look. I think they're fine but definitely not spectacular like some spooky night nails can be!

Colours used: Audacious Green - Accessorize, Cyan - Barry M, Flakie Taco - Holo Taco, Grey - Barry M, Foil Effects in Silver - Barry M, White Stamping Polish - Rainbow Connection, Black Stamping Polish - Dance Legend

Monday, 9 August 2021

Peachy Nails Take Two

Hi everyone! Another late Glam Nails Challenge prompt today, this one is peaches. I had a lovely weekend with my sister visiting so didn't have time to do my nails or blog. it was a great weekend though so I'm happy to be catching up today! For this theme I decided to recreate some peach nails I did in the past with my Nails Inc Kiss My Peach duo. I'm not so good at freehand so it's good to practise and see if I've improved.

I started with a base of pale peach on all nails, and used brighter peach to create a gradient on my index finger, little finger and thumb. On my middle two nails I used the bright peach to add some peach shapes, I created sort of vague heart shapes as this helped me work towards something and stop them being to blobby! I then added some little green leaves using the same brush. Overall I do think they've come out better than my previous ones. I'd like to see what the peaches are like with black outlines but I didn't want to risk messing it up!

Colours used: Peach Tease - Nails Inc, Hot Fuzz - Nails Inc, Key Lime - Barry M

Monday, 9 November 2020

A 30th birthday gradient

Hello world! I hope you're doing well today. I have one of my various birthday nail looks to share with you today. I made a poll on Instagram before my birthday suggesting four different options for birthday nails. I then ended up deciding to do something different for the actual day (the firework nails from my previous post) which didn't really work all that way - maybe it was a sign I should have stuck to the poll! Anyway, the look that won the poll was this burgundy and rose gold gradient, so I wore it for a birthday meal I had with a few friends. This took place just before the next lock down was announced here in the UK so was quite well timed really!

I saw this exact colour combination years ago, I can't remember where but it's easy to find if you Google these two nail polishes (listed below pictures). Ever since I wanted to give it a go but kept thinking I shouldn't buy two polishes just for this look! Eventually I saw them both for sale again at the same time and decided to go for it. It's not a colour combination I would have thought to use for a gradient if I hadn't seen it before but I really like it, both polishes have a lot of shine to them and a good party vibe. It feels appropriately grown up but also party-ish for a 30th birthday! I simply sponged on two layers of the gradient, could have possibly done a third but this definitely gave full coverage.

So in conclusion this was a success! I couldn't capture the polishes sparklyness the same way as the original pictures I saw but the funny lighting in the pictures below is where I've tried! I'd totally where this look again, and will be working through the other birthday looks in my poll in the order they were picked.

Colours used: Ambrosia - Cirque Colors, Himalayan Pink - Cirque Colors

Wednesday, 7 October 2020

Halloween Nails - Black Cats On The Moon!

Hello again and I hope you're ready for more Halloween nail art! These are probably a bit more versatile than just being Halloween nails, but I have had this design on my mind for a while, so when the Black Cat prompt came up in this months Glam Nails challenge it seemed like the perfect time! I saw this look on the Nail It Mag Instagram account, and then recreated by srg.nails. It didn't entirely go to plan for me but I think it came out OK in the end.

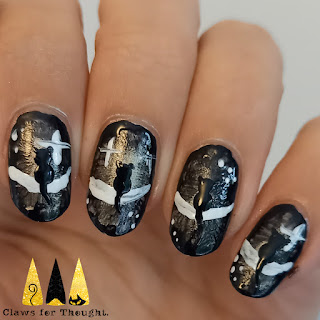
I started off with a grey-ish base, one I got from Topshop when they had their gorgeous matte metallic shades out years ago, it's been a while since I've used it! The next step was to paint a rough outline around my nails using a generous amount of black nail polish. I then used a wide flat brush to try and blend it into the middle a bit. This was the first part where I thought it went wrong, some came out too dark, and all of them looked pretty scruffy. Next I used a small nail art brush and white polish to draw the moons, and at this point I seriously considered giving up on this one, they are pretty wonky, freehand really isn't my strongest skill! I powered through and added some little stars and spots. It was only once I added the cats (using a dotting tool and nail art brush) that I thought it looked OK!

As I wasn't 100% sure on this look I added some shimmer over the top to jazz it up. The last picture shows it before the shimmer/glitter. So overall I adored the original look, mine was not so good but it did get a lot better once I added the cats! Good freehand practise too!

Colours used: Easy Peasy - Topshop, Lady In Black - OPI, White Stamping Polish - Rainbow Connection, Crystal Shimmer - Accessorize 

Monday, 28 September 2020

Midnight Leafy Nails

Hi everyone, hope you're having a good start to the week! The nail art I'm sharing today was inspired by Urban Nail Art on Instagram and YouTube. I saw this beautiful design on her Instagram and just had to try it! Didn't come out quite right for me but I think it can with some practise! 

I started with a base of white polish (colours listed below the pictures). Next I used a gradient sponge and using white, pink, purple and blue I made circles on the sponge, with white filling the middle. I dabbed some of this pattern onto each nail to create a gradient. Next up was some stamping. I used the Uber Chic Lovely Leaves 01 plate and some sheer black stamping polish for the leafy pattern. This didn't show up that well on all nails but it worked on some! I then used black stamping polish and the same image over the top but not directly over the other leaf print, to create a sort of shadowy effect. All of this was done using the tutorial on the Urban Nail Art YouTube channel.

I have mixed feelings about how this one came out! I do think it's pretty, but the gradient didn't come out well on all nails, and the sheer black I used was possibly a bit too sheer too! I think the thumb nail and middle finger nail came out best. Still, I do love the colours and the pattern is pretty too so it's not all bad!
Colours used: Floral Street - Nails Inc, Love & Liberty - Painted Polish, Acai Smoothie - Barry M, Lexington Gardens - Nails Inc, Coal - Fancy Gloss, Black Stamping Polish - Rainbow Connection

Saturday, 13 June 2020

A Selection of Nail Art Techniques for Nail Addicts Collab

Hi everyone, hope you've had or are having a lovely day! I have some very bright nail art to share with you today. A few years ago I was part of the Nail Addicts Collab on Instagram, whose first challenge was 'nail art' themed. I did some pastel nails with images of nail art brushes and stamping tools, I believe I bought the plate especially. This year the collab is back, and starting with the same theme, so I thought I'd try something a bit different rather than going back to the same plate, tempted as I was!

On each nail I tried out a different nail art technique, all using the Bring On Spring collection from Wikkid Polish. I enjoyed getting these super bright neons out again! I finished off with a matte top coat to enhance the colour of the neon polishes. I've listed the effects I used below:

Index Finger - Watercolour (nail polish mixed with polish remover on foil & applied with a brush)
Middle Finger - Three colour gradient.
Ring Finger - Stamping (I'd forgotten white doesn't show up well over neon yellow!)
Little Finger - Dry brushing
Thumb - Smoosh (polish blobbed onto a stamper and then roughly pressed on the nail)

The smoosh nail is definitely my favourite and I'm glad to be back doing this challenge again!
Colours used: Cream Soda - Barry M, Bikini Bombshell - Wikkid Polish, Hello Sailor - Wkkid Polish, Joyful L'il Jellybean - Wikkid Polish, Peachy Beachy - Wikkid Polish, My Mate Illuminate - Wikkid Polish, Down At The Deep End - Wikkid Polish, White Stamping Polish - Rainbow Connection

Wednesday, 1 January 2020

Happy New Year 2020!

Happy New Year! I hope you all had a lovely new years eve, whether it was a big night out or a quiet night in. I had a family new years eve this year which was good fun, although I'm annoyed with myself for missing a trick and not having a 20's themed party!

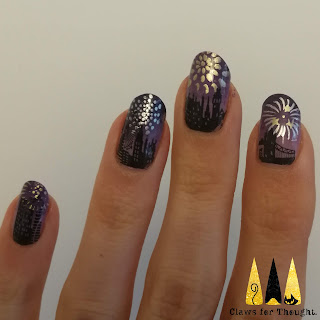
I had this idea a few weeks ago for new year and am pleased with how it turned out, definitely one of my best new year looks. I started with a gradient of two shades of purple (colours listed below pictures) and then used some metallic polishes for the fireworks using Mo You London's Festive 05 plate. I also used this plate for the Happy New Year wording on my thumb. I was going to get 2020 in there somewhere but it didn't work out that way in the end, also now thinking I should have done some 20's nail art! Ah well, plenty of time for that over the next decade! For the London skyline I used the clairestelle8 plate from Maniology, it turned out to be the perfect size.

I'll keep this blog post short and sweet but as mentioned before, really happy with these! Wishing you lots of positive things for 2020 and beyond!
Colours used: Wardour Street - Nails Inc, Wigmore Street - Nails Inc, Foil Effects in Gold - Barry M, Foil Effects in Silver - Barry M, Black Stamping Polish - Rainbow Connection