Showing posts with label Sharpie Mani. Show all posts

Sunday, 22 January 2023

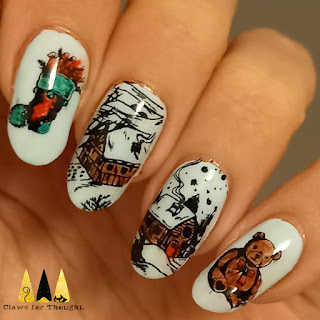
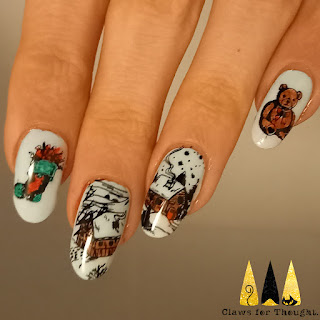
North Pole BAU

Hello space turtles! More Glam Nails Challenge nail art to share today. Todays theme is 'North Pole'. As it's quite a Christmassy theme I wanted to find a way to make it fit but not be too Christmassy since we're in January. I am really enjoying doing these wintery themes and continuing to use my Christmas stamping plates throughout the month! The idea behind this look is that it's the North Pole is having a bit of a peaceful lull after the chaos of Christmas - business as usual!

I started with a base of white and then added images from Mo You London's Noel 01 stamping plate on three fingernails and the north pole sign on my ring finger using their Festive 01 plate. The image on my thumbnail is from their Noel 19 stamping plate. Next I added a layer of quick dry top coat and once dry I used sharpies to carefully colour in the images which was quote satisfying to do! I finished the look with a matte top coat to make the colours pop.

I really like how these came out and their wintery feel. I'd like to try something similar with sparkly roofs on the houses and sparkly snow.

Colours used: A Mantis shrimps favourite colour - Bees Knees Lacquer, Black Stamping Polish - Dance Legend, Various Sharpies

Tuesday, 16 August 2022

Sparkly Safari Sunset

Hey space turtles :) I'm a bit behind with blogging at the moment so playing catch up. This one is for a Glam Nails Challenge prompt of Sunset. I had liked the idea of trying sharpies over reflective glitter for a while and thought this would be a good opportunity to try it in gradient form.

I started with a peel off base followed by two coats of reflective glitter and a quick dry top coat. I then used yellow, orange and red sharpies to draw three stripes of colour directly onto my nails. I then took a wide nail art brush and some nail polish remover which I used to blend the colours together. Next I added some tree, giraffe, bird and rhino images in black using Mo You London's Mother Nature 08 stamping plate. I finished the look with another glossy top coat.

I'm super happy with these. The reflective glitter sparkles so nicely through the gradient. I've had a few good compliments on them too :)

Colours used: Platinum Diamond - Fun Lacquer, Various Sharpies, Black Stamping Polish - Dance Legend

Tuesday, 9 August 2022

Disco Animal Print

Hey space turtles! Today's nail art is for the Glam Nails Challenge theme Animal. I had so many possible options for this but decided to do an animal print as I thought it would go well with a watercolour look and wanted to try that with my new Holo Taco topper. 

I started with a white base and then top coat, and added sharpie inc over the top, drawing directly onto my nails. I then used a wide brush and nail polish remover to blend the colours together and get the watercolour effect. I added a coat of Holo Taco's Reflective Taco and then stamped the animal print over the top from Uber Chic's Warm Blooded stamping plate.

I am pleased with how these came out however I'm not sure this is the best way to use the Reflective Taco. That or I have a dud. I really struggled to get the sparkle to show even in bright lights and not just on camera. I really like that it's a topper rather then dense glitter but perhaps for this reason it gets drowned out by the watercolour pattern underneath. I will try it over a darker colour and hopefully get better results.

Colours used: White Out - Nails Inc, Various Sharpies, Reflective Holo Taco - Holo Taco, Black Stamping Polish - Dance Legend

Tuesday, 11 January 2022

Angling for a new year!

Hi all! In my family we like to use the phrase 'angling for' as in 'she was angling for some chocolate!' so I decided to name my blog post that way as it features an angler fish, I might be reaching a bit... So when deciding what to do for this nail art I suggested underwater theme and my partner suggested an angler fish. I didn't have any stamping plates for that but liked the idea so went ahead anyway! The nail art is extra new year nail art for the latest Holo Taco competition on Instagram which closes today.

I started with a peel off base followed by two generous coats of Holo Taco's Black Holo Wish from their latest Christmas collection. Got to have glitter for new year nails! Meanwhile, I created decals on my Uber Mat for the number and fish nails. I painted each one using a small brush onto some clear polish and then added more clear polish over the top, peeling off to stick on my nails once dry. Fiddly but easier than painting directly onto my nails! While creating them I had the idea to add some lights as well as I was already going for a glowing theme. I added light images from Uber Chic's Happy Christmas plate. I then added a quick dry topcoat, and once dry I added the colours using an assortment of Sharpies.

I do quite like these, they are so weird and random and sparkly! I like to think it's an angler fish in the darkest sparkly depths of the ocean hanging up some lights for new year - perhaps it can light them with it's own light? Pictures came out a bit mixed but I enjoyed a couple of new hand poses!

Colours used: Black Holo Wish - Holo Taco, White Stamping Polish - Rainbow Connection, Sharpies

Tuesday, 14 December 2021

Winter Spices & Christmas Vices

Hey everyone! Bit of  break from the Glam Nails Challenge posts as there are some more designs I want to try out and time always flies so fast at Christmas I never have time to do all the designs I think of! So this look is using a stamping plate I bought just after Christmas last year so haven't really got to use it yet, although it is wintery not just Christmassy so could probably have been used a little earlier. The plate is Mo You London's Noel 07.

I started with a base of off-white on three of my nails, dark green on one and gold on the other. I then stamped the wintery images onto the white nails in black and added some layers of gold glitter to the gold nail. Once the stamping was dry I added a top coat to protect it and smooth it out for the next step. I wasn't sure if I'd need to water the sharpie ink down but it turned out to be fine as it was, so I used the pens to colour in the images on my nails. Could have done with two shades of orange really but orange and yellow did the job I think! Once all was dry I finished off with a glossy top coat.

Once this look was complete I went straight out to a Christmas market and didn't take pictures till later. While I was putting wrapping paper away - disaster struck! Nail disaster that is... I caught my ring finger nail on the cupboard door and it snapped. Such a shame - right before Christmas too! It could be a lot worse, but it's a shame I didn't get some nice pictures before it happened, I had to patch up the nail polish at the end which it why it looks a bit lumpy. Otherwise I was pretty pleased with this look!

Colours used: Cream Soda - Barry M, TBC - Cuccio, Gold Digger - Barry M, Gold Glitter - Barry M, Chelsea Embankment - Nails Inc, Black Stamping Polish - Dance Legend, Various Sharpies

Friday, 10 December 2021

Santa is on the loose!

It's beginning to look a lot like... CHRISTMAS! OK so maybe it's past beginning to look like it, we're in full swing Christmas! This look is one of this months Glam Nails Challenge prompts which is Santa Claus. I decided to use Mo You London's Noel 01 stamping plate to create this look depicting Santa delivering presents. I just couldn't resist those adorable little house images!

I started with a base of pale blue, then used black stamping polish to add the festive images. I added a quick dry top coat to protect the images and once dry I used sharpies to colour them in. I wasn't sure how it would look but I actually really like the pale blue effect for the snowy scenes! Unfortunately I messed up the Santa stamp a little and then smudged it which is not ideal, but I do rather like the rest! I did also have some issues with my ring light, leading to these images being a bit yellow!

Colours used: Borrowed & Blue - Essie, Black Stamping Polish - Dance Legend, Various Sharpies

Sunday, 25 April 2021

Stamping Sunday: Cats in the Garden

Hello world! I feel like I'm losing the plot today, it's only 10am and I'm so sleepy, planning to go for a run shortly too! Today's nail art is for glam nails challenge, and I'm thinking about bringing back stamping Sundays so thought I'd include it as that too. The theme for this prompt is cats. I feel like I have done quite a few cat nails already this year but I have a few cat stamping plates so I have no complaints!

I started with a base of white polish and then used black stamping polish to apply the cat images from Mo You London's Crazy Cat Lady 04 stamping plate. Once dry I applied a layer of quick dry top coat to protect the images for the next stage. I included a picture of how it looks in black and white as I do really like it and was tempted to leave it this way. Once the top coat was dry I mixed up some sharpie ink with nail polish remover to apply some colour with a small brush. I soon realised I wanted the colours to be brighter so used the sharpies directly into my nails. I initially did the ginger cat orange but it was way to bright so I added some brown which gave it a bit of a mottled effect. I finished the look with a matte top coat.

Overall I quite like these but am not so sure about the ring and little fingernail images. They are OK but I'm not sure they flow that well. I like the index and middle fingernails and think the contrast of the colours works well. Also love the thumb, I do have a habit of doing the thumb nail best, I think it's because there's more nail to work with!

Colours used: Floral Street - Nails Inc, Black Stamping Polish - Dance Legend, Assorted Sharpies

Friday, 3 July 2020

Montreal Botanical Garden Inspired Nails

Hello all! Today I am sharing you some nail art which is actually not for an Instagram challenge, so a change from the last month. I must admit I think I might take part in another this month though as I have rather enjoyed it! So I did this nail art at the weekend and it's something I've had on my nail art to do list for ages! In September last year my boyfriend and I went on holiday to Canada and the US (visiting a few different places in each) and our trip to the botanical gardens in Montreal inspired some nail art. We spent all afternoon, lunch time and evening at the gardens and could have been there longer! In the evening they lit everything up and that in particular is what this nail art is based on. I could really capture all the lovely lit up things on the water but I did include the lanterns (there were loads in the woods it was lovely!).

To create this look I started with a plain black base, and then stamped some images from the Suki 09 plate from Mo You London onto my nails in white. Once dry I used sharpies to colour in the images, directly onto my nails to give a strong colour. I gave that a little time to dry as well and then added a shimmery top coat. So it was actually a pretty simple look to create. I like it, particularly the lanterns, but I wish I hadn't done the flowers in pink. I think they'd have been better in yellow or something, as the pink clashes with the red lanterns and the lanterns had to be red!

I highly recommend a trip to Montreal Botanical Gardens if you get the chance, there is so so much to see, you could easily spend the day there! We couldn't believe how big the greenhouse was too! I've included a couple of bonus pictures at the bottom of this post of the thumb nail in front of my desk, as it did look good without the glitter too!
Colours used: Lady In Black - OPI, White Stamping Polish - Rainbow Connection, Sharpies In Various Colours, Crsytal Shimmer - Accessorize 

Thursday, 14 November 2019

Foxy Autumn Nails

Hey everyone, I'm back again already with some more autumn nail art! I enjoyed doing these on Sunday afternoon at my grandparents house, I've been wanting to try these fox images from the Uber Chic Woodland Chic stamping plate for quite some time. I used a cream base for most nails, and on the accent nail, black with a gold flakie topper. It's an old Nails Inc one I picked up in TK Maxx a few years ago.

I stamped the images onto the cream nail polish and then added a layer of quick dry top coat to protect them from the nail polish remover in the next step. Once dry I mixed some sharpie ink and nail polish remover on a piece of tin foil, and used a small nail art brush to colour in the images. I had to mix it up quite a few times as it dries pretty fast!

There wasn't much more to this one really! It took a while as there were a few layers of polish to dry but it was a pretty simple process. I used sharpie ink as I don't really have any fox coloured nail polish! They did come out a bit more of a bright orange than I was going for but I suppose they are cartoon foxes so it kind of works!
Colours used: Cream Soda - Barry M, Lady In Black - OPI, Black Stamping Polish - Rainbow Connection, Orange Sharpie, The Donmar - Nails Inc

Sunday, 14 October 2018

Stamping Sunday: Autumn Drinks

Hey everyone! The sharpies are back! They often come back into my nail art around autumn as among my hundreds of bottles of nail polish I don't have many autumnal shades. Had some small mishaps with this but it came out OK in the end!

I started with a base of off-white, and then stamped on some leaf images from the Uberchic Lovely Leaves 01 plate and the hot drinks cup image on their Bottoms Up plate. I had a bit of trouble with blurring on some of the drinks images, as you can see in the pictures. I think it was caused by a few things but fortunately it's not kept happening so hopefully it was a one off!

Once the images were dry I put a quick dry top coat on to protect them from the nail polish remover mixed with Sharpie ink. The Sharpie's I have are from a mixed pack which I think had an 80's theme. I picked some greens, browns, oranges and reds. I mixed the ink from the sharpies with nail polish remover on some foil using a small brush, and then painted onto the images. It's quite a time consuming process as the ink dries fast.

Once it was all dry I finished off with another layer of quick dry to coat. I like the autumn feel of these nails, but they did turn out a little messy and are possibly just not very me. I felt like they were missing something - probably glitter! I have just re-done them with something more shiny and fun so looking forward to sharing those with you. TTFN!
Colours used: Cream Soda - Barry M, Cocoa - Barry M, Assorted Sharpies

Thursday, 28 June 2018

Sharpie Flutterby Nails!

Hello everyone - hope you're enjoying some sunshine! I still so behind with nail things, this one feels like it was ages ago! Still working through my untried polishes and this is my first use of Kitty, a sparkly blue polish from Picture Polish. I saw a design on Instagram with some butterflies alongside blue nails and thought I'd give it a go myself.

On my middle fingers I used butterfly wing images from Mo You London's Kitty 12 plate which I covered over with a clear top coat and then coloured in with sharpies. Initially I tried the usual approach of mixing with some nail polish remover on foil, and then painting it on with a brush, but I found that some of the colours I chose were a bit pale for that. Turns out colouring directly onto the nails with sharpie works well too! There were some lines visible but taking a tiny bit of polish remover on a brush I could gently smooth those out.

Once all dry I covered the butterfly designs again with a clear top coat to seal the image in and stop the sharpie parts rubbing away. Overall I like this design, especially the colours, though I possible wish the images were a little bigger/longer.
Colours used: Kitty - Picture Polish, Floral Street - Nails Inc, Midnight Mischief - Painted Polish, Assorted Sharpies