Showing posts with label Gems. Show all posts

Wednesday, 15 March 2023

Gems with Cirque Colors Facets Collection

Hey space turtles! Super excited to be using Cirque Colors' Facets Collection again as it remains my favourite collection of all time. I'd forgotten just how many polishes there are and chose a select few for this look. Initially I was planning just a sheer pink background but then remembered the collection has a sparkly pale pink so I added one layer of that before adding my decals.

I started with four layers of 'Mani Mask' sheer polish and then added one coat of pale sparkly pink. While this was drying I created decals on my Uber Mat (see how here) for the gems using Mo You London's Crystal 06 stamping plate. Using Cirque Colors' Facets collection for a gems look has been something I've meant to do for ages so was great to finally do it! I finished the look with a glossy top coat and then unfortunately wiped a bit of the design away at the bottom left of my thumb by mistake - a shame as that was my favourite one! I'm enjoying the way these sparkle in the sunlight - very authentic!

Colours used: Bashful - Barry M, Rose Quartz - Cirque Colors, Black Stamping Polish - Dance Legend, Emerald - Cirque Colors, Tourmaline - Cirque Colors, Zircon - Cirque Colors, Ruby - Cirque Colors, Citrine - Cirque Colors

Saturday, 2 January 2021

Snowy Snow-globe Nails

Hello again! I have some more wintery nail art to share today. This one is actually from between Christmas and New Year, but I got a bit behind and wanted to post my New Year nail art on the last couple of days, so just getting round to it now! I was inspired by a nail tech/artist on Instagram with the account name The Beauty Room by Sarah. She did some absolutely stunning snow globe nail art which I knew I couldn't recreate but thought I'd try and create the same theme with the tools I have available! I'd totally recommend checking hers out they are beautifully done! Mine bear no resemblance at all to be honest, but the theme is the same!

I started with a base of metallic blue (colours listed below the pictures) and then added snowflakes from Mo You London's Festive 02 plate with white stamping polish. For my ring fingernail I created a snow-globe decal using an image from the Uber Chic Happy Christmas (Christmas 04) plate. After applying all the nail art and a matte top coat to my nails I stuck on some gems while the top coat was still wet. I then added another layer of matte top coat to seal them in, and a little blob of glossy top coat on top of each gem to bring the shine back! I also added a couple of layers of glossy top coat over the snow globe to make it look more glass like. It didn't have as strong of an effect as I would have liked, but was a nice touch all the same.

Overall I have mixed feelings. I know they were never going to be like Sarah's ones, but I thought I'd like them a bit more than I did. I think I'd have really liked them if I'd managed to get them a bit neater, not smudged the snowflakes on the thumb with the top coat (my matte top coat is awful for that!) and if the polish had come out a bit better. I'm blaming my matte top coat, definitely need a new one, it's just not quite matte enough and very smudgy!

Colours used: Aruba Blue - Essie, White Stamping Polish - Rainbow Connection, Gold Digger - Barry M, Say Love - ILNP, Cream Soda - Barry M

Monday, 25 December 2017

Christmas Day Nails 2017 (ft Dinosaurs!)

It's Chriiistmaaasss! Hope everyone is having a lovely day :) Today has gone really fast for me but that's to be expected. I regret forgetting to bring my colouring book to my parents house as that would have been the perfect chilled end to the day. Christmas is one of those rare occasions when there's time to do it. So on to the nails, unfortunately I was in a rush to leave and didn't have time to get pictures of these in my lightbox, or with the fancy camera, so I took them with my new phone leaning over the bath! Therefore not so happy with the picture quality, but I do rather like the nails.

I like to have classicly Christmassy colours for my Christmas day mani, usually including red, and think these fitted that. The gem wreaths are a little wobbly, but kind of work! On my little finger I used my Mo You London Festive 45 stamping plate for the Merry Christmas wording. I used the same plate for the stocking on my index finger, for which I made decals on my Uber Mat, you can see how here.

On my ring finger I used Fired Up, one of the new colours from ILNP, I really like it so look forward to using it again and getting some proper pictures! I used a holly image from the Festive 06 plate, and placed gems over the berries. I really like how those ones turned out, a little more sophisticated than the rest of my nails! Last but not least the dino's! I layered up green metallic polish behind the glitter to make them stand out a bit more, and added my own little Christmas hats to the decals using a black nail art pen. I'm glad I managed to feature dinosaurs in my Christmas nails!

I have a little bit of a back log of Christmas nails, but wanted to share the Christmas nails on Christmas Day, so hopefully there will be more tomorrow. Merry Christmas!
Colours used: Madder - Cirque Colors, Fired Up - ILNP, Primadonna - Danglefoot Polish, Midnight Mishcheif - Painted Polish, Secret - Fun Lacquer, Emerald Green - Barry M, Alpine Snow - OPI, Bright Lights - Barry M, Rain On Me - Barry M, Nail Art Pen in Black - Barry M

Monday, 24 July 2017

Lilac Disco Lobster

Hi everyone, I hope it's nice and sunny where you are. It's been a bit grey here and it's making me sleepy! It could also be the intense dreams I've been having... so to brighten things up here are some disco lobsters! I based this nail art on the quirky lobster jewellery from Tatty Devine in Covent Garden. I have one of their red ones which I adore, but they have also come in a few other colours as limited additions. The purple disco lobster surfaced on Instagram some time ago and I've been meaning to create it on my nails ever since.

The lobsters were painted using a small nail art brush, I did them in separate segments to mimic the necklace I have but this also made them easier to paint. It was a good excuse to practise my freehand as that's what I'm least good at in nail art. I used a dotting tool for the eyes. For the gems I put a bit of top coat where I wanted to place them, and once they were all placed and dried I added a top coat again. I find this generally keeps them on for a few days before they start to disappear, I do get tempted pick at them. It's not worth gluing them on in my opinion as it makes it very tricky to get them off!

Here they are below in varying lengths. It didn't make much sense unless I was holding my hands that way, but I enjoyed the novelty, and being able to hold them different ways for different lengths of lobster!
Colours used: Wardour Street - Nails Inc, Alpine Snow - OPI, Lady In Black - OPI

Monday, 6 February 2017

Adventures In Gel Polish

The Christmas just gone I asked for a gel lamp, as I was keen to see what it was like after discovering the joy of peel off base coats! I'm by no means converting entirely to gel, but I know it offers some advantages, like super shiny nails! I was also curious to see how it all works, and to try chrome nails with gel as it makes a smooth base.

Tonight I'm showing you my first attempt! To the left are the things I used on my much loved 'nail station'. OK perhaps I didn't 'use' the pineapple lamp for this, but it had to
be included!

So I started off with a peel off base coat so that I
could easily remove the gel. The peel off base
works well with thick polishes like gels or
glitters.

I used the Dance Legend peel off base
coat in nude.

The other items I used (shown above) were a gel lamp, gel polish and top coat, small 'gems' and a soft pencil for picking up the gems (from eBay).

I purchased a few cheap gels just to try them out, the colours I bought are from FairyGlo and the top coat is BlueSky.


One of the things I like about the gel/polish/peel off base combo is that if I'm peeling it off anyway I may as well stick things on it! So I decided to try adding gems on top of the gel. Below are some pictures of the result. I was so impressed with how shiny it was! I have some very shiny nail polishes but this really was incredibly shiny! I could see my reflection! You can see some trees outside the window on my thumb nails in the pictures below!

These didn't last long as I couldn't resist peeling them off (very unlike me!). I've included some pointers below the pictures about what I learnt.

  • Use thin layers of gel - you want enough  polish to evenly cover the nail, but not too much as this can cause it to pool at the edges, and once it's cured it can't be undone! Because the polish doesn't dry until it's cured in the lamp you can always add a little more if there isn't enough on the brush.
  • Stick on gems using tiny specs of polish - I placed the gems over a layer of gel polish, which because the layer hadn't tried ended up pushing it into the edges. Using small blobs would mean there isn't enough for it to pool into the edges of your nail.
  • Cure your thumb nails separately - This probably depends how much polish you've used, but I found if I put my whole hand in the gel lamp the gel on my thumb nail shifted to the side a bit as my thumb was on it's side.

Thursday, 24 December 2015

Throwback Thursday: Christmas Pud's

I've technically just missed the opportunity to do this throwback Thursday... but I don't think it counts as being the next day till I've been to sleep and woken up! I hope everyone's had a fab Christmas eve. This was my first one off in a while and I've filled the day with nice things. Feeling very happy and snug, and very ready for Christmas!

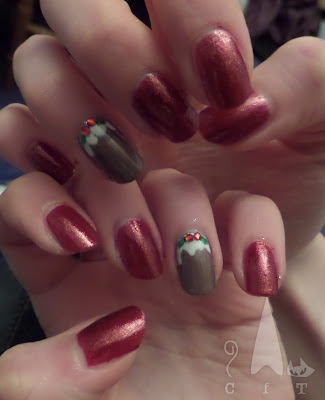
So below is a picture of last years Christmas day design. I was and still am pleased with this one. The red is a lovely Butter London which my boyfriend managed to get me at his old job. It is a Christmassy read with fine gold glitter, but sadly this doesn't really show up in the picture. For the puddings I used two different polishes as at the time I didn't have the right colour. I outlines the cream on top with a nail art pen and then filled in with a small brush. The gems were from Ebay and stuck on with clear polish, and the leaves freehand.

I've got my Christmas day nails done for this year now, will post them tomorrow or boxing day. I hope you all have a magical Christmas! xx


Colours Used: Bric-A-Brack - Butter London, Cappucino - Barry M, Shimmery brown polish - Unknown, Coconut - Barry M, Nail Art Pen in White - Barry M Emerald Green - Barry M