Sunday, 24 September 2017

Stamping Sunday: Flowers and glittery space

Hi everyone! Happy Sunday! I'm coming to the end of a week off so feeling pretty chilled, but unfortunately I think I'm getting a poorly timed cold... Today I have my holiday nails from Cornwall to show you. They weren't meant to be my holiday nails, but due to lack of time I have now had this on for just over 2 weeks, and still do! Not like me at all, but it will be the same story for the next month or so, so I'm just hoping I will have enough to stop my blog looking to sparse! 

For this nail art I took inspiration from Instagram. Unfortunately I can no longer find who it was, despite trawling through loads of my liked photos! So if anyone knows please comment so I can credit them. They had done some silver glitter over bare nails and then added pale purple flowers. I decided to to the same with some advanced stamping using my Uber Mat, and Mo You London Flower Power 03 Plate. You can see how to advanced stamp here.

For the glitter I used two different silvers, to end up with a little bit thicker coverage than the Instagram design, as I just couldn't resist the glitter! I started with an old Barry M limited edition of holo glitter particles in a clear base, and some mixed size glitter in a clear base, polishes are listed below the pictures. In conclusion I like this nail art - which is good considering how long I've been wearing it!
Colours used: Boots Limited Addition 343 - Barry M, Diamond Glitter - Barry M, Midnight Mischief - Painted Polish, Key Lime - Barry M, Wardour Street - Nails Inc

Tuesday, 12 September 2017

Tropical Tuesday: Fresh Fruit

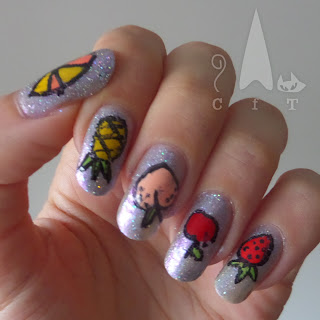
So some time ago when I'd just started this blog, and had a big backlog of pictures to use, I did a weekly 'Tropical Tuesday' with various brightly coloured tropical themed nail art ideas. I've not been so good this year, I've had way less tropical themed manicures, but at least I can squeeze one in before the weather gets cold!

My inspiration for this nail art came from Wah Nails on Instagram. They did a lovely design with peaches over pale purpley glitter. I considered doing peaches on all my nails, but decided to go for more variety, sort of fruit machine style.

To make these I drew the fruit onto my Uber Mat, coloured them in with nail polish and a dotting tool, added clear polish, and then peeled them off to stick onto my  nails. I had real diffuclty as I used a nail art pen to draw them on, which had gone a bit funny. It was taking so long to do them that the outlines started to dry and crack a little, you can see that on some of the picture below.

So overall I think these are OK but not majorly successful. The peaches came out best so I think I should have stuck to them!
Colours used: Nimbus - Illyrian Polish, Nail Art Pen in Black - Barry M, Passion Fruit - Barry M, Dead Heat - Barry M, Peach Melba - Barry M, Seven Dials - Nails Inc, Marylebone Road - Nails Inc, Papaya - Barry M

Sunday, 10 September 2017

Stamping Sunday: Lines and Shadows

Happy Sunday everyone! I am definitely not ready for the weekend to be over! I'm about to drift off to sleep, but think I can muster up the energy to talk about nail varnish for a bit! I'm struggling to keep up as many blog posts as I'd like to at the moment, just don't know where the time is going!

So for this nail art I started out with a couple of coats of Poison Rose from Tonic Polish. It was my first time using that particular shade and I wasn't that enthused at first. It just looked a bit less existing than I expected, the glitter isn't very prominent (it wouldn't really show up in the pictures!). So I decided to use it as a base for trying some layered stamping.

I used my Holy Shapes 03 stamping plate from Mo You London to stamp some shapes onto my nails in gold. I then used black stamping polish to stamp the same images again, but slightly higher so they overlapped but didn't cover the gold. Using a clear stamper was essential for this so I could see exactly where I was placing the images. I really like the way it came out. I think it looks sophisticated and perfect for work. It completely changed my opinion of the nail polish as well!
Colours used: Poison Rose - Tonic Polish, Uptown Glamour - Nails Inc, Midnight Mischief

Saturday, 2 September 2017

Sparkling Lemons

Hi everyone, happy Saturday! I'm so very glad it's the weekend and wishing we had another bank holiday! So the sun is shining here in the UK so it's a good day for fruity lemon nails. I particularly like lemons for summer nail art, and blue is my favourite colour to pair them with, I like the contrast.

For these nails I started with a base colour of off white (colours listed below the pictures) , and then painted a couple of layers of sheer-ish blue over three nails on each hand. The white makes the colour stronger, and with it being slightly sheer adds some depth. For the lemons I created decals on my Uber Mat. I used a nail art pen to draw the lemons and leaves, and then coloured them in using a dotting tool. For the leaves I used a sheer green over silver. The yellow is from Cupcake Polish's sweets collection, and is absolutely wonderful! It's super sparkly, I've got a red from the collection to try still and am struggling to resist buying more of them!

I like this nail art, particularly the blue and yellow polishes, but I don't think the lemons were as good as they could have been. Oddly I've done better lemons as freehand, which is unusual for me! You can see them here. If you've not quite had your fix of lemons and nails today, you can also see some more lemon nails here!
Colours used: Cream Soda - Barry M, Mirajane - Zoya, Princess Lolly - Cupcake Polish, Nail Art Pen in Black - Barry M, Turquoise Aesthetic - OPI