Showing posts with label Accent Nail. Show all posts

Friday, 13 August 2021

Perfect Porcelain Plates Please

Hey nail people! I have some nail art from last month to shre with you today which I didn't get round to sharing previously. I have the Mo You London Porcelain 02 plate with these lovely china plate patterns on which I usually use layering up a sheer white polish with a cracked image in grey to add the illusion of a bit of texture before I add the blue patterns. Recently I saw some nail art where the patterns were applied straight on top of a white base and I liked the way it looked so thought I'd try that for a change.

The description of how I did it will be pretty short this time! I started with a base of white on all but my ring fingernail and silver for the accent nail. I then added a couple of layers of silver glitter on the accent nail. On my other nails I used blue nail polish and images from the Porcelain 02 plate to stamp the pattern onto my nails, finishing with a quick dry top coat.

Overall I really like these, I feel like this stamping plate is fail safe, I always love it! I enjoy the way I've done it previously as well but liked trying it a bit differently. It's also a pretty easy look that I could recreate for something like a wedding if I did't have time to do more complex nail art.

Colours used: Floral Street - Nails Inc, Indigo - Barry M, Silver Lining - Barry M, Diamond Glitter - Barry M

Tuesday, 18 February 2020

Atmospheric Night Nails

Hey everyone, hope your week has started well! Today I'm sharing some nail art which I really rather liked! I actually had it on before the love bugs of my last post (which I'm still wearing), but wanted to share the bugs on the appropriate day! For this look I used the Noel 06 stamping plate from Mo You London. It was part of their Christmas collection this year but it's really wintery rather than Christmassy and it has so many lovely images for wintery outdoor scenes.

I started with a base of blue on some nails and pale purple on others, topping off my ring finger nails with some super sparkly silver bar glitter (colours listed below the pictures). I then used black, gold and silver stamping polish and images from the Noel 06 plate, and some shades of blue for the layered mountain images. I used the same shades for a gradient on my index fingernails too. I really like these but I wasn't too sure about the purple nail with the blue mountain, so added a wolf the next day. I also mattified them. I kind of regretted it at the time but I do quite like the pictures!
Below is the nail art with a matte top coat and additional wolf. Which ones do you like best - matte or shiny? I really like the way the layered mountains one came out!
Colours used: Laguna-  Barry M, Wardour Street - Nails Inc, Cobalt Blue - Barry M, Indigo - Barry M, Foil Effect in Gold - Barry M, Foil Effect in Silver - Barry M, Black Stamping Polish - Rainbow Connection, White Stamping Polish - Rainbow Connection, Summer Sparkler - Painted Polish by Lexi

Sunday, 26 January 2020

Steampunk Nails with a hint of danger!

Hi everyone, hope you are having or have had a lovely weekend! I had a yummy takeaway pizza for tea so am feeling pretty good about that... but have kept feeling a bit under the weather lately and can't seem to shake it. Must be a January thing. So the inspiration for this look was a lovely lady who comments on my blog posts (thank you! :) ) who said she'd love to see some steampunk nail art from me after I mentioned it in a previous blog post. So, here it is. I had good fun with this one!

So on three of my nails on each hand I painted my nails black, and then used the Steampunk 02 plate from Mo You London to apply the steampunk images in gold. On my thumb and ring finger nails I used Candlelight from ILNP, which I was drawn to after seeing one of their Instagram posts and I really like it! Good subtle shimmer and perfectly wintery.

So the next bit of this nail art is where it get's interesting... In my nail art box I have some little steampunk nail accessories which have been lurking around for some time after I bought them from She Sells Seashells. Unfortunately they are no longer trading but I do still have quite a lot of stuff from them. So on my ring finger and thumb nails I stuck the little trinkets down with clear polish, and it soon became clear they were pretty 3D and would need something stronger! So I did two separate layers of gel top coat to hold it all in place, and one layer on my other nails too so they had the same consistency.

So the overall verdict is I loved the way these looked! It's a good wintery colour scheme and something a bit fun and different. However I only kept them on for about 24 hours as despite all the gel there were a lot of rough or sharp edges, which besides catching on everything actually cut my finger at one point! (ridiculous I know! :D). I'm so glad I did these though, and sometimes it is fun to have short lived nail art as it gives me an excuse to do more!
Colours used: Lady In Black - OPI, Candlelight - ILNP, Foil Effect In Gold - Barry M, Steampunk Nail Accessories - She Sells Seashells

Sunday, 19 January 2020

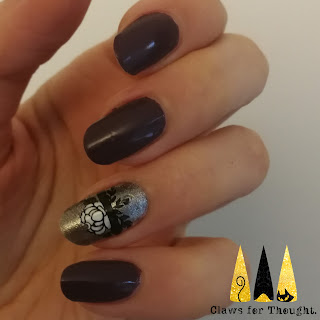
Subtle Floral Nail Art With Maud In Mind

Hey everyone - long time no speak! I haven't found the time to do a lot of nail art recently but I have this one and one more lined up to share with you. Today's nail art is a good work friendly look, or one for adding something extra to a dark wintery colour. I actually wore this to the funeral of my Great Aunt Maud as she liked the colour purple, though it did come out a bit darker than I anticipated. I think she preferred lighter shades. Auntie Maud was the most positive person I have ever known, always smiling and always grateful for what she had. I hope I can inherit those traits from her and will sorely miss going to visit her and having a good giggle!

I could go on but as this is my nail blog I'm going to say a little about how I achieved this look. I used the purple polish on most nails and silver for an accent nail on each hand (colours listed below images). For the design on the accent nail I used the Flower Power 23 stamping plate from Mo You London, and the advanced stamping technique using my Uber Mat. You can see how here. I chose black and white to keep it simple and am glad I did as I think it works well with the silver.
Colours used: Vintage Violet - Barry M,  Silver Lining - Barry M, Black Stamping Polish - Rainbow Connection, Floral Street - Nails Inc

Sunday, 10 February 2019

Winter Brights with Cirque Facets Polishes

Hey everyone! Something bright today for the winter months, well, apart from the black, but it was January when I did these so it seemed appropriate! Besides, I like the contrast. I haven't worn black nail polish for a while and  I enjoyed the shininess!  I originally intended for these to feature all the new Facets shades, but once I got started I wasn't sure how well that would work, Also meant to do the thumb nails in the pattern as well but had time pressure and it's quite a fiddly one to colour in!

For the pattern I used Mo You London's Crystal 01 plate (can't wait to try out the actual crystal images!), and decided to add a bit more of the orangey-pink polish on my middle finger. Not 100% sure if that was the right decision or should have left it black. Padparadscha was the first polish I thought I'd use from the newer Cirque Color's Facets shades but it's turned out to be the last! I'm not 100% on it to be honest, it is more orange than I expected.

For the image I used the advanced stamping technique (see how here). It was a bit of a fiddly one to colour in but worth it I think! I'll definitely use this image again.
Colours used: Lady In Black - OPI, Padparadscha - Cirque Colors, Emerald - Cirque Colors, Sapphire - Cirque Colors, Midnight Mischief - Painted Polish