Saturday, 8 February 2020

An Alpine View On My Nails

Hello everyone and happy Saturday! I hope you're enjoying your weekend. Something fairly simple to share with you today, and something that is for once still on my nails! Not too long ago I saw themermaidpolish on Instagram use this alpine image in dark blue over light blue and it looked sooo good! I had always thought of using it filled in with colour, and hadn't tried it out yet, but after seeing that I thought I'd give it a go with just the outline as well. The image is from the Bundle Monster clairestelle8 plate which I love.

I started with a base of Chateau by ILNP which was an untried polish for me, and I think the french name kind of fits with the alpine scenes too. It was a little darker than I expected but pretty. I then used white stamping polish to apply the image across my four finger nails on each hand, the image is well sized to fit four nails I think. For my thumbnail I used the snowflake image from Mo You London's Noel 06 plate which I've used a few times, it's a good one for combining with things.

I was pleased with the way it turned out though I don't think it's as expertly done as the ones by themermaidpolish. You do have to have a proper look to see that it's an alpine scene (and I have to keep my hands still!) but it's not necessarily a bad thing. It seems very fitting for all the ski holidays I'm seeing on Instagram at the moment! I love the look of the snow and the mountains and snuggness but I don't fancy taking to the slopes myself!
Colours used: Chateau - ILNP, White Stamping Polish - Rainbow Connection

Wednesday, 5 February 2020

Winter Stars

Heyyyy everyone! More star themed nail art to share with you this evening. One of my Christmas stamping plates (Noel 03 from Mo You London) had this cute candle in a jar image I was keen to try, and I think it works in non-Christmassy looks. One of my colleagues did say they look Christmassy though so maybe not! I tried a couple of recent-ish untried ILNP shades with this look and enjoyed trying them out, I think they are good wintery colours (colour names listed below the pictures).

I started with a cream coloured base on my middle fingernails, and the new ILNP's on my other nails, I alternated the colours on each hand as I quite like each hand being a little different. For the images I used the advanced stamping technique (as per), with images from Mo You London's Sci-Fi 10 and Noel 03 plates. I coloured the images in with the same two ILNP shades to keep it consistent, and of course shimmery! I finished the look with a glossy top coat (bit a a challenge as I'm nearing the end of the bottle!).

I like how this look turned out. They're not my usual sort of colours so it was fun wearing something a bit different, and it's quite seasonal too.
Colours used: Legacy - ILNP, Candlelight - ILNP, Cream Soda - Barry M, Black Stamping Polish - Rainbow Connection

Saturday, 1 February 2020

Stars and Stars!

Hello everyone, hope you are having a good weekend :) Today I am sharing with you my first try of Nails Inc's Seeing Stars duo. I have had this one sitting around for a little while and finally wore it for an evening out at a law society dinner with my friend who works in law. I wanted something a special but fairly simple that would work with my dress (it was fitted, long and dark green with a bit of sparkle and sleeveless on one side).

The first polish in this duo is Get Discovered, a sheer pale pink which works well for the negative space trend that's big at the moment. I do like to have a bit of colour like this when doing a negative space type look as my nails are a bit yellow as they never get a break from all the nail polish! I used three layers of this to give it a bit more opacity but still keep it clear enough that you can see my nails underneath. I filed them down beforehand as I'm not sure that sort of look suits me much with more white space.

The second polish is Lost In Luna, which is a clear polish filled with little shiny gold stars. The stars are so cute but as expected they can catch a little on clothes, especially if you have quite curved nails like me, I struggled to get them to lie flat. In my case my previous nail art was sharp and a tad dangerous so this wasn't bad in comparison! It can be a little fiddly getting the stars out of the bottle, and then where you want them on your nails, but I really like the final look, and would definitely enjoy recreating this look in the future.
Colours used:

Sunday, 26 January 2020

Steampunk Nails with a hint of danger!

Hi everyone, hope you are having or have had a lovely weekend! I had a yummy takeaway pizza for tea so am feeling pretty good about that... but have kept feeling a bit under the weather lately and can't seem to shake it. Must be a January thing. So the inspiration for this look was a lovely lady who comments on my blog posts (thank you! :) ) who said she'd love to see some steampunk nail art from me after I mentioned it in a previous blog post. So, here it is. I had good fun with this one!

So on three of my nails on each hand I painted my nails black, and then used the Steampunk 02 plate from Mo You London to apply the steampunk images in gold. On my thumb and ring finger nails I used Candlelight from ILNP, which I was drawn to after seeing one of their Instagram posts and I really like it! Good subtle shimmer and perfectly wintery.

So the next bit of this nail art is where it get's interesting... In my nail art box I have some little steampunk nail accessories which have been lurking around for some time after I bought them from She Sells Seashells. Unfortunately they are no longer trading but I do still have quite a lot of stuff from them. So on my ring finger and thumb nails I stuck the little trinkets down with clear polish, and it soon became clear they were pretty 3D and would need something stronger! So I did two separate layers of gel top coat to hold it all in place, and one layer on my other nails too so they had the same consistency.

So the overall verdict is I loved the way these looked! It's a good wintery colour scheme and something a bit fun and different. However I only kept them on for about 24 hours as despite all the gel there were a lot of rough or sharp edges, which besides catching on everything actually cut my finger at one point! (ridiculous I know! :D). I'm so glad I did these though, and sometimes it is fun to have short lived nail art as it gives me an excuse to do more!
Colours used: Lady In Black - OPI, Candlelight - ILNP, Foil Effect In Gold - Barry M, Steampunk Nail Accessories - She Sells Seashells

Wednesday, 22 January 2020

Fancy Little Fox Nails

Hi all! Got some kind of autumnal nail art to share with you today. I've used three nail polishes I got for Christmas and really like the way it came out. Definitely making use of these again in the autumn but hopefully before then too! The only polishes I already had in this look are the cream and white polishes, and the black stamping polish. Colours are listed below the pictures, and there are a couple of bonus pictures this time, including one of a leaf decal I made as I love the way it looked shimmering away on my Uber Mat!

So I started with a base of cream on my middle two fingernails on each hand on my thumb nails. On my index and little finger nails I used my new flakie polishes which I alternated on each hand, as I did with the leaf and fox images. For the leaf and fox designs I used my Uber Mat to create decals as I always do! You can see how here. For the leaves I used the UberChic Lovely Leaves 01 plate, and for the foxes I used the Woodland Chic plate. They're so cute and I'm so glad I finally have a fox appropriate shade to colour them in with!

So as I mentioned before I really like these! It was the first time I'd tried Polished For Days (Christmas presents from my parents) and I'm really happy with the formula and overall look. I particularly like Birch, the silvery one, and love the way they both look on the leaves. The fox shade is from Essie and was a Christmas present from my boyfriend as he knew I'd been looking for something like that, previous designs where I've used the fox images have come out way too orange! One final thing to say in this blog post is sorry about my thumb cuticles, they are pretty dry at the moment and I had a paper cut under one of them so they look a bit gross in the close up pictures!
Colours used: Birch - Polished For Days, Meadow - Polished For Days, Cream Soda - Barry M, Black Stamping Polish - Rainbow Connection, Playing Koi - Essie, Floral Street - Nails Inc

Sunday, 19 January 2020

Subtle Floral Nail Art With Maud In Mind

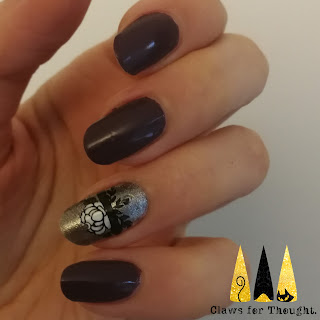
Hey everyone - long time no speak! I haven't found the time to do a lot of nail art recently but I have this one and one more lined up to share with you. Today's nail art is a good work friendly look, or one for adding something extra to a dark wintery colour. I actually wore this to the funeral of my Great Aunt Maud as she liked the colour purple, though it did come out a bit darker than I anticipated. I think she preferred lighter shades. Auntie Maud was the most positive person I have ever known, always smiling and always grateful for what she had. I hope I can inherit those traits from her and will sorely miss going to visit her and having a good giggle!

I could go on but as this is my nail blog I'm going to say a little about how I achieved this look. I used the purple polish on most nails and silver for an accent nail on each hand (colours listed below images). For the design on the accent nail I used the Flower Power 23 stamping plate from Mo You London, and the advanced stamping technique using my Uber Mat. You can see how here. I chose black and white to keep it simple and am glad I did as I think it works well with the silver.
Colours used: Vintage Violet - Barry M,  Silver Lining - Barry M, Black Stamping Polish - Rainbow Connection, Floral Street - Nails Inc

Wednesday, 1 January 2020

Happy New Year 2020!

Happy New Year! I hope you all had a lovely new years eve, whether it was a big night out or a quiet night in. I had a family new years eve this year which was good fun, although I'm annoyed with myself for missing a trick and not having a 20's themed party!

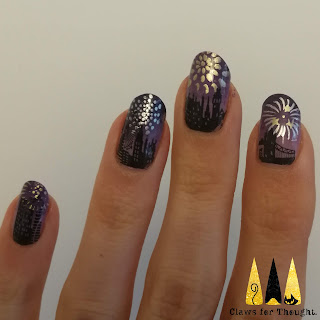
I had this idea a few weeks ago for new year and am pleased with how it turned out, definitely one of my best new year looks. I started with a gradient of two shades of purple (colours listed below pictures) and then used some metallic polishes for the fireworks using Mo You London's Festive 05 plate. I also used this plate for the Happy New Year wording on my thumb. I was going to get 2020 in there somewhere but it didn't work out that way in the end, also now thinking I should have done some 20's nail art! Ah well, plenty of time for that over the next decade! For the London skyline I used the clairestelle8 plate from Maniology, it turned out to be the perfect size.

I'll keep this blog post short and sweet but as mentioned before, really happy with these! Wishing you lots of positive things for 2020 and beyond!
Colours used: Wardour Street - Nails Inc, Wigmore Street - Nails Inc, Foil Effects in Gold - Barry M, Foil Effects in Silver - Barry M, Black Stamping Polish - Rainbow Connection