Thursday, 31 December 2020

Happy New Yeap!

The title of this blog post is not a typo... I just couldn't quite fit the happy new year wording on my thumb nail and this is what I ended up with -see below! This is another day late prompt for the Glam Nails Challenge December, I shouldn't really be late at the moment as I have time off, but between the walking and cooking (I've been trying some new dishes that take ages!) and general other things around the house I've been doing I somehow seem to have got a bit behind!

For this look I started with a base of Play Rose from Holo Taco as I think it's the perfect new year shade and so delightfully glittery! I used three layers over a peel off base. I then used images from Mo You London's Festive 05 stamping plate which has a new year theme. It's my only new year plate and is  a great go to for my new year nail art! I picked a few images and stamped them all in black. It's a good job I forgot to file my thumb nail as I struggled to fit the image on as it was! My favourites are the clock and champagne nails.

I'm pleased with these, how could I not be when they are so sparkly!! Couldn't be more new year-sy in my opinion! I have another new year look on my other hand which I hope to share tomorrow. Happy new year!

Colours used: Play Rose - Holo Taco, Black Stamping Polish - Dance Legend

Monday, 28 December 2020

Cat and Mouse Christmas

Hey everyone! Back again and a bit behind with the glam nails challenge as these should have been posted yesterday. The prompt was Christmas presents, and I knew I wanted to use this cat image from my new Mo You London stamping plate, Noel 09. I used a similar theme for the wording, and also the gift tag image which I rather like. I also couldn't resist using this cute little mouse image, even though it isn't directly present related. I like the idea that it's looking curiously over at the cat, waiting for its present!

I started with a base of red and white (colours listed below the pictures) and got them a little mixed up as I think I should have done one less red nail, I was just enjoying using this gorgeous shade again! I then stamped the wording on my little finger, and created decals for all my other nails, you can see how here. All the images I used are from the Noel 09 plate. I do wish I'd managed to find space for the adorable little rabbit featured on the plate as well!

On the whole I'm happy with them though I did mess up a little in a couple of places and could have probably done the cat on a white background which would have let it stand out better. 

Colours used: Say Love - ILNP, Christmas Cookie - ILNP, Black Stamping Polish - Dance Legend, Foil Effects in Gold - Barry M, Evergreen - Picture Polish, Playing Koi - Essie, Grey - Barry M, Cream Soda - Barry M

Sunday, 27 December 2020

All The Jingle Ladies - Merry Christmas!

Hello all and Merry Christmas! I'm sharing my Christmas day nail art with you today which I meant to share earlier but I have been enjoying some lazy time the last few days! I ended up with different nail art on each hand for Christmas day, this was the new one I did on Christmas Eve, and on the other hand I wore my 'Tree-Rex' nail art which I really like! Although Christmas had to be altered this year I was lucky enough to still be able to see my parents and one of my sisters, and we had a lovely day.

For the nail art I started with a base of red on most nails and gold on one. I then sponged some red glitter over the red nail polish, it came out quite bright as the polish underneath was a bright shade of red. On my middle finger I stamped some wording from the Mo You London Noel 10 plate which matches a Christmas top my sister got me a few years ago, which I wore on Christmas day. On the accent nail I sponged on some gold glitter, and then stamped the reverse bell image from the Uber Chic Happy Christmas/ Christmas 04 stamping plate. It was pretty simple to do but I like the final look.

My partner got me a ring light to use to help me with the lighting in my nail pictures, and it's being used in the first three of these pictures. The effect it gives on the glitter  in these pictures is a little strange but I think I'm making progress. It was a great gift!

Colours used: Dead Heat - Barry M, Kiss Me - Fun Lacquer, Gold Digger - Barry M, Gold Glitter - Barry M, Black Stamping Polish - Dance Legend,  Foil Effects in Gold - Barry M

Wednesday, 23 December 2020

Rocking Around the Christmas Tree (Rex)

Rawwwwr hello! Hope you're all doing OK. things aren't great here in the UK at the moment as I'm sure you will know. I'm distracting myself with nail polish as usual! (and soon Christmas presents!). When I saw the images on Mo You London's new Noel 10 plate I just had to have it, and I knew right away I would be trying out this Christmas dinosaur look this year! Today's Glam Nails Challenge prompt is Christmas Tree, so I thought I'd use this as my moment to try the tree-rex look!

I started with a base of green on my ring fingernail and ILNP's Christmas Cookie on my other nails, it's such a perfect base for Christmas nail art! I stamped the lettering in gold directly onto the green nail, I had to try a few times as I always struggle to get lettering to come out nicely with stamping plates. For the other nails I used my Uber Mat to create some dino decals, you can see how here. I pretty much followed the same pattern as the example on the MYL website as it goes well together, and added some lights on the thumb from the same stamping plate.

I'm so happy with how these came out! I am intending to change my nail art again on Christmas Eve as I always do, but it will be a challenge to let go of this one, Maybe I shall have to keep it! I've had a few successful 'can't take them off' Christmas nail looks this year!

Colours used: Spring Green - Barry M, Christmas Cookie - ILNP, Black Stamping Polish - Dance Legend, Foil Effect in Gold - Barry M, Madder - Cirque Colors, Misery - ILNP, Aria - ILNP, Yellow - Barry M

Sunday, 20 December 2020

Wrap Those Nails!

Hey everyone, hope you're holding up OK with all this madness that's going on! I have more Christmas nail art to share with you today from the Glam Nails Challenge, today's prompt is wrapping paper. It's a great theme, and one I did a couple of years ago too (see here). It works perfectly for a skittle nail art look using different images that look like they could be wrapping paper! Previously I did it to use some stamping plate images I hadn't used before, and this year I used mostly images from my new Mo You London plates (Noel 9 and Noel 10 for this look).

I started with a variety of base colours, different ones on each nail. It's a bit miss-matched but I like how the final look came together. ILNP's Christmas Cookie is featuring in a lot of my Christmas nail art at the moment! For the panda's and penguins I created decals, you can see how here. The other images were stamped directly onto my nails. For the middle finger I picked up the image in one colour, and used a dotting tool to remove the bits I didn't need, then did the same again for the other parts of the image. The plates used were the MYL ones mentioned above, and Uber Chic Christmas 01.

I am overall pleased with these, they're good fun and were a great opportunity to try out some more of my new stamping plate images. Definitely the sort of theme I would do again. I like these more than my last try too!

Colours used: Madder - Cirque Colors, Christmas Cookie - ILNP, Aria - ILNP, NP 292 - Barry M, Emerald Green - Barry M, Foil Effect in Gold - Barry M, Foil Effect in Silver - Barry M, Black Stamping Polish - Dance Legend, White Horse Street - Nails Inc, Floral Street - Nails Inc, Cocoa - Barry M, Watermelon - Barry M, Misery - ILNP

Wednesday, 16 December 2020

Reindeer and their arctic friends!

Hey everyone! Super excited to share todays nail art with you as I'm really happy with how it came out. This look was a bit fiddly and took ages but it was so worth it - the little creatures are so cute! (if I do say so...). Today's Glam Nails Challenge prompt is reindeer. I have a new stamping plate from Mo You London (Noel 11) which has 8 animal layering images, so you can create the animals in their own little festive outfits! I decided to make today's reindeer prompt 'reindeer and friends' and added a few more arctic creatures to the look. I was particularly excited to try out the walrus image. Honestly not sure how I will bring myself to take these off!

I started with a base of ILNP's Christmas Cookie (full colour list below the pictures) and then got to work on the layered images. Often it is simpler using layered images as you don't have to wait for decals to dry and trim them down etc, but this one was a little more fiddly! This is because I was using so many different colours, so I had to keep swapping colours in and out and cleaning the stamping plate too. Still, it's a great way of creating images that I definitely couldn't do freehand! On the thumb I used some of the colours from my other nails to add snowflakes with images from the same plate.

So I totally love them! I pretty much followed the templates for these colour wise as it was my first time trying them, but I look forward to trying out some variations, particularly of the walrus image! I'm also keen to try the other animal images on the plate too, though these are my favourites.

Colours used: Christmas Cookie - ILNP, Indigo - Barry M, White Stamping Polish - Rainbow Connection, Black Stamping Polish - Dance Legend, Grey - Barry, Red Hot Rio - OPI, Acai Smoothie - Barry M, Beach Hut - Models Own, Cappuccino - Barry M, Block Your Green - Rimmel, Cocoa - Barry M, Cyan Blue - Barry M

Sunday, 13 December 2020

Light up your Christmas jumper!

Hi all! I'm hoping this blog post won't appear on Google for people searching how to light up a Christmas jumper, but I wasn't sure what else to call this! Maybe they will be inspired and light up their nails too? Who knows! Todays Glam Nails Challenge December prompt is Christmas lights. I do love a good Christmas lights nail look (and Christmas lights in general) and I have a couple of different Christmas lights stamping plate options. I decided to put a bit of a twist on the Christmas lights look as I have been hankering after a crazy light up Christmas jumper this year but can't justify buying one, so I've made it on my nails instead.

I started with a base of ILNP's Christmas Cookie (full colours list under the pictures) and then used images from Mo You London's Noel 10 and Uber Chic Beauty's Holiday Spirit (Christmas 01) plate to apply the Christmas jumper patterns in green, red and grey. For the lights I created decals using my Uber Mat (see how here). I used a Noel 10 image from the multi-coloured ones and an image from the Holiday Spirit plate for the gold and silver lights. I decided to keep these ones simple as there was already a pattern underneath, which I think was the right decision.

In conclusion I'm super happy with these! I was sure if it was going to be a bit much but the different patterns and images stand out clearly and it feels super festive! I suppose I will leave it up to you whether it's 'too much' in a Christmassy way, but for me I think it's just the right amount of loud and colourful Christmas! :D

Colours used: Christmas Cookie - ILNP, Black Stamping Polish - Dance Legend, Spring Green - Barry M, Grey - Barry M, Red Hot Rio - OPI, Indigo - Barry M, Pimadonna - Danglefoot Polish, Shine - Orly

Thursday, 10 December 2020

Meowy Christmas Santa Claws!

Hi again! Back already as I have some more nail art to share from the weekend. This was done for the Holo Taco 'Holodays' prompt. The images are from Mo You London's Noel 10 plate and I just had to squeeze it in as one of my Christmas looks this year, they're so cute! A Simply Nailogical/ Holo Taco competition seemed like the perfect occasion!

I started with a base of dark green (colours listed below the pictures) and a couple of Holo Taco toppers to lighten it up a bit. I then used gold to add the wording on my ring fingernail, and made decals for the rest of the nails, you can see how here. I enjoyed getting some Christmassy colours out for the cat hats! I think the base colour was too dark really, which I should have known! I thought the toppers would lighten it up a bit more than they did. A couple of pictures are from outdoors again as I took them at the same time as the pictures from my last post!

Colours used: Stylenomics - Essie, Linear Holo Taco - Holo Taco, Gold Flakie Holo Taco - Holo Taco, Black Stamping Polish - Rainbow Connection, Foil Effects in Gold - Barry M, Say Love - INLP, Secret - Fun Lacquer, Playing Koi - Essie, Grey - Barry M, Floral Street - Barry M

Wednesday, 9 December 2020

Deck the halls with boughs of holly!

Hello all! More Glam Nails challenge today, this time the prompt is 'holly'. I decided to expand it to 'deck the halls with boughs of holly' from the classic Christmas song, which is what's behind the gold decorations. I really wanted an excuse to use them and thought it would work well over ILNP's Eclipse, which I am wearing here for the first time.

So I started with a base of Eclipse on all nails, and then stamped the gold images from Mo You London's Noel 09 stamping plate onto my middle two fingernails. For my thumb, index and little fingernails I used holly images from the same stamping plate and created decals, you can see how here. I used sparkly nail polish to help them stand out a bit as the base colour is so dark.

Overall I quite like these bit there are a few things I'm not so pleased with. Firstly the thumbnail chipped before I could take these pictures, which is probably due to the peel off base coat but they don't normally chip that soon! I do think it worked as a look but the holly did need to be in good lighting to stand out properly against the background (should have known really!). Lastly I am not enjoying how wrinkly my hands look taking these pictures out in the cold! I think next time I shall persevere with my lightbox if it's dark indoors!

Colours used: Eclipse - ILNP, Black Stamping Polish - Rainbow Connection, Say Love - ILNP, Secret - Fun Lacquer, Foil Effect in Gold - Barry M

Sunday, 6 December 2020

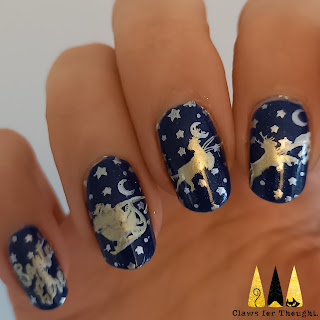
Dashing through the sky!

Hey everyone! More Christmas nail art to share with you today (of course!). This one is the second prompt in the Glam Nails Challenge for December 2020, the theme is 'Santa's sleigh'. I've done a sort of similar look to this before (see it here), which was good fun so I thought I'd try something similar.

I started with a base of blue (colours listed below the pictures), and then used silver nail polish to stamp the stars image over all of my nails. The image is taken from Mo You London's Noel 09 plate, and I love it so much that I didn't layer anything over it on my thumb, so I could appreciate it on it's own. For the Santa's sleigh images and the wording (Santa is here!) I stamped them onto my nails in white, and then layered gold over the top. This didn't work as well as I'd hoped, I think I layered them too directly over the top of them, rather than slightly off to get that layered effect. Also the gold nail polish ended up looking pretty similar to the silver stars.

Overall I quite like them. They could have been better, but I like them better than my previous attempt of this look, and am enjoying the festive vibes!

Colours used: Starry Night of the Summer - Fun Lacquer, Foil Effect in Silver - Barry M, White Stamping Polish - Rainbow Connection, Foil Effect in Gold - Barry M

Wednesday, 2 December 2020

Candy Cane Lane

Hello all and happy December! I can't believe we're here already, this year is going weirdly fast! What I also can't believe is that I haven't started the Christmas nail art early this year, we even put the tree up on Sunday, I guess I just had so many other things I wanted to try in November. I'm back to doing the Glam Nails Challenge again for this month, I honestly never anticipated I'd enjoy it this much and even end up doing it for December! As always I have a huge list of Christmas nail art ideas which I won't be able to complete, but some of these tie in well with the glam nails challenge themes so I'm going to give it a go.

For this look I started with a base of Misery by ILNP, which seems like such a bizarre choice for a Christmas look given the name! I think it has a nice cosy vibe to it though and I wanted to try it out as it's a new one. I used the advanced stamping technique to create a variety of decals on my Uber Mat (see how here). The cottages and snowman are from Mo You London's Noel 01 stamping plate, and the reindeer and candy cane's are from Noel 09 - one of this years releases. I layered up the candy canes over the cottages and reindeer, after being inspired by a couple of houses I saw in the local area with their Christmas lights up. There seems to be a bit of a candy cane theme this year, and one of the houses was a beautiful cottage too.

I'm pleased with how these turned out. Not my favourite Christmas nail art I've ever done but I do rather like it! I called this look 'Candy Cane Lane' after the song by Sia which gets in my head frequently while wearing this nail art!

Colours used: Misery - ILNP, White Stamping Polish - Rainbow Connection, Black Stamping Polish - Dance Legend, Spring Green - Barry M, Red Hot Rio - OPI, Indigo - Barry M, Cappuccino - Barry M, White Moonstone - Barry M

Sunday, 29 November 2020

Cirque Colors No Tools Nail Art - Amethyst & Shibori

Hey everyone! One last blog post before the Christmas nail art begins! Last weekend I decided to have a play around with my Cirque Colors no tools nail art sets for the first time. This is the second time Cirque have released nail art sets consisting of sheer polishes which can be layered to create an overall look. I was tempted the first time but didn't go for it, this time though they had blue and purple options so I had to give it a try! Each set consists of three sheer polishes, I followed Kelli Marissa's tutorials for my first attempt.

Overall I don't think mine came out great, but they're OK and it was my first try! The first three pictures are of the Amethyst set. I layered this up in various ways to try and get the overall effect of Amethyst stones. I think some came out better than others, but I was a little too neat around the edges and probably didn't blend them well enough. I will try it again and try to improve and I also like the idea of using some thin lines of rose gold to the look too.

The next three pictures are of the Shibori set. To be honest I've never heard of Shibori! I think this look came out a little better but could have still been a better! I did miss a few little bits at the sides which made it look a bit like they were chipped, I think I can improve on this one quite easily though. Underneath these looks I tried out a new base coat which I was delighted to win as part of a Halloween nail art competition on the Rainbow Connection Facebook group! I've included my thoughts on it and a picture below the nail art pictures.


On the left here is the Polished For Days Soft Focus base coat I used underneath this look. It's designed to blur the natural colour of the nail so the white tips are less obvious underneath nail polish, so it's particularly good for sheer looks like this. I used two coats before applying the colours, you can see this on the left.

The application was good and it definitely covered up the white part of my nail once the sheer colours were added too. I think it did possibly make the look a little darker but I can't be sure as I haven't tried it with any other base coat!