For the design I tried out a range of the patterns from my Back To The 20's 04 plate from Mo You London's time traveller collection. It was lovely to see them in action! The designs really remind me of the Great Gatsby film that came out a few years ago. I particularly like the more detailed patterns like the one on my middle and ring fingers on each hand. I think I will try this colour combination again later in the year, for now I'm sticking to summer colours!
Sunday, 31 July 2016
Stamping Sunday: Great Gatsby Nails
Good evening! Just in time to get one more blog post in before August! Today's design is from a couple of weeks ago when I needed smart nails, but didn't fancy just a plan colour. These colours are a little wintery, I think they'd be great for autumn/winter. I just really fancied using Butter London's Bramble again, it's such a lovely rich creamy polish. The colour I stamped with is technically a rose gold, though it looked more gold over the purple. It still just had that little hint of something different to a normal gold though which I liked.
For the design I tried out a range of the patterns from my Back To The 20's 04 plate from Mo You London's time traveller collection. It was lovely to see them in action! The designs really remind me of the Great Gatsby film that came out a few years ago. I particularly like the more detailed patterns like the one on my middle and ring fingers on each hand. I think I will try this colour combination again later in the year, for now I'm sticking to summer colours!
Colours used: Bramble - Butter London, Kings Road - Nails Inc
For the design I tried out a range of the patterns from my Back To The 20's 04 plate from Mo You London's time traveller collection. It was lovely to see them in action! The designs really remind me of the Great Gatsby film that came out a few years ago. I particularly like the more detailed patterns like the one on my middle and ring fingers on each hand. I think I will try this colour combination again later in the year, for now I'm sticking to summer colours!
Thursday, 28 July 2016
Dinoflagellates
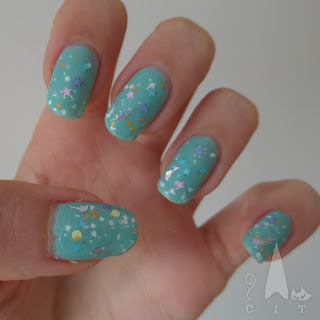
Good evening nail world! Today I am sharing a manicure I did based on memories and science! You may wonder what on earth the title is about, or maybe you don't. I recently watched a documentary on lights in nature, where they had these microbe/plankton like creatures that produced glowing light in the water, they are called dinoflagellates (a great word!). There was some gorgeous footage of dolphins splashing through the water with glow in the dark water spraying out behind them! Based on this and the weather getting warmer, I decided to try out the second of my Ellagee dolphin collection polishes, Rainbow Reef, I did also use a glow in the dark top coat, but unfortunately I had no idea how to photograph it! One to think about for my next glow in the dark mani!
Rainbow Reef is a top coat with dolphin and star shaped glitter, and a variety of pastel coloured hexagonal glitters. It really reminds me of a little plastic pendant I got by the sea at Weston Super Mare. We went there to visit my Gran when she was on holiday and it's one of my earliest memories. We also went on an awesome double swing and I rode a donkey! The pendant is a clear plastic bauble with clear liquid in and little pastel shells and stars etc. I like having this polish to bring back the memories as I've no idea if the pendant still exists!
Colours used: Mint Green - Barry M, Rainbow Reef - Ellagee
Rainbow Reef is a top coat with dolphin and star shaped glitter, and a variety of pastel coloured hexagonal glitters. It really reminds me of a little plastic pendant I got by the sea at Weston Super Mare. We went there to visit my Gran when she was on holiday and it's one of my earliest memories. We also went on an awesome double swing and I rode a donkey! The pendant is a clear plastic bauble with clear liquid in and little pastel shells and stars etc. I like having this polish to bring back the memories as I've no idea if the pendant still exists!
Tuesday, 26 July 2016
HPB Presents: Galaxy Nails
Hello internet! Today I'm taking part in another Hobby Polish Bloggers link up. I try to take part every month and really enjoy the team spirit of the group! This months theme is 'space'. I was going to try something unusual like aliens, but I couldn't resist the obvious opportunity for my first attempt at galaxy nails!
For this design I started with dark blue with a hint of glitter (colours listed below) to make sure my mani was cosmic throughout! I then used small pieces of sponge to sponge on the colours in a vague galaxy-ish pattern! I started with pale blue through the middle, with a bit of silver holo over the top. Then I splodged some glitter randomly across each nail. I am currently on holiday in Wales and forgot my nail art brush, so the stars were done with a tooth pick! I couldn't quite get my camera to pick up the sparkle properly.
Overall I like the sparkly cosmic look of this design, but think it could do with some tweaking to make it look more like a galaxy. I used one of nails inc's galaxy polishes just to complete the look! Just goes to show you can't go wrong with a bit of glitter! Check out the other designs at the bottom of this post.
Colours used: Mustang Eli's On A Roll - Colors By Llarowe, Blueberry - Barry M, Mega - ILNP, Catwalk Queen - Barry M, Westminster Bridge Road - Nails Inc
For this design I started with dark blue with a hint of glitter (colours listed below) to make sure my mani was cosmic throughout! I then used small pieces of sponge to sponge on the colours in a vague galaxy-ish pattern! I started with pale blue through the middle, with a bit of silver holo over the top. Then I splodged some glitter randomly across each nail. I am currently on holiday in Wales and forgot my nail art brush, so the stars were done with a tooth pick! I couldn't quite get my camera to pick up the sparkle properly.
Overall I like the sparkly cosmic look of this design, but think it could do with some tweaking to make it look more like a galaxy. I used one of nails inc's galaxy polishes just to complete the look! Just goes to show you can't go wrong with a bit of glitter! Check out the other designs at the bottom of this post.
Friday, 22 July 2016
Monthly Indie Review: Picture Polish
Hello everyone, happy Friday! I am extra excited this Friday as I have my first week off of the year (bad planning there!), I'm off to Wales with my boyfriend and his family and I can't wait. I think I will still be blogging as I'm taking my laptop with me. Today I am showing you my first review of a brand I've wanted to try for soooo long! I discovered Picture Polish years ago before I even know indie polish was a thing. But I didn't fancy the expensive postage. Now I know I can get them at Rainbow Connection, yay! :)
Below are the colours I decided to try. I'd seen Lakodom online loads and Instagram for the last year and just had to try this delicate shimmery shade. The second is Ocean. Everything about this colour is my kind of thing! I love blue I love the ocean, I love glitter, and I love the little quote on the bottle.
The first one I tried was Lakodom, it's a little more grey than I expected. I thought it would be an off white. Still, I have a bit of a thing for grey polish so it's fine by me! It was easy to use and painted on well, but I did find it very thin. I ended up using four coats rather than my usual two! Still as you can see in the fourth picture my nail line was visible in bright light! Overall not as impressed with this one as would have hoped, but I do still like it.
Next up is Ocean, and oh my goodness where do I start! This colour is absolutely stunning, I just kept looking at my hands! The glitter is a mixture of holo and tiny flakies that combine to create a beautiful shade the glitters in all lights, catching the light especially in the sun. It is flattering, and I imagine it would be for all skin tones, and paints on well. I used two coats for the pictures below.
Overall I am pleased with these nail polishes. The Ocean one is a firm favourite! I really like the bottle design as well. I like the shape and how they have the quotes/phrases on the bottle, and the name in bold. It's bit different to what I usually see. Thanks for reading!
Below are the colours I decided to try. I'd seen Lakodom online loads and Instagram for the last year and just had to try this delicate shimmery shade. The second is Ocean. Everything about this colour is my kind of thing! I love blue I love the ocean, I love glitter, and I love the little quote on the bottle.
The first one I tried was Lakodom, it's a little more grey than I expected. I thought it would be an off white. Still, I have a bit of a thing for grey polish so it's fine by me! It was easy to use and painted on well, but I did find it very thin. I ended up using four coats rather than my usual two! Still as you can see in the fourth picture my nail line was visible in bright light! Overall not as impressed with this one as would have hoped, but I do still like it.
Monday, 18 July 2016
Farnborough Air Show: Aeroplane Nails!
Hi everyone! Hope you had a great weekend. I am very sun burnt after mine! After a trip to Portsmouth to see friends on Friday night/ Saturday, I spend Sunday with my boyfriend at the Farnborough Air Show. So of course it was the perfect excuse for some themed nail art! I haven't done freehand for a while as I've been stamping a lot lately, so I enjoyed having something different. I find it can be more rewarding sometimes as it takes more effort to create!
For this design I started with a Nails Inc 'latex' pale blue, I like the strength of the colour, the matte/latex effect really brings it out. I then used a small nail art brush and some grey matte nail polish to paint plane outlines on my thumbs and ring fingers. I looked on Pinterest for some aeroplane outlines and chose the ones I thought I could do best! I then used a cotton bud and some cream polish to dab on some clouds. I'd never tried the cotton bud technique before, it is absolutely perfect for clouds! My design was matte already but I finished off with a matter top coat to seal in the black outline (the pens can have a tendency to rub away otherwise).
Colours used: Bermondsey Street - Nails Inc, Easy Peasy - Topshop, Nail Art Pen in Black - Barry M, Coconut - Barry M
Below you can see my nail planes meeting their idols! I couldn't manage to get any while the planes where flying, I'd need an extra hand!
For this design I started with a Nails Inc 'latex' pale blue, I like the strength of the colour, the matte/latex effect really brings it out. I then used a small nail art brush and some grey matte nail polish to paint plane outlines on my thumbs and ring fingers. I looked on Pinterest for some aeroplane outlines and chose the ones I thought I could do best! I then used a cotton bud and some cream polish to dab on some clouds. I'd never tried the cotton bud technique before, it is absolutely perfect for clouds! My design was matte already but I finished off with a matter top coat to seal in the black outline (the pens can have a tendency to rub away otherwise).
Below you can see my nail planes meeting their idols! I couldn't manage to get any while the planes where flying, I'd need an extra hand!
Sunday, 10 July 2016
Stamping Sunday: Nautical Nails
Happy Sunday everyone! Today I'm showing you a design I was really please with, with one of my new stamping plates from Mo You London. I used the nautical plate Sailor Plate Collection 01. I usually go for full plates with full pictures/patterns on but really liked the individual images on this plate and think it will be a firm favourite. Besides I'm a big fan of anything nautical or sea themed. Below is the stamping plate super shiny and reflective before being used. As you can see I was excited to try it...
For this design I used a mixture of images over a plain background, and images over a stripy background. Used some of my trusty striping tape as you can see to the left. I couldn't find any of the colours of tape I'm not as keen on so ended up using this lovely bronze. I need to try using this as part of nail art some time.
You can see the final design below. I used black over the striped so that it would show up well, and brown and white for the others. I love all the images on this plate, I'm particularly fond of the boat ones. The ferry (or perhaps it's meant to be a cruise ship I'm not sure) reminds me of summer holidays to France as a child.
Colours used: Blueberry - Barry M, Alpine Snow - OPI, Red Hot Rio - OPI, Cocoa - Barry M, White Knight - Mo You London, Black Knight - Mo You London
You can see the final design below. I used black over the striped so that it would show up well, and brown and white for the others. I love all the images on this plate, I'm particularly fond of the boat ones. The ferry (or perhaps it's meant to be a cruise ship I'm not sure) reminds me of summer holidays to France as a child.
Tuesday, 5 July 2016
Tropical Tuesday: Neon Palm Tree Smoosh!
Tropical Tuesday is back! Finally it is that time of year again :) I definitely don't think I can keep this up for every Tuesday like I did last summer. At the time I'd just started blogging, and had a nice hefty backlog of pictres to go through.
I have to say I thoroughly enjoyed having really vibrant summery colours on my nails again. It's been a while. I started with a white base to really make the colours pop. I then used a stamper to use the 'smoosh' technique. This involves putting blobs of nail polish on the stamper, and then dabbing it around on the nail, to get a random splotchy effect. I love the kind of nail art where you can be as messy as you like and it still turns out pretty!
When I first splotched the colours on I wasn't sure about the combination, but as I did some more and finished the design and grew on me quickly! For the palm trees I used a small nail art brush and black nail polish - colours listed below the pictures.
Colours used: Alpine Snow - OPI, Seven Dials - Nails Inc, Flip Flop Fantasy - China Glaze, Uptown Glamour - Nails Inc, Lady In Black - OPI
I have to say I thoroughly enjoyed having really vibrant summery colours on my nails again. It's been a while. I started with a white base to really make the colours pop. I then used a stamper to use the 'smoosh' technique. This involves putting blobs of nail polish on the stamper, and then dabbing it around on the nail, to get a random splotchy effect. I love the kind of nail art where you can be as messy as you like and it still turns out pretty!
When I first splotched the colours on I wasn't sure about the combination, but as I did some more and finished the design and grew on me quickly! For the palm trees I used a small nail art brush and black nail polish - colours listed below the pictures.
Sunday, 3 July 2016
Stamping Sunday: A Subtle Holo
Happy Sunday everyone, it's been nice and sunny in the south of the UK today, hope it's been sunny for you too! Sun is the perfect kind of weather for showing the manicure I'm blogging about today, though unfortunately it did not quite go to plan.
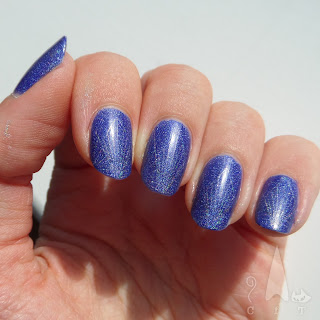
I started with a base of shimmering and lightly holographic cobalt blue from A England (details below pictures), it's a really beautiful shade and suits me well I think. I decided I would try out a pattern from my new Back to the 20's 04 plate from Mo You London. I tested out the image in paper first using a metallic and a holo polish, and went for the holo as although more subtle I love the way it caught the light.
Sadly what I did not think through was that over dark blue the polish would be even more subtle, to the point where in some lights it's barely even visible, oops! The pictures below are in good light so you can see the design, I couldn't capture the holo very well. Still, I love the pattern and very much look forward to using it again with a better colour combination!
Colours used: Spirit Of The Moors - A England, Mega - ILNP
I started with a base of shimmering and lightly holographic cobalt blue from A England (details below pictures), it's a really beautiful shade and suits me well I think. I decided I would try out a pattern from my new Back to the 20's 04 plate from Mo You London. I tested out the image in paper first using a metallic and a holo polish, and went for the holo as although more subtle I love the way it caught the light.
Sadly what I did not think through was that over dark blue the polish would be even more subtle, to the point where in some lights it's barely even visible, oops! The pictures below are in good light so you can see the design, I couldn't capture the holo very well. Still, I love the pattern and very much look forward to using it again with a better colour combination!
Subscribe to:
Posts (Atom)