Monday, 31 October 2016

All Holo's Eve!

Happy Halloween everyone! I hope you've enjoyed your day. I have been at work but there was a charity bake off so I have had a very sugar fuelled day! Today I am taking part in another Halloween link up, with the most fantastic name, All Holo's Eve!

To fit the holo theme I used a base of Black Holo Witch from Fun Lacquer, a Halloweeny polish with a Halloweeny name! For the design I used white stamping polish to try out some of the designs from my Mo You London Festive Plate 16. I suppose there is not all that much else to say on this one really, it was pretty simple to do! The Black Holo Witch is not as black as I would have liked, but it is certainly sparkly!

Check out all the other lovely designs below the images. I love how we've all gone for a similar colour scheme!
Colours used: Black Holo Witch - Fun Lacquer, White Knight - Mo You London


Sunday, 30 October 2016

HPB Presents: Halloween 2016!

Hello everyone, happy almost Halloween! Today I'm taking poart in a blogger link up with the Hobby Polish Bloggers Facebook group. It's a freindly group for nail bloggers at any level to share/ask for tips and advice. Hallooween last year was the second time I took part in a HPB link up, I can't beleive the time has gone so fast!

I've gone for a fairly classic Halloween look, using two stanping plates I got for the occasion. One is Bundle Monster H08 and the other is Mo You London's Festive Plate 16. I adore the images on the MYL plate, and the BM one I bought specificially for the spooky eyes. I wanted a mish-mash of designs so I went with a bunch of different colours, and a different image on each nail. I think the orange and purple look a little odd together, but hey it's Halloween!

The bats, eyes and zombie hands all came from the BM plate. and the rest are from the MYL plate. I used white stamping polish for the eyes and then coloured them in with yellow polish. Unfortuntaely I had a bit of a mis-hap with the graveyard image on my thumbnail. It stamped perfectly and then I accidently splashed it with a little nail polish remover!
Colours used: Lady In Black - OPI, Baby Bellini - Rimmel, Grey - Barry M, W18 - Color Cosmetic, White Knight - Mo You London, Black Knight - Mo You London, Yellow - Barry M

As usual I have seen sooo many lovely Halloween manicures this year, that I now have loads more ideas, shame it's so nearly over! Next year I must start earlier... Don't forget to check out everyone else's designs below!


Thursday, 27 October 2016

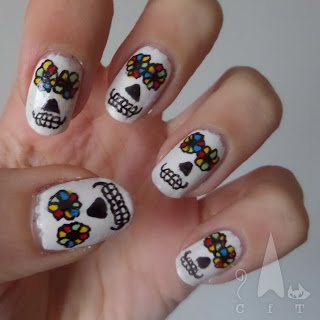
Day Of The Dead Skulls

Hello nail people! Today I'm showing my attempt at Hannah Rox It Nails basic day of the dead nail art. Her video's are great, I would highly recommend checking out her Youtube channel. My left hand looks a lot better than my left with these, I think I've been doing so much stamping that I'm out of practise with freehand. You can see my wobbly right hand bottom left!

I used Barry M's Coconut as a base, mine is nearly finished and getting a bit thick now, so it was a bit of a challenge! Next I used a dotting tool to create black dots for the eyes, and then a smaller tool to create the colourful markings around the outside of the eyes. While this was drying I used black polish and a small brush to create the triangular noses. For the mouths I reverted back to my old nail art pen! I found this easier for creating the thin lines. Finally, I used the pen to draw outlines of the markings on the eyes, et voila, spooky!

I have mixed feelings on this mani, I do think it's imperfections made it a little spookier! I kept it on for a few days and kept changing my mind whether I wanted to keep it on or not! If I could have got it as neat as Hannah did that would have been ideal!
Colours used: Coconut - Barry M, Lady In Black - OPI, Yellow - Barry M, Cyan - Barry M, Dead Heat - Barry M, Key Lime - Barry M, Nail Art Pen in Black - Barry M

Tuesday, 25 October 2016

Easiest Halloween Ghosts

Today I'm on a UK holiday near the cost on Norfolk, having just got back from visiting family in Switzerland. We've spent the day on the beach I'm now snuggled up in a cottage. So I'm very much in a seashells and beach nails sort of mood! All I have though is a few Halloween designs to share! I'm starting with the very simplest of Halloween nails/cheat Halloween nails, classic 'sheet over head' style ghosts!

So I probably don't need to go into detail on how I did this one! I started with a white/slightly off white base, and then used dotting tools to place some ghostly eyes using black polish. This achieved a sort of 'cute ghost' look.You could make them look a little spookier by making the eyes larger and longer. Note the strange lighting too, don't know if it made them look more ghostly really but worth a try!

That's all for now, more Halloween and autumn nails to follow!
Colours used: Coconut - Barry M, Lady In Black - OPI

Wednesday, 19 October 2016

Monthly Indie Review: Fun Lacquer

Hi everyone! Today I have a monthly indie review I've been waiting to do for a long time - Fun Lacquer. When the Simply Nailogical collaboration came out I just couldn't resist giving it a go! The collection featuires three shades, each one in a holo glitter, and a holo glitter with extra holo particles. I thought the extra holo ones looked a bit more silvery so went with the normal holo glitter in Black Holo Witch and How Deep Is Your Holo. They are both intensely glittery glitter, in a clear base.

First up is How Deep Is Your Holo, a super glittery cobalt blue. I have seen a lot of video's of this suggesting that you need to sponge it on. It's definitely a good technique for this type of glitter, but I managed to get the below look using three coats. It's a gorgeous shade of blue, and in the light its twinkles in lovely blue and green sparkles. As expected it dries with a textured finish, but this can be smoothed out with a top coat.
The second colour I tried is Black Holo Witch, very appropriate for the season! I'd say it's more of a grey than a black, but when those sparkles get going it is sooo lovely and rainbowish! For this one I did sponge on the glitter. This was a quicker process that painting it on layer by layer, but was a little bit of a faff getting it to cover the whole nail! I suppose that will improve with practise.
I enjoyed both of these polishes, and their extreme sparkle! I did find them a little heavy on my nails though, and being a glitter they need a peel off base coat or to be soaked off. I tried soaking the first off and it was still quite tricky to get rid of it all! I am glad to have these in my collection, they are great colours and the boxes are so fun too! (yep, they're holo!) I probably won't buy many more glitters this intense though. I did buy a two tone colour shift polish from Fun Lacquer as well which I can't wait to give a go.

Saturday, 15 October 2016

Watercolour Succulents

Last (or maybe second to last) summery design for the year! I'm a little behind with my blog posts due to the amount of time I've been away from home lately. This design was created with my Uber Chic succulents stamping plate, which I absolutely adore. This isn't an original, I saw the design on the Nail Polish Society and loved it so had to give it a go myself. It's a little different as I used a watercolour effect rather than water marbling and slightly darker colours.

I started with two coats of white polish, and while it dried prepared my stamping tools. For each of the three watercolours, I mixed a blob of polish with some nail polish remover on a piece of foil. I then used a wide nail art brush to splodge/spread the nail polish on to my nail. Anywhere I thought the colour was too opaque I just dipped the brush in some polish remover and used it to water down the colour. Finally, once dry, I used black stamping polish and a negative space image from the Uber Chic succulents stamping plate over the top, ta-da!

I really liked how this design turned out and it was very easy to do. Thank you Nail Polish Society for the inspiration! I used the image on the left of the stamping plate which is perfect for pretty much any nail length, as it goes the whole way up the plate. This is perfect for me as my nail length varies often and sometimes it is too long for the images on smaller plates.
Colours used: Alpine Snow - OPI, Greenberry - Barry M, Cyan - Barry M, Bright Purple - Barry M, Black Knight - Mo You London

Saturday, 8 October 2016

Rippling Waves

Amidst all the new autumnal shades and Halloween designs across the nail bloggersphere at the moment, I'm bringing one last glimpse of summer! I wore this for a long weekend with family friends in Center Parcs at the end of September, and fancied squeezing in just one more summer design. I've seen a lot of these rippling wave beach designs around over the last few years and thought that my sheer polish, 'Flipper', from Urban Outfitters would be perfect to create it.

I started with a base of white polish, and then a couple of layers of Flipper. Next I used the rippling waves pattern from my Bundle Monster XL25 stamping plate and white stamping polish. It's a perfect pattern for ocean designs and I think it could possibly create a good marble effect too. I used another layer of Flipper over the pattern to soften the harsh white lines a little and give it a bit more dimension.

For the sand I used three different polishes, starting with one of Nails Inc's concrete effect polishes. I created an uneven line of sand at the bottom of each nail, I tried a straight line on one thumb but it just didn't look beachy enough! I then covered it over with a little bit of an ancient Barry M fine gold glitter, and then a little bit of Barry M's chunky yellow topaz glitter. Finally I used a small nail art brush to paint on a starfish on each ring finger and covered over with a super shiny topcoat.
Colours used: Alpine Snow - OPI, Flipper - Urban Outfitters, White Knight - Mo You London, London Wall - Nails Inc, Gold Glitter - Barry M, Yellow Topaz - Barry M, St James - Nails Inc

Monday, 3 October 2016

Barry M Coconut Infusion - Autumn 2016

Hi everyone! Today I am showing you my swatches of some of Barry M's new coconut infusion nail polishes for autumn/ winter 2016. There are six new shades, though I have only three to show you today. I'm trying to save money and space, but I'm beginning to wonder if I should have just got all six!

First up is Paradise, a lightly purple toned beige/nude. There are a lot of muted colours in the new set which I'm loving! I'm having a bit of a phase for dusty/muted colours at the moment, not sure if it's just the season or I'm getting old! Perhaps both ;) Below is two coats with no base or top coat. It painted on well and is a great shade for autumn.
Next we have Oyster, a cosy greige (grey/beige). When I saw this initially I thought it was just grey, and having a bit of thing for grey polish I bought it to replace another grey I have that's running out. It turned out as more of a grey/beige, but I'm happy about that as it's such a nice flattering shade! Below is two layers with no base or top coat.
The final polish I bought from this collection was Oasis, a very autumnal smokey purple shade. Again the below is two coats with no base or top coat. I think this will be really good for Halloween designs this month, and just generally a nice colour for the colder weather approaching.
The verdict - these are lovely polishes! I expected my favourite to be the purple but I'm actually quite a fan of the greige as it's so flattering and reminds me of cosy jumpers! There are three more colours in the collection, a red, a brown and a grey; and they cost £4.99 each in Boots, Superdrug or Barry M's website. Thanks for reading! I leave you with a bonus picture, of Paradise and Oyster each held in the opposite hand to the one they are painted on.

Sunday, 2 October 2016

Stamping Sunday: Burano Lace

Hello nail people! I hope you've had a good weekend. Todays stamping Sunday design is a simple one, which I had intended to have as my holiday nails for Venice had I not been too keen on these nails to take them off! I'm glad I didn't use these as they didn't go quite as well as I would have liked. I don't think I got the placement quite right, and the curve at the bottom of the design isn't as visible as I thought it would be.

On my trip to Venice we also went to some of the neighbouring islands such as Murano and Burano. In Burano they used to make lace and we went to a lace museum there, so these nails reminded me of the trip. I used the Fashionista plate 17 from Mo You London and the base is a speckled effect polish from Cirque Colors. I look forward to using this plate again with some more muted colours.
Colours used: Hatch - Cirque Colors, Baker Street - Nails Inc