So, onto the good stuff! The first polish I tried was Crunk On Copper an extremely holographic copper glitter. In the pictures it looks slightly lighter than it did in real life, and I don't think they really do it justice, but it's hard to capture something so sparkly. The glitter is in a clear base, I would say it takes about three coats for opacity, but sponging it on gets faster results! It dries textured so if you want it smooth a couple of coats of top coat is required.
Monday, 21 November 2016
Monthly Indie Review: Painted Polish
Hello nailaholics! This months Indie polish review is SUPER SPAKLY and holographic and I love it! So you don't need to read on to see if I liked them... I first spotted Painted Polish by Lexi on Instagram a year or so ago and fell in love with some of their gorgeous glitters. Unfortunately the postage to get is across from America wouldn't have been justifiable, so when Rainbow Connection launched it as a new brand I was so excited, especially when I noticed they had the shades I was after all that time ago.
So, onto the good stuff! The first polish I tried was Crunk On Copper an extremely holographic copper glitter. In the pictures it looks slightly lighter than it did in real life, and I don't think they really do it justice, but it's hard to capture something so sparkly. The glitter is in a clear base, I would say it takes about three coats for opacity, but sponging it on gets faster results! It dries textured so if you want it smooth a couple of coats of top coat is required.
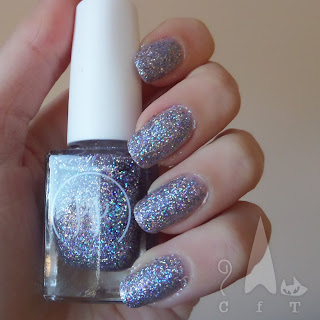
The second polish I tried is Lusty Lavender, again the pictures don't do it justice, though I think the pictures are a little more true to life with this one. Just as sparkly as the first! Again this would would take about three glitter heavy coats, but sponging it on is probably the best technique. It's a beautiful unique shade of silvery lilac. Very unicorn-ish!
So in conclusion, I LOVE these! They are just so intensely holographic and sparkly. I've found them even better than the Fun Lacquer Simply Nailogical holo's I reviewed last month. I would seriously seriously recommend them! I think Crunk on Copper is my favourite, but it's a tough choice, I love them both! Nail art to follow with both colours.
So, onto the good stuff! The first polish I tried was Crunk On Copper an extremely holographic copper glitter. In the pictures it looks slightly lighter than it did in real life, and I don't think they really do it justice, but it's hard to capture something so sparkly. The glitter is in a clear base, I would say it takes about three coats for opacity, but sponging it on gets faster results! It dries textured so if you want it smooth a couple of coats of top coat is required.
Friday, 18 November 2016
Constellation Nails
Good evening everyone, perhaps it's not the evening where you are, but you can pretend it is by looking at my constellation nails! I wanted to do some nail art with one of ,my dark shimmer polishes and this seemed like the perfect option. Casablanca from Jessica nail polish is a black jelly polish with purple/green shimmer throughout. The shimmer gives it a super shiny effect, it reminds me of a beetles wing.
For the constellations I looked on Google images for some inspiration, but did make some up a little to simplify it! I used a dotting tool to map out the stars with Dazzle from Orly, which is super shiny and bright. I then used a small nail art brush to join the dots. Voila!
Colours used: Casablanca - Jessica, Dazzle - Orly
For the constellations I looked on Google images for some inspiration, but did make some up a little to simplify it! I used a dotting tool to map out the stars with Dazzle from Orly, which is super shiny and bright. I then used a small nail art brush to join the dots. Voila!
Monday, 14 November 2016
Work Friendly Nails
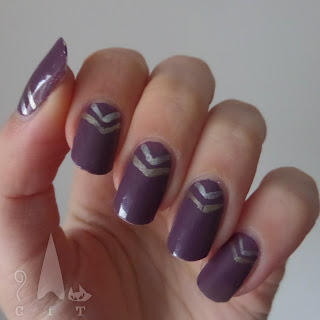
Today I have some nice simple 'work friendly' nails to show you. I wore this last week and have now gone super holo, so it feels a little odd to be writing about these! I picked up this muted purple Barry M shade when grabbing some of their newish cocunut infusion shades, it's from their basic collection and therefore only cost £2.99! Unfortunately it is quite similar on the nail to their coconut infusions shade 'Oasis' which I bought at the same time.
I'm lucky enough to be able to wear whatever crazy nail polish I like to the office, but I do have to tone it down a little if I'm off to a client meeting. This muted shade is perfect for an autumn/winter work meeting! I decided to add a little interest by using a small nail art brush to paint on some chevrons at the base of each nail. To be honest I'm not especially pleased with how these turned out, it was quite late when I did them and they are just too wonky! Next time I do this I'll use a strinping brush as I think it would help me achieve neater lines.
Colours used: Vintage Violet - Barry M, Uptown Glamour - Nails Inc, Soho Silver - Nails Inc
I'm lucky enough to be able to wear whatever crazy nail polish I like to the office, but I do have to tone it down a little if I'm off to a client meeting. This muted shade is perfect for an autumn/winter work meeting! I decided to add a little interest by using a small nail art brush to paint on some chevrons at the base of each nail. To be honest I'm not especially pleased with how these turned out, it was quite late when I did them and they are just too wonky! Next time I do this I'll use a strinping brush as I think it would help me achieve neater lines.
Saturday, 12 November 2016
Glitter and Bubbles
Hello all! Blogging in the middle of the night, wooo! My sleeping pattern has gone a little wrong due to some travel over the last few days. Tonight I am showing you a bit of simple stamping I did over How Deep Is Your Holo from Fun Lacquer's Simply Nailogical collection. You can see my review of it here.
For the images I used Mo You London's Sailor Plate 01 and a clear jelly stamper so I could see where to place the images. The images on this plate are quite small so on some I squeezed in two per nail. I particularly liked the way the mermaid and bubbles on my thumbnail turned out. It looks like she's playing with them or catching them.
Colours used: How Deep Is Your Holo - Fun Lacquer, Silver Foil Effect - Barry M
For the images I used Mo You London's Sailor Plate 01 and a clear jelly stamper so I could see where to place the images. The images on this plate are quite small so on some I squeezed in two per nail. I particularly liked the way the mermaid and bubbles on my thumbnail turned out. It looks like she's playing with them or catching them.
Tuesday, 8 November 2016
Femme Fatale Paragon - A Colour Change Adventure
Hi everyone! Today I'm showing off my second colour change nail polish, which I wore for my birthday last week. I avoided colour polish for some time as I thought it was just a gimmick that wouldn't work that well. But when I gave in and decided to try one (reviewed here) from Femme Fatale I fell in love! Perhaps I am just easily amused, but I don't seem to get bored of the colour change aspect! The only downside is the slight disappointment when the next nail polish I wear doesn't change colour under the tap!
Paragon from Femme Fatale is a pale purple glitter in cold temperatures, and white glitter when it's warm. It has a sort of unicorn feel to it I think! There is a lovely sparkly to it. The polish I fairly sheer, the below images are with three coats. I would thoroughly recommend this polish, it was really pretty and a novelty to wear on my birthday. I couldn't bring myself to put nail art over the top!
Wednesday, 2 November 2016
Autumnail
Good evening nail people! Technically here it's not really the evening, it's almost twenty past midnight!I'm not ussually up this late on a work night, but I think it must be a child like sense of excitement that's keeping me awake, as it's now technically my birthday! :D
Tonights design is not my birthday mani, but one that I wore last week while on holiday in Switzerland, and then Norfolk. I had such a wonderful time at both, and it felt so wonderfully autumnal in the Norfolk countryside! Crunchy leaves everywhere! There are some pictures on my Instagram (link top right). Needless to say these bring back fond memories.
To create this look I used the advanced stamping technique, using my Uber Mat. I started with a base of this new smoky purple shade from Barry M, Oasis. Then on my Uber Mat stamped on the mixed leaf design over some clear polish I'd applied earlier, On my index and ring fingers I stamped another leaf pattern directly onto my nails. I think they look a little like stars! One to keep in mind for Christmas. Both images used are from Born Pretty (BP - 19).
On the images on the Uber Mat I used a dotting tool to fill in the leaves with subtle autumnal colours (listed below pictures). Once dry I applied another layer of clear polish, and let it dry. I then peeled the images gently off the mat, and applied them to my nail, cutting off any excess that I could. I went round the edges with a clean up brush and nail polish remover to tidy them up, and then applied a shiny top coat. Voila - cosy autumn nails!
Colours used: Oasis - Barry M, Gold Foil Effect - Barry M, Copper Mine - Barry M, LakoDom - Picture Polish, Wuthering Heights - A England
Tonights design is not my birthday mani, but one that I wore last week while on holiday in Switzerland, and then Norfolk. I had such a wonderful time at both, and it felt so wonderfully autumnal in the Norfolk countryside! Crunchy leaves everywhere! There are some pictures on my Instagram (link top right). Needless to say these bring back fond memories.
To create this look I used the advanced stamping technique, using my Uber Mat. I started with a base of this new smoky purple shade from Barry M, Oasis. Then on my Uber Mat stamped on the mixed leaf design over some clear polish I'd applied earlier, On my index and ring fingers I stamped another leaf pattern directly onto my nails. I think they look a little like stars! One to keep in mind for Christmas. Both images used are from Born Pretty (BP - 19).
On the images on the Uber Mat I used a dotting tool to fill in the leaves with subtle autumnal colours (listed below pictures). Once dry I applied another layer of clear polish, and let it dry. I then peeled the images gently off the mat, and applied them to my nail, cutting off any excess that I could. I went round the edges with a clean up brush and nail polish remover to tidy them up, and then applied a shiny top coat. Voila - cosy autumn nails!
Monday, 31 October 2016
All Holo's Eve!
Happy Halloween everyone! I hope you've enjoyed your day. I have been at work but there was a charity bake off so I have had a very sugar fuelled day! Today I am taking part in another Halloween link up, with the most fantastic name, All Holo's Eve!
To fit the holo theme I used a base of Black Holo Witch from Fun Lacquer, a Halloweeny polish with a Halloweeny name! For the design I used white stamping polish to try out some of the designs from my Mo You London Festive Plate 16. I suppose there is not all that much else to say on this one really, it was pretty simple to do! The Black Holo Witch is not as black as I would have liked, but it is certainly sparkly!
Check out all the other lovely designs below the images. I love how we've all gone for a similar colour scheme!
Colours used: Black Holo Witch - Fun Lacquer, White Knight - Mo You London
To fit the holo theme I used a base of Black Holo Witch from Fun Lacquer, a Halloweeny polish with a Halloweeny name! For the design I used white stamping polish to try out some of the designs from my Mo You London Festive Plate 16. I suppose there is not all that much else to say on this one really, it was pretty simple to do! The Black Holo Witch is not as black as I would have liked, but it is certainly sparkly!
Check out all the other lovely designs below the images. I love how we've all gone for a similar colour scheme!
Subscribe to:
Posts (Atom)