Saturday, 26 December 2015

Snowy creatures on a mild Boxing Day

I hope everyone's Christmas was grand! Today I have guest hands again. These are the nails I did for my sister Imogen, and finished yesterday morning. The snowmen are freehand and were done using small brushes and dotting tools. I was going to add snowflakes or dots on the plain nails, but we quite liked it the way it was. Also decided against little snowman arms as we weren't sure how well they would show up against the background colour. So they are snow creatures rather than snow men!

I always find it harder doing other peoples nails, as I'm used to doing my own. I think it's due to the angles. It won't stop me though!


Colours Used: In the Navy - Colours By Llarowe, Coconut - Barry M, New York Noir - Nails Inc, Dazzle - Orly, Antique Coral - Natural Collection

Friday, 25 December 2015

HBP Presents: Merry Christmas!

Merry Christmas everyone! I didn't think I'd be blogging on Christmas day but I couldn't stay away! I hope you have all had/ are having a magical day. Today I'm showing you my Christmas Day 2015 nails. Finished these off quite late last night, just in time before Santa arrived :D This post is doubly special as it's not only Christmas day but it's also part of the Hobby Polish Bloggers Facebook groups monthly link up (this is my fourth). I've learnt a lot from this group and love being a part of it.

As you can see from the pictures below this years design is based on a Christmas card. This is one of the ones I got from Paperchase this year. I usually have all kinds of animals on my cards but I liked the semi-traditional feel of this one. I kept it simple and didn't attempt do do the Santa. My freehand skills only go so far!

I started with a blue base and then used sponges to create a slight gradient for the night sky. I then very lightly sponged over the top with cream polish on cling film/saran wrap to give light snow effect. Next step were the gold stars, done with a small nail art brush. For the trees I used a thin detail brush, and the same for the outlines of the houses (then filling them in with another). I did try putting snow on one of the trees but it didn't really work so I changed it back. Finished off with my favourite top coat, Nails Inc's Kensington Caviar (quick dry).

Overall really pleased with how this turned out. It wasn't as complicated as I thought, and the thin brushes were really nice to use. Today I was given a pot to put my brushes in, so hopefully now that they will be more easily accessible (previously kept under my bed!) there should be more freehand to come!


Colours Used: Blueberry - Barry M, Cobalt Blue - Barry M, Coconut - Barry M, Gold - Limited Collection at M&S, British Racing Green - Butter London, Red Hot Rio - OPI, Seven Dials - Nails Inc

Check out the other lovely holiday/winter designs below!


Thursday, 24 December 2015

Throwback Thursday: Christmas Pud's

I've technically just missed the opportunity to do this throwback Thursday... but I don't think it counts as being the next day till I've been to sleep and woken up! I hope everyone's had a fab Christmas eve. This was my first one off in a while and I've filled the day with nice things. Feeling very happy and snug, and very ready for Christmas!

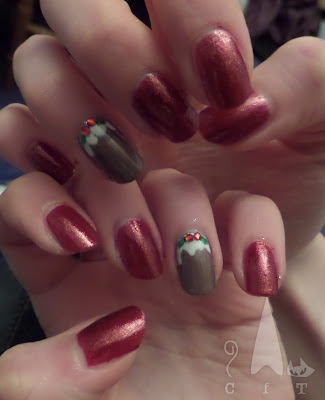
So below is a picture of last years Christmas day design. I was and still am pleased with this one. The red is a lovely Butter London which my boyfriend managed to get me at his old job. It is a Christmassy read with fine gold glitter, but sadly this doesn't really show up in the picture. For the puddings I used two different polishes as at the time I didn't have the right colour. I outlines the cream on top with a nail art pen and then filled in with a small brush. The gems were from Ebay and stuck on with clear polish, and the leaves freehand.

I've got my Christmas day nails done for this year now, will post them tomorrow or boxing day. I hope you all have a magical Christmas! xx


Colours Used: Bric-A-Brack - Butter London, Cappucino - Barry M, Shimmery brown polish - Unknown, Coconut - Barry M, Nail Art Pen in White - Barry M Emerald Green - Barry M

Tuesday, 22 December 2015

Little Red Robin

Bit of an odd collection of nail pictures today, I had to use some odd lighting to get the little robins beaks to show up properly (it kept showing up as a blurry blob!). Today's design is actually inspired by my dad! I was deliberating what to do next and he suggested robins, which I liked as I hadn't really seen robin nails before, though after a little Googling I see I'm definitely not the first!

The colours are very reminiscent of reindeer nails, which these do look a little like when upside down! I used the ussual polish brush to do the robin and it's red tummy, a small nail art brush for the eyes and beak, and a nail art pen for the legs and feet. Very shoirt and simple. This was necessary as it was Sunday night and I'm far to knackered to do any strenuous nail art. Hopefully will have some more ready to show on Christmas eve. Can't wait!!


Colours Used: Sparkling Ruby - Barry M, Cappuccino - Barry M, Red Hot Rio - OPI, Cocoa - Barry M, New Your Noir - Nails Inc, Nail Art Pen in Black - Barry M

Monday, 21 December 2015

Simply, having, a wonderful Christmas time!

Today's Christmas design has been done on my sister Imogen's nails. Aren't I lucky to have some extra nails to paint! I've been quite fond of the traditional Christmassy colours this year, so lots of red and green and gold, so that's what I went for here too. On a red base of Barry M's Dead Heat I painted Christmas trees onto the accent nails in metallic green. All detail was done with a small nail art brush, and dotting tools for the decorations.

With my last Christmas tree design I discovered that by overlapping three triangles I could get a neater Christmas tree shape, so I used that technique here too. I think some of the trees shapes are dwarfed a little by the decorations, but overall I like how this turned out. So Christmassy! For the finishing touch I added some gold flakies to the plain red nails. This is the only flake polish I own, need to use it more!


Colours Used: Dead Heat - Barry M, Emerald Green - Barry M, Cocoa - Barry M, New York Noir - Nails Inc, Dazzle - Orly, The Donmar - Nails Inc

Sunday, 20 December 2015

It's beginning to look a lot like Christmas...

OK so it began to look a lot like Christmas a while ago, but I like this as a name for this design! I don't usually use glittery polish for a base colour but I think this one is perfect for Christmas designs. I used a fine brush to paint on the trees and presents freehand. For the trees I used a very dark green underneath and then a metallic green over the top to give it a more 3 dimensional effect. I also used brush strokes to try and make it look a bit like branches, but it doesn't really show. I think to get that effect I'd probably have needed more contrasting colours.

I'm pleased with how they turned out, I think they look very classically Christmassy, and the gold gives them that extra something. I also likes how bright the presents were with the gold shining through a little from underneath. I toyed with the idea of putting some decorations on the tree but quite liked it how it was, keeping it simple.


< Here's a shot of the thumbs up close, I can never quite capture them quite as well in pictures of the whole hand. as you can probably tell from this i am right handed, hence the much neater tree on my left hand!


Colours Used: Primadonna - Danglefoot Polish, Stylenomics - Essie, Emerald Green - Barry M, Cocoa - Barry M, Red Hot Rio - OPI

Thursday, 17 December 2015

Throwback Thursday: Reindeer Parade

Today I'm showing you my 2013 Christmas Day nails. I usually try and save the best Christmas design for Christmas itself, but I still don't know what I'm doing this year yet! I will show you 2014's ones on Christmas eve, though I think this might actually be better...

I started with a red base colour, and then went over it with one of Barry M's original glitters (smells pretty potent now, I don't know what they put in there! :0). The deer outline was done just with the polish brush (a and a smaller brush for the ears), dotting tools for the eyes, and a smaller brush for the antlers and nose. Pleased with how it turned out, and that I still like it two years later! Perhaps this is one to revisit this year...


Colours Used: 500 L'Oreal, Red Glitter - Barry M, Cappucino - Barry M, Matt White - Barry M, New York Noir - Nails Inc

Tuesday, 15 December 2015

Winter Forest

Good evening! Todays post is a design from the run up to Christmas last year that I remember fondly. Though there were a few steps to get to the end result it wasn't too complicated and I'm pleased with the way it turned out. The design is copied from one I saw on Pinterest, which looks like it first came from didmmynails.com, you can see the original here.

After starting with Barry M's Cyan blue as a base I sponged on some cobalt blue at the top to represent the night sky. The snow at the bottom was super easy as it was like doing a really wonky French manicure! The trees were painted in a dark green (Essie's Stylenomics), and then a metallic green over the top to make them look a little more three dimensional, and the snowfall was created using dotting tools.

As you can see the trees on the two nails on the right look a little paler. This is because I tried adding snow to them like the original picture, but it didn't really work so I blanked it out! Shh!


Colours used: Cyan - Barry M, Baker Street - Nails Inc, Matt White - Barry M, Stylenomics - Essie, Emerald Green - Barry M

Sunday, 13 December 2015

Stamping Sunday: Snowflake Flurry

For once I am posting a picture of the nail art that I am actually wearing! I often tend to be about a week behind. This design reminds me of the movie Frozen though it wasn't intentional. I've been wanting to do a gradient again for a while, and it's essential that I need to use my snowflake stamping plate at least once this year! The stamping plate used was Konad's QA57.


I have accidentally ended up with the right hand darker/brighter than the left hand, though the same three shades were used. I just didn't quite get the gradient right on the second hand. More practice needed I think. They do look a bit like separate designs. I like the left hand best as the gradient is better, but I think I prefer the brightness of the right hand.


Colours Used: Alpine Snow - OPI, Blue Moon - Barry M, Bruton Place - Nails Inc, Cyan - Barry M, White Knight - Mo You

Friday, 11 December 2015

Monthly Indie Review: Danglefoot Polish

I've moved this months indie review forward (usually around the 20th of the month) because I thought it might be helpful to those of you who are still Christmas shopping/ wish list creating. This months indie polish to try was Danglefoot polish (UK seller), which I discovered on Instagram. I was won over by a beautiful picture of gold polish being poured into the bottle and looking like liquid treasure! I ordered these on etsy for £6.50 each, and they arrived so fast and so sparkly I can only assume they were delivered by unicorn!

First up is the liquid treasure, Primadonna. This a lovely bright and shiny yellow gold. As you can see I got a little over excited with trying to apply the second coat too quickly and did smudge it a little. The polish is glitter heavy but the glitter is well combined with the base which gives it a nice smooth finish. It's absolutely spot on for the party season and will feature in one of my Christmas designs shortly! Below is two coats.


Next up is Grape Expectations (such a good name!), which is just SO SPARKLY!! I think this is in a clear base but you really get your moneys worth in glitter! Below is two coats but even one coat packs some serious sparkle. I won't lie, this is pinker than I expected, I thought it would be more purple. I'm keen to try it over a dark purple and see how that looks. If you're a really girly girl (or are looking for a Christmas present for a really girly girl) I would highly recommend this! I enjoyed the way this was always catching the light (even in the office) and got lots of compliments and 'wow's'.


So in conclusion I am definitely sold on these. Danglefoots speciality seems to be glitter which is awesome! Even down to the bottle design these are lovely, and really different, what Indie polish is about I think. I've also spotted an equally sparkly purple (Scream Queen) which I'm keen to try in January when my pre-Christmas embargo is up.

Thursday, 10 December 2015

Throwback Thursday: Trees and Dots

Today's' throwback is obviously from a shorter nail moment for me! I've just given them a trim this evening as they were getting very talon like again. This month I think there will be a great variety of nails lengths in my posts!

I think this design is quite modern, I took inspiration from Pinterest, and wanted to use a new sparkly green I'd got. They make me think of wrapping paper. They are possibly not quite as christmassy as I'd intended but I like the final effect. My favourite nail is of course the accent nail with the little tree and star. This was stuck on with regular nail polish as I find it's surprisingly adhesive!


Colours Used: Coconut - Barry M, Emerald City - Models Own, Uptown Glamour by Kate Spade - Nails Inc, 500 - L'Oreal

Monday, 7 December 2015

Stamping Sunday on a Monday: Xmas Jumper

Good evening! Today's post as you can see is a delayed post, I ran out of time what with Chrsitmas shopping, and still recovering from the first of the work Christmas parties! This is the first bit of Christmas nail art I've done this year, and as you can see I've started subtle. What I wearing now is much more garish, but thats still to come!

For this design I used a little octagonal stamping plate I got on ebay a few years ago. I'm unclear which brand it is but it's called QA57. It contains five different snowflakes and five Christmas jumper style patterns. I think it is the perfect Christmas stamping plate :D

As my nails are getting pretty long at the moment I decided to add some half moons so the design doesn't have gaps at the bottom. These were my downfall with this design I think. To start with I did them too big, my nails obviously aren't as long as I thought! The second issue was the stencils I used. They're from a bunch I got on ebay which I'm not too pleased with as they're massive! This meant there wasn't enough of a curve to the half moons I think it also made it a bit trickier with the edges strangely. Should have freehanded!

All in all I do like this design because of the colours, and I really love the pattern, but I think it could do with some perfecting.


Colours used: Kensington High Street Gel Effect - Nails Inc, Kings Road - Nails Inc

Thursday, 3 December 2015

Throwback Thursday: Subtle Christmas Tree

Hello! I have had a terrible day at work so it's so nice to be sat here peacefully blogging! The bad days are almost worth it for the wonderful feeling of going home! Tonight is my first properly Christmas post, though I admit it's pretty subtle. I think it's a good one for work as it's not too out there.

Not sure how easy it is to tell because it's an old picture but the base colour is actually a super dark green. The modern Christmas tree outline was done with a dotting tool. I also used some thin nail tape to make sure the edges were neatly triangular. On top is a little decorative star which I got in a pack from eBay. I stick these on to my nails with a bit of clear polish, as I find it's actually surprisingly adhesive. Also much easier to remove that way! TTFN!


Colours used: Stylenomics - Essie, Gold - Limited Collection at M&S, Gold Star - eBay

Tuesday, 1 December 2015

Grown Up Nails!

It's the 1st of December and I'm afraid I don't have a Christmas mani to show you just yet! I actually have one on now that I did today but it didn't quite go to plan, so I'm undecided whether it will feature. Heard my first two Christmas songs on the radio so I feel like I can finally start getting excited. So, onto a fairly Christmassless mani - I suppose it's still good for party season...

This one was done earlier in the year before I started blogging properly, and was copied from a design on Pinterest. Had a little look now and I can't find who to credit it to, if anyone knows please let me know! The grey and white design was done using nail tape, and the gold spots were creating with a dotting tool. The main colour used is Nails Inc's Kensington High Street, which it turns out is beautifully shiny, so it was a little heartbreaking putting a matte topcoat on it!


Below is the only other picture I have of this, in Instagram format. Though it's not quite as true to colour I do like the slightly glowing blurred effect the filter has had. Thanks for reading! (colours used below image)


Colours Used: Kensington High Street - Nails Inc, Coconut - Barry M, Easy Peasy - Topshop, Gold - M&S Limited Collection

Sunday, 29 November 2015

Stamping Sundays: Arctic Creatures

Todays stamping sunday post is something lovely a wintery for everyone snuggled up this evening! I used a combination of decals made on my Uber Mat, and regular stamping straight onto my nails. I used Barry M's silver foil effect polish, they stamp so well! All colours used for this design were Barry M but I used my Nails Inc Kensington Caviar top coat as usual. I really can't fault it!


The stamping plate used is from Mo You's new(ish) Enchanted Collection and it plate number 05. it has a variety of arctic creatures framed in wintery patterns, and some additional patterns at the bottom. I'm really taken with the enchanted plates, the tropical one is particularly good too, I like the little snake and iguana.

I learnt from my last stamping post (here) to place my mat over a light coloured surface so that I can see i'm filling in the designs completely. This worked much better this time, I think the main images being smaller helped too. The decals I made were placed on my thumbs, ring fingers and index fingers. With the remaining ones I stamped the designs straight on.

Learnt a couple more things from this mani too. Firstly placing the bottom of the image at the bottom of my nails rather than starting from the middle as I've done with larger patterns meant I didn't end up with a mess around my cuticles. Sides are much easier to clean! The other is that I have always read to put the decals over a wet/tacky layer of polish and have done this previously. however with this design I forgot and let it dry completely. Therefore if I accidently put a decal on wrong I could just peel it of and replace!

Overall I'm pleased with how this turned out, hope you like it too!

Colours Used: Cobalt - Barry M, Silver Foil - Barry M, Matt White - Barry M, Cappuccino - Barry M, Kensington Caviar - Nails Inc

Saturday, 28 November 2015

HPB Presents: Glitterchrome

The time has come for another Hobby Polish Bloggers link up. I almost missed this one as I've been so busy at work I haven't been checking the group as much, glad i've managed to get it done last minute as I really enjoy doing these. This months theme is Monochromatic Mani, creating a design all in one colour (or varying shades).

As it's that time of year I've gone for glitter, I'm having a major glitter moment! I picked blue as it's my favourite colour, and have tried a gradient as i've been wanting to have another go at gradients for a while now, they often seem to end up in my summer designs which feel so far away now! It's only really visible in the close ups but I have done a two tone blue gradient underneath the glitter, and then added to different glitters over the top.

The first blue glitter is one of Barry M's first ever glitters which I've had for years, and to be honest smells a little concerning! But I figured as it was over two polishes already it probably wouldn't do too much damage (fingers crossed!). The final one is a beautiful Nails Inc glitter with varying sizes and it's just so shiny, I wasn't sure about this mani at first but the final glitter made it!


Colours Used: Atlantic Road - Barry M, Bruton Place - Nails Inc, Blue Glitter - Barry M, Royal Archade (Saphire) - Nails Inc

Make sure you check out the other entries below!


Sunday, 22 November 2015

Stamping Sundays: Stained glass - take one

Todays stamping blog post is another work in progress. I really love the colours but the advanced stamping didn't quite go to plan so only ended up lasting me a day or two. However I think I learnt a fair bit in the process, so hopefully the next time I attempt larger decals it will work a little better. I've generally had better luck with smaller designs, such as the tiny turtle nails I did for my sister a couple of months ago.This was my first attempt at decals using my new Uber Mat so had lots of fun trying that out! The stamping plate used is from Mo You's Gothic collection and is Gothic Plate number 10.

For today's post I'm going to list a few things I learnt from this design and hope will be useful pointers, but before that I would like to rave about Butter London's British Racing Green! I got this as a birthday present and this was the first time I used it. It's got a lovely smooth consistency, as I've found with all the Butter London polishes I've tried, and the colour is so strong and shiny! The pictures below are using two coats, but it's almost opaque in one.


Colours Used: British Racing Green - Nails Inc, Black Knight - Mo You, Sprint Finish - Barry M, Indigo, Barry M, Wigmore Street - Nails Inc

Advanced stamping on Uber Mat - what I learnt:
  • If using a mat to make decals, make sure it is over a light surface. The corner of the mat which contained my decals was over the edge of my laptop, meaning I couldn't see very well if I was leaving little gaps, which as you can see above it turned out I was!
  • Make sure the colours on your decals contrast enough. The dark blue and dark purple I used look quite different in the bottle, but once they are shrunk down onto tiny nail designs they are pretty hard to distinguish from one another, making the design a tad less colourful.
  • When placing the decals on your nail, make sure the bottom of the design is at the bottom of the nail, rather than just placing it on and cleaning the excess after. Cleaning around the sides and top of the nail is easy but trying to clean gloopy decal from the cuticle area is harder!