Saturday, 31 October 2015

HPB Presents: Na Na Na Na Na Na Na Bat Nails!

The time has come around so quickly for this months Hobby Polish Bloggers blog link up! I'm very excited to be taking part for the second time. Not 100% happy with how mine turned out this month, but it is too late to change them now, I have halloween getting ready to do!

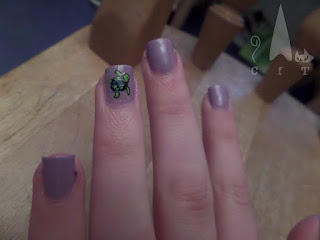
I started out well with my beloved purple Ink by OPI. This colour shines so wonderfully and catches the light really well. Pretty much they shiniest polish I have! (excluding glitters and holo's of course!). On my ring finger I used Orly's Shine, it's the first of their polishes I've tried and I must say I really like it, it's just such a strong shiny silver. I've found it's great for nail art as it stands out against any colour.

For the bats I've used the inside parts of my new nail stencils from She Sells Sea Shells, meaning I seem to have ended up using stickers for the second month running, something trickier next time I promise! On the purple nails I've outlines the stickers with Shine to give the bats a sort of halo look. I have mixed feelings about the outcome, I really love the colours and the shapes, but i think it looks a little scruffy. If I had more time i think i'd try a purple gradient with silver bats instead. There's always next year!


Below is a close up to show off the shinyness of the polishes. So shiny! I can't wait to have a proper look through everyone else's designs this month. Please check them out via the links below. Happy Halloween!


Colours Used: Ink - OPI, Shine - Orly

Thursday, 29 October 2015

Throwback Thursday: It's Pumpkin Time

This time last year I sported a pumpkin face design for halloween. Was going through a bit of a shorter nails phase as you can see below. This was a very simply design to do, I used a dotting tool for the spots, and a nail art pen for the pumpkin faces. I know that there are some pretty good pumpkin face decals around at the moment but think they are one of the easier halloween designs to do. Would definitely consider trying this one again next year (I think I've just about run out of time this time round!).


Colours Used: W18 - Color Cosmetic, New York Noir - Kate Spade at Nails Inc, Matt White - Barry M, Nail Art Pen in Black - Barry M

Wednesday, 28 October 2015

Deep Sea Demons

The nail art I'm currently wearing was designed for Mo You's recent Instagram competition. The idea is to create a halloween look using any of their stamping plates, not necessarily the halloween themed ones. I currently only have two Mo You plates, something I will rectify next week when my pre-birthday buying ban is over! :D So I went with an underwater theme, but made the little sea creatures rather demonic looking with their red eyes. Once I'd stamped on the design I noticed there were some gaps so used a fine brush to create some lines to look like waves/seaweed. I used a dark purple for this but it looks black in the pictures.

This polish is a really old one and had somehow got really watery, this took seven coats to look opaque!! To be honest it's still not 100% when held up in bright light! Got this one years ago and I'm not quite sure about the colour choice, but it's a perfect slime green for halloween!


One of the suggestions in the competition description was to include some halloween accessories. I don't have any of those but I do have my awesome lobster slippers, which I felt were very fitting with the design. Here they are below looking considerably less evil than my nails!


Colours Used: Neon Green - Accessorize, Black Knight - Mo You, Wigmore Street - Nails Inc

Tuesday, 27 October 2015

Creepy Kitties

Fittingly with my blog name I've created some spooky cat nails for halloween. These were surprisingly easy to do and were based on some designs I've seen around on the internet. There was one picture I followed in particular but I can't seem to find where to credit it too as its just on lots of sharing sites.

The cat heads and ears were done freehand with the polish bottle brush and a small nail art brush for the ears. I used a darker colour than the picture that inspired me as I wanted it to look darker and more halloweeny! I then used the small brush to paint the yellows of the eyes and the thin pupils that gives them that stare! To finish I used a matte top coat the make the design stand out better.

More halloween nails to come!


Colours Used: Slip Stream - Barry M, Lady In Black OPI, Canary Yellow - Barry M, Pro Matte Finish - Rimmel

Friday, 23 October 2015

Spooky Branches

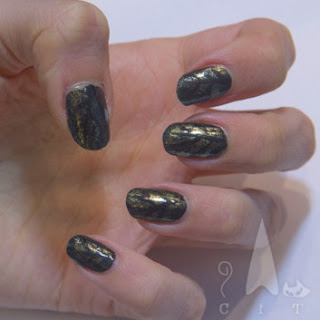
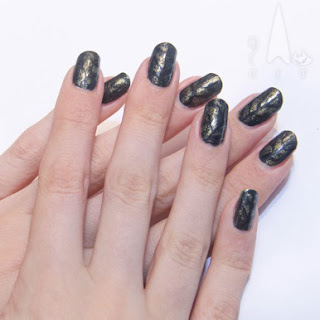
It's about time I got some halloween nails up on the blog! These are only subtly halloween themed as they are from a week ago and I didn't want to look too keen. Starting to regret that approach now thought as I don't have long left to rock the halloween look! Will have to start earlier next year.

The look I went for below is based on a spooky/ mysterious forest. OooOOoooh! I started with Essie's Stylenomics which is a super dark green. I then lightly sponged on Tophsop's Hidden Treasure with some cling film/saran wrap (bottom left). Of all the shades of gold this one was perfect as it's quite dark and two tone with a hint of green. For the trees/ branches I used a thin brush and gently painted them on in black. I like the way it turned out. Subtle, but still a little spooky. They were super hard to photograph!

Colours Used: Stylenomics - Essie, Hidden Treasure - Topshop, Lady In Black - OPI

Tuesday, 20 October 2015

Freckles Polish - Monthly Indie Review

Today is my second monthly indie polish review, and I'm excited to share with you Freckles Polish! This is a UK based brand and I purchased the polishes on Etsy, link here if you're interested.I was really impressed with the variety of polishes available, and the shinyness! I went for Anne Teak and Descendants Of Salem to start with, but when my pre-birthday/Christmas buying ban is over I will certainly be tempted to get more!

First up is Anne Teak. I chose this one as it's a bit different to anything I've seen before, and was indeed complimented on it. I have a quite a few golds, but this one is darker/bronzer and shines an almost greeny grey in some lights. The pictures below are in a variety of different lighting to give you an idea. This is my favourite of the two. The consistency was great and I just love how indivdual and shiny it is. One of those polihses where you just have to keep looking at your hands!

Next we have Descendants Of Salem, a dark holo green. This is a chameleon of a polish and does different things in different lights, like several colours in one! The holo is more visisble in bright light, as in the bottom two pictures. In daylight it is a holo/sparkly green, and in darker areas/ the office, it is a dark metallic green. I like the versatility of this one, and that the holo isn't too intense. It is my favouirte holo so far, only out of two at the moment, but still, a happy customer! :)

Let me know what you think in the comments below! TTFN :)

Sunday, 18 October 2015

Stamping Sundays: Tiny Turtle

Today I have my sister Imogen's nails again modelling some more of my stamping attempts! I've had another go at advanced stamping and went for a simple but cute design. This was ready for her trip to Germany.

I've used my Mo You London Doodles Plate 07 for the decal, and used my stamper rather than an uber mat (I just can't make my mind uop whether I need one!). I have a double ended stamper which was perfect for this. I picked up the design in black and cleared of any excess with sellotape. Getting rid of a narwhal was emotional! I then used dotting tools to fill in the little gaps in two shades of green, and left to dry for about fifteen minutes. After this I painted a thick layer of clear polish over the top, and left for about half an hour.

The decals are suprisingly easy to peel off without breaking, but a bit fiddly to place on the nail. As these are just little ones they were easier than full sized decals. After pressing the decals down gently I topped it all off with a top coat. If you look closely at the bottom left picture here you can see where the edge of the decal comes to. This one was taken before top coat. Also worth mentioning that the top layer of nail varnish is still sticky/tacky when I place the decal, this makes it cling to the nail better.

Colours Used: Wardour Street - Nails Inc, Black Night - Mo You, Key Lime - Barry M, Block Your Green - Rimmel

Thursday, 15 October 2015

Throwback Thursday: Gold Leaf Flakes

This is one of my oldest throwback pictures, so apologies for the picture quality. Feels so long ago now! Must be getting on for about three years. I had read online somewhere about using sheets of gold leaf from a craft shop to use for nail art so decided to give it ago. It's suprisingly easy to do though can be a little fiddly.

The gold leaf can be broken into small peices using tweezers or your finders. Because it is so thin it mould and sticks to the nail really well even if the polish isn't still wet. A top coat is of course needed  to keep them in place and seal it in. I have pretty much got a lifestime supply of this stuff now so will have to try it again in the future!


Colours used: 161 - Barry M, Gold Leaf - Local Art Shop

Tuesday, 13 October 2015

Cheer Up Glitter!

Being that time of year where colds are inevitable, and where work is chaos, I would like to cheer myself up by showing you one of my favourite glitters! This is Topshop's Dark Knight. and it was love at first sight! I'm really impressed with Topshop's polishes, though admittedly I don't have any plain colour ones. Wouldn't normally go to a clothes shop for nail varnish but they have some quite special ones that I just had to try.


It's a full cover polish with lots of different sizes and shades of glitter in a clear dark blue base, giving it a lovely multi-dimensional look. It needs a few coats to be opaque but would also look good in thinner coats over dark colours. I particularly like to wear it on an accent finger next to their black Matte Metallic polish. Nothing but good feedback on this one! Texture is slightly rough due to the glitter but can be smoothed out with a top coat.

Sunday, 11 October 2015

Stamping Sundays: Beatle Mania

My 50th blog post today, how exciting! Today I'm showcasing my Mo You Rockstar Plate Collection no. 10. I had a little more trouble with this one than my doodles plate so had to make some amendments to my original intended design. I was going for the famous picture of the Beatles crossing Abbey Road in black on my blue nails, but just couldn't get the image to pick up. I think this is because the images are quite wide, and my black stamping polish doesn't seem to be quite as good as the white one. It's just that bit too thick I think.
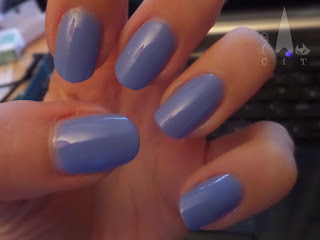
So I made do with another image from the plate which I do think looks quite nice in white. The only downside is that I managed to miss off their heads on the middle finger. Doh! General feedback was that it was a nice pattern but people weren't sure what the image in the middle was meant to be, so I don't think this is one of my best manicures! Still, I like the colour combination and it was fun to have on for a couple of days.
Colours Used - Lady In Black - OPI, Blueberry - Barry M, White Knight - Mo You

Thursday, 8 October 2015

Throwback Thursday: The one with the pom-poms!

Got something a bit silly to showcase tonight. After watching the last episode of Doctor Foster in iPlayer I think I need something a bit lighthearted! So, I got this Nail Rock pom-pom set on sale a little while ago in Topshop. I've got a couple of their other sets, the caviar and velvet but none as ridiculous as this! I like!

The set comes with a lovely green nail polish, which I think I'd be pretty tempted to wear on it's own. It's a nice consistency and lovely and shiny. Instructions are fairly simple, apply one coat, let it dry, apply another coat, press on pom-poms and allow to dry. Here are the results below:


In conclusion these were great fun and suprisingly long lasting! I wore them for a night out and the next morning I had only lost one. They lasted most of the next day but were starting to gather dust and look kind of grey, so I think these are a one day/night look. I actually had to cut the pom-poms off in the end but they were fairly easy to remove once it was just little fuzzy stubbs left. What do you think, super silly or super awesome?!

Wednesday, 7 October 2015

Nails Inc - The New White

Good evening! Today I'm reviewing a couple of polishes from Nails Inc's 'The New White' range. They are not especially new any more, I think they've been around for about a year now, but oh my they are beautiful! So I would like to share my thoughts though they are a little late.

The new white polishes are super pale, essentially 'shades' of white. The first I got was this lovely pale green, Swan Street, as a valentines day present and fell totally in love with it. The consistency is brilliant and the tapered brush makes it easy to apply and keep the edges neat. In the pictures and on the bottle you can see it's lovely white mint green shade, but in some lights it also looks a sort of duck egg blue, it's just wonderful!

As I loved Swan Street so much I went back for more! The pale grey shown below is White Horse Street. In the pictures it looks just a touch more matte than it is in life but the colour is the same. It's a lovely subtle shade and again it goes on really smoothly. Wore this for a client meeting the other day, the perfect grown-up colour! In conclusion I would highly recommend these! They're versatile and beautiful. Yet to try some nail art with them as I just love how they look on their own.


Colours Used: Swan Street - Nails Inc, White Horse Street - Nails Inc

Tuesday, 6 October 2015

Rainbow Fish!

Todays blog post is based on a colourful friendly kids character from a book I enjoyed as a child, the rainbow fish (Google him, he's a beauty!). I saw a fish scale manicure on Instagram and decided to simplify it a bit as I was short on time. I've used dotting tools to add on one colour at a time, in  the Instagram video the colours are layered going down the nail to look more like scales.

I really like this one. Although it took a while for all the colours to dry it wasn't difficult and had a detailed final effect.


Colours Used: Blueberry - Barry M, Cyan - Barry M, Indigo - Barry M, Spring Green - Barry M, Holland Park - Nails Inc, Never Been Kissed - Topshop, Soho Silver - Kate Spade at Nails Inc

I've included a picture of the base colour, Barry M's Blueberry, as I love the way it looks! I've used it a lot lately, it goes on smoothly and is lovely and shiny. Big fan!


Sunday, 4 October 2015

Stamping Sundays: Guest Nails

So, I said last week that Stamping Sundays would be fortnightly... But I've been doing a lot of it recently, and as I have had some kindly volunteers for practise I think I should be able to do it weekly for the near future.

Below we have my sister Imogen's nails modelling a sea themed design from my Born Pretty stamping plate number 23. I bought this one as it has a little whale on it :) This design was done to go with an outfit she wore to a barge party we went to for a family friends birthday. The colours matched her skirt, and the flowers on her top.

I found it a little tricky to pick up the whale image as it's quite a thick image. I've found that the more fiddly stamping designs tend to pick up better. All in all pretty pleased with how this turned out, I think the colours suited the design well. Ttfn!

Colours Used: Papaya - Barry M, Guava - Barry M, White Knight - Mo You

Thursday, 1 October 2015

Throwback Thursday: Pastel Patterns

Todays throwback is a little rough round the edges, it was my first attempt at outlining my nails round the edges, and all the lines were done with a Barry M nail art pen. Inspiration from Pinterest but as with many of my throwback Thursdays I'm not sure where this would have been from so if you know please let me know so I can credit.

Finally have a watermark! :) Thank you to my lovely boyfriend for help with this. Thinking of adding it to all my older blog posts but I think it would take a while!


Colours Used: Mint Green - Barry M, Berry Ice Cream - Barry M, Colville Mews - Nails Inc, Nail Art Pen in Black - Barry M